Let’s take a tour through ScreenFloat and see how it can power up your screenshots, too.
ScreenFloat for Mac – Your Screen Capture Power Tool All-Rounder
ScreenFloat powers up your screenshots by allowing you to take screenshots and recordings that float above everything else, keeping certain information always in sight. Its Shots Browser stores your shots and helps you organize, name, tag, rate, favorite and find them. Everything syncs across your Macs.
Extract, view and copy detected text, faces and barcodes. Edit, annotate, markup and redact your shots effortlessly and non-destructively. Pick colors any time. And more.
Posts in this Series
Part VI: Store – The Shots Browser, iCloud Sync, Tags Browser
Every shot you capture with or import to ScreenFloat is stored in the Shots Browser, and optionally synced across your Macs over iCloud. Read on to learn how the Shots Browser helps you organize and collect, name, tag, rate, favorite and find your shots, and keep your Desktop clutter-free in the process.
Table of Contents
The Shots Browser
Open the Shots Browser with its keyboard shortcut (by default, ⇧ ⌘ 1), or from the app’s icon in the menu bar. It will open up in any app or space you’re in so it won’t take you away from what you’re doing at any given time.
Your Shots at a Glance

In the Shots Browser, you can access your Shots (center), folders (left panel), and detailed information about selected shots (right panel).
Your shots are sorted by their creation date (newest first) by default, with the option to change it to date last used, favorites first (by date favorited), rating, titles, file sizes, dimensions and kind (image or video).
You can see a preview image (1), title (2), type and dimensions or duration (3), its rating, favorite status and whether it’s floating (4).
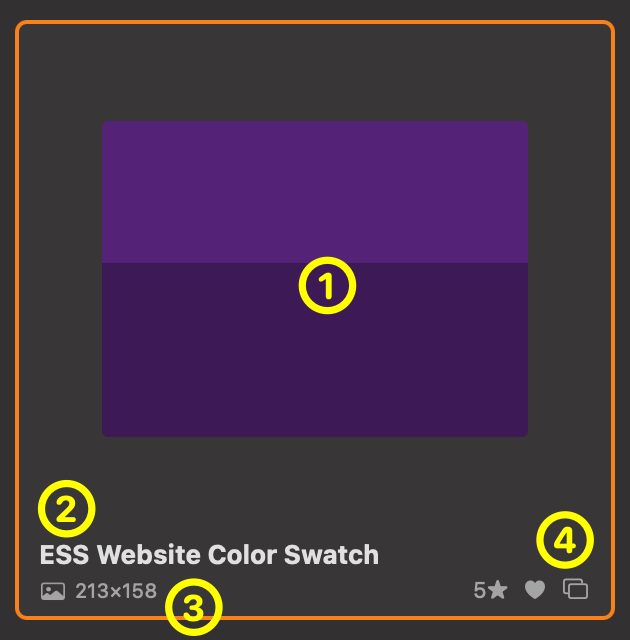
Pinch on your Magic Trackpad, or use the slider at the bottom left to adjust the size of the previews.
Double-click a shot (or press enter when shots are selected) to make them float, or press the space bar to use Quick Look. 0-5 will rate them. Press f to (un-)favorite them. Right-click selected shots to reveal more options, or to edit/annotate them. Shots you don’t want shown under All Shots can be hidden, so they only appear in the “Hidden Shots” folder, and folders you have set up to include hidden shots.
You can click into a title to rename the shot quickly, or you can open…
The Info Panel
In the Info panel, you can edit the selected shots’ title, tags, notes and rating (1), see their metadata (2), as well as access and re-scan the shot’s detected text (3).
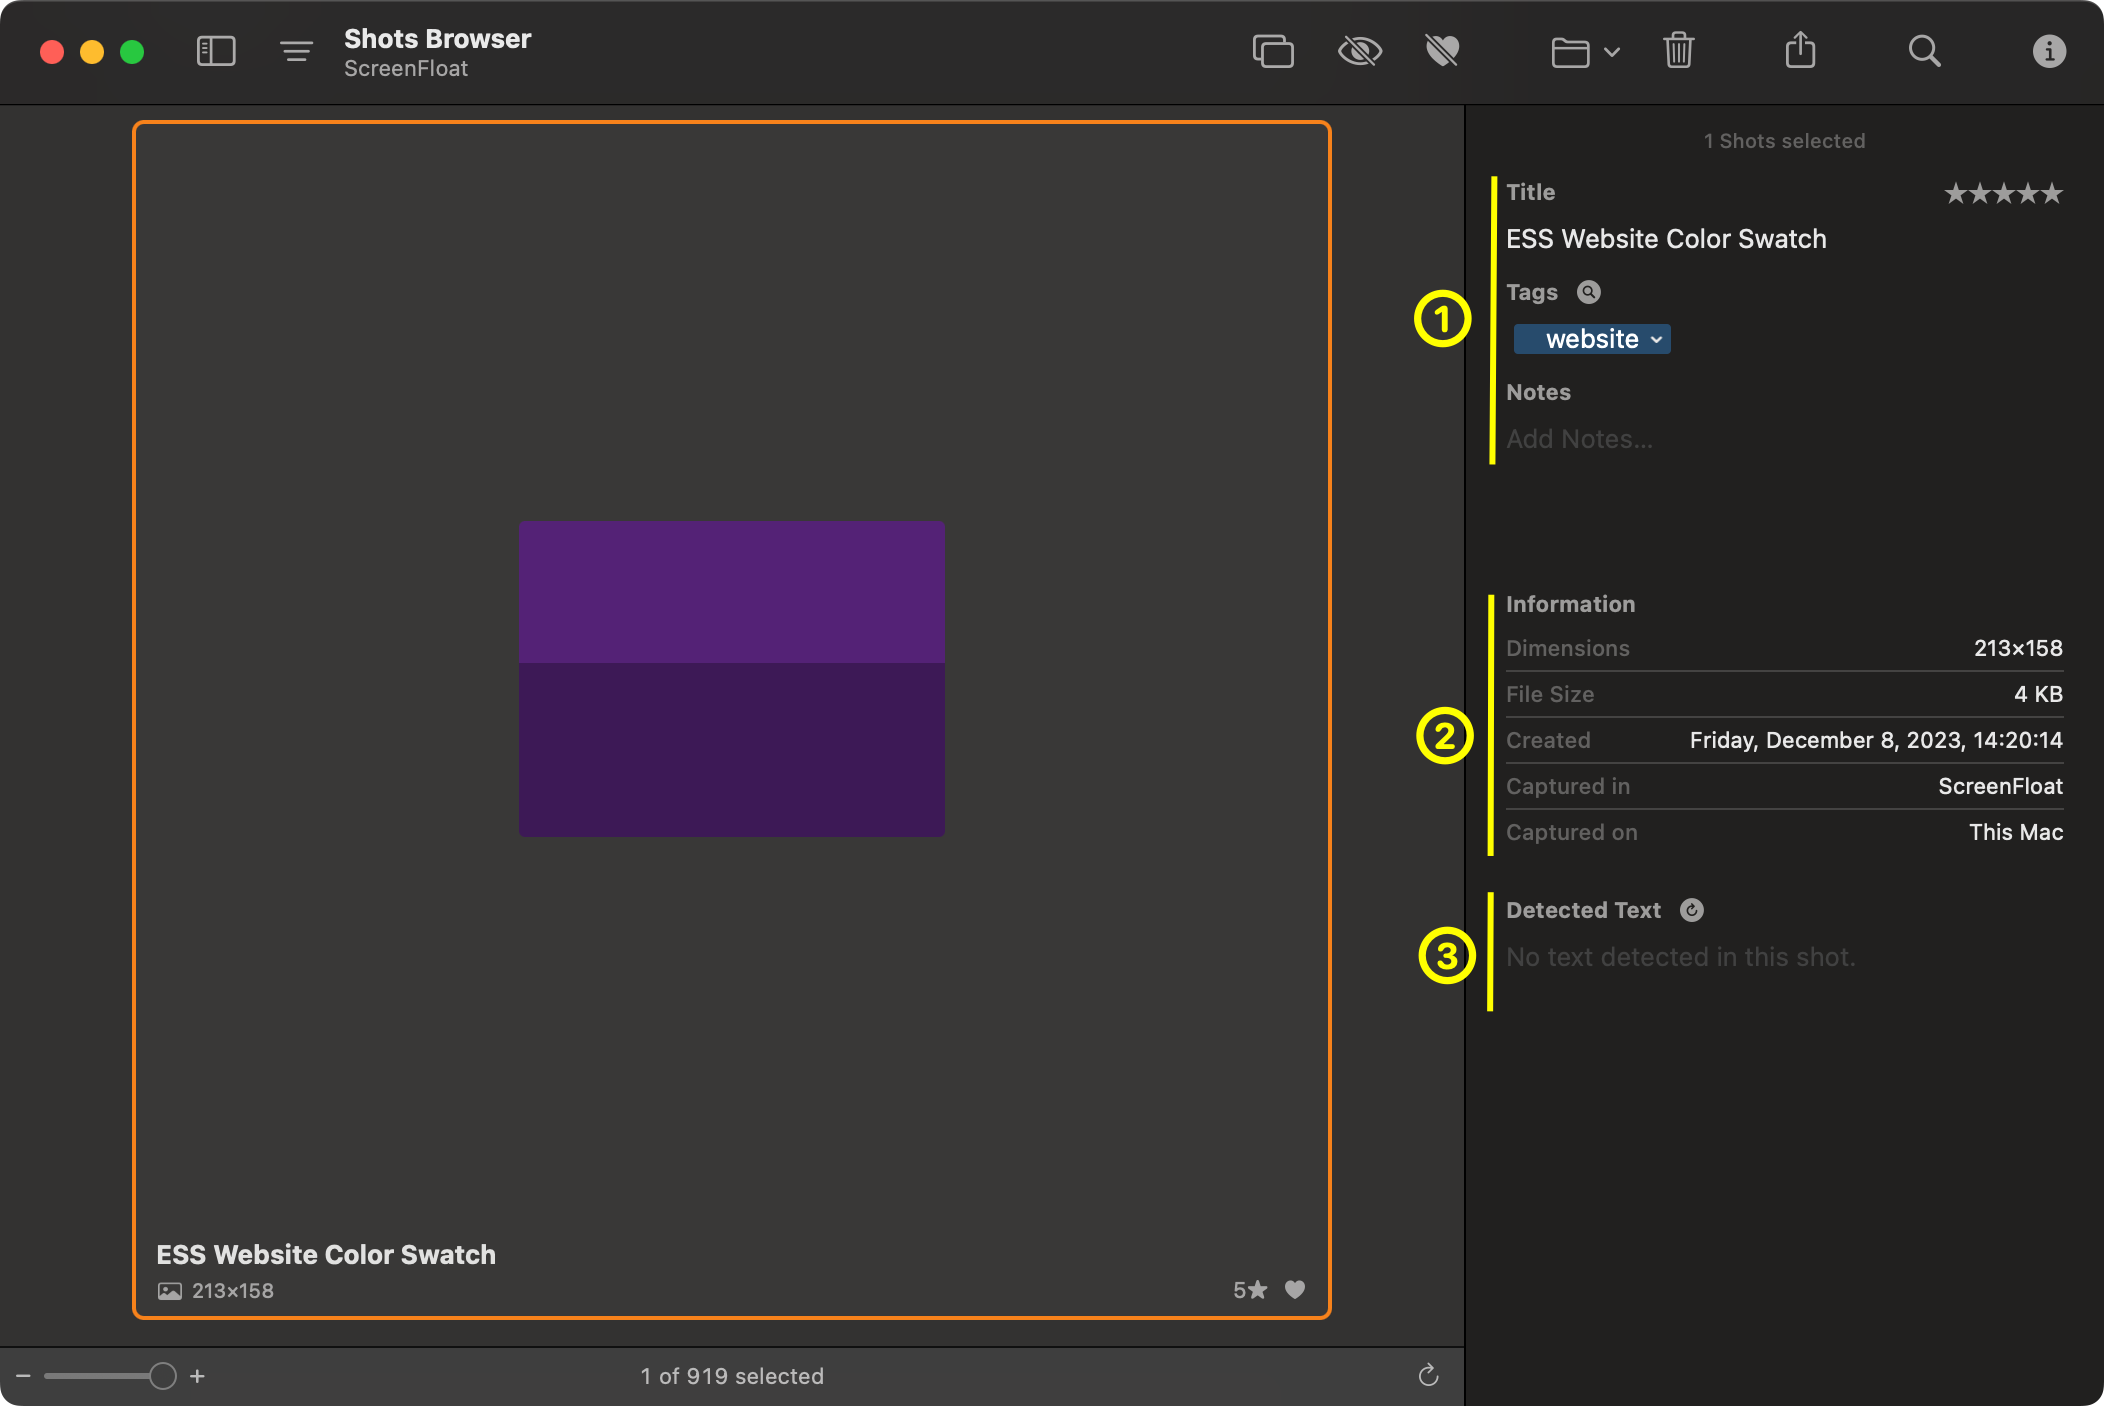
Tags will auto-complete as you type them, weighted by whether they’re favorites or not. Click the loupe button to reveal the Tag Browser (which we’ll talk about in a future installment of this series), or long-click/right-click it to get a list of all your tags to select from.
Notes are useful to add additional information, like the source of a screenshot – for example, a link.
Under Information (2) you can view the shot’s metadata: Its dimensions, duration (if it’s a screen recording), file size, the creation date, what application it was captured in, and what device it was captured on.
Detected Text (3) will show all of the text ScreenFloat detected in the shot – including a barcode’s contents. Here, you can select and copy it.
Click the refresh button to re-detect faces, or re-detect text in the shot, with custom preprocessing filters if you wish.
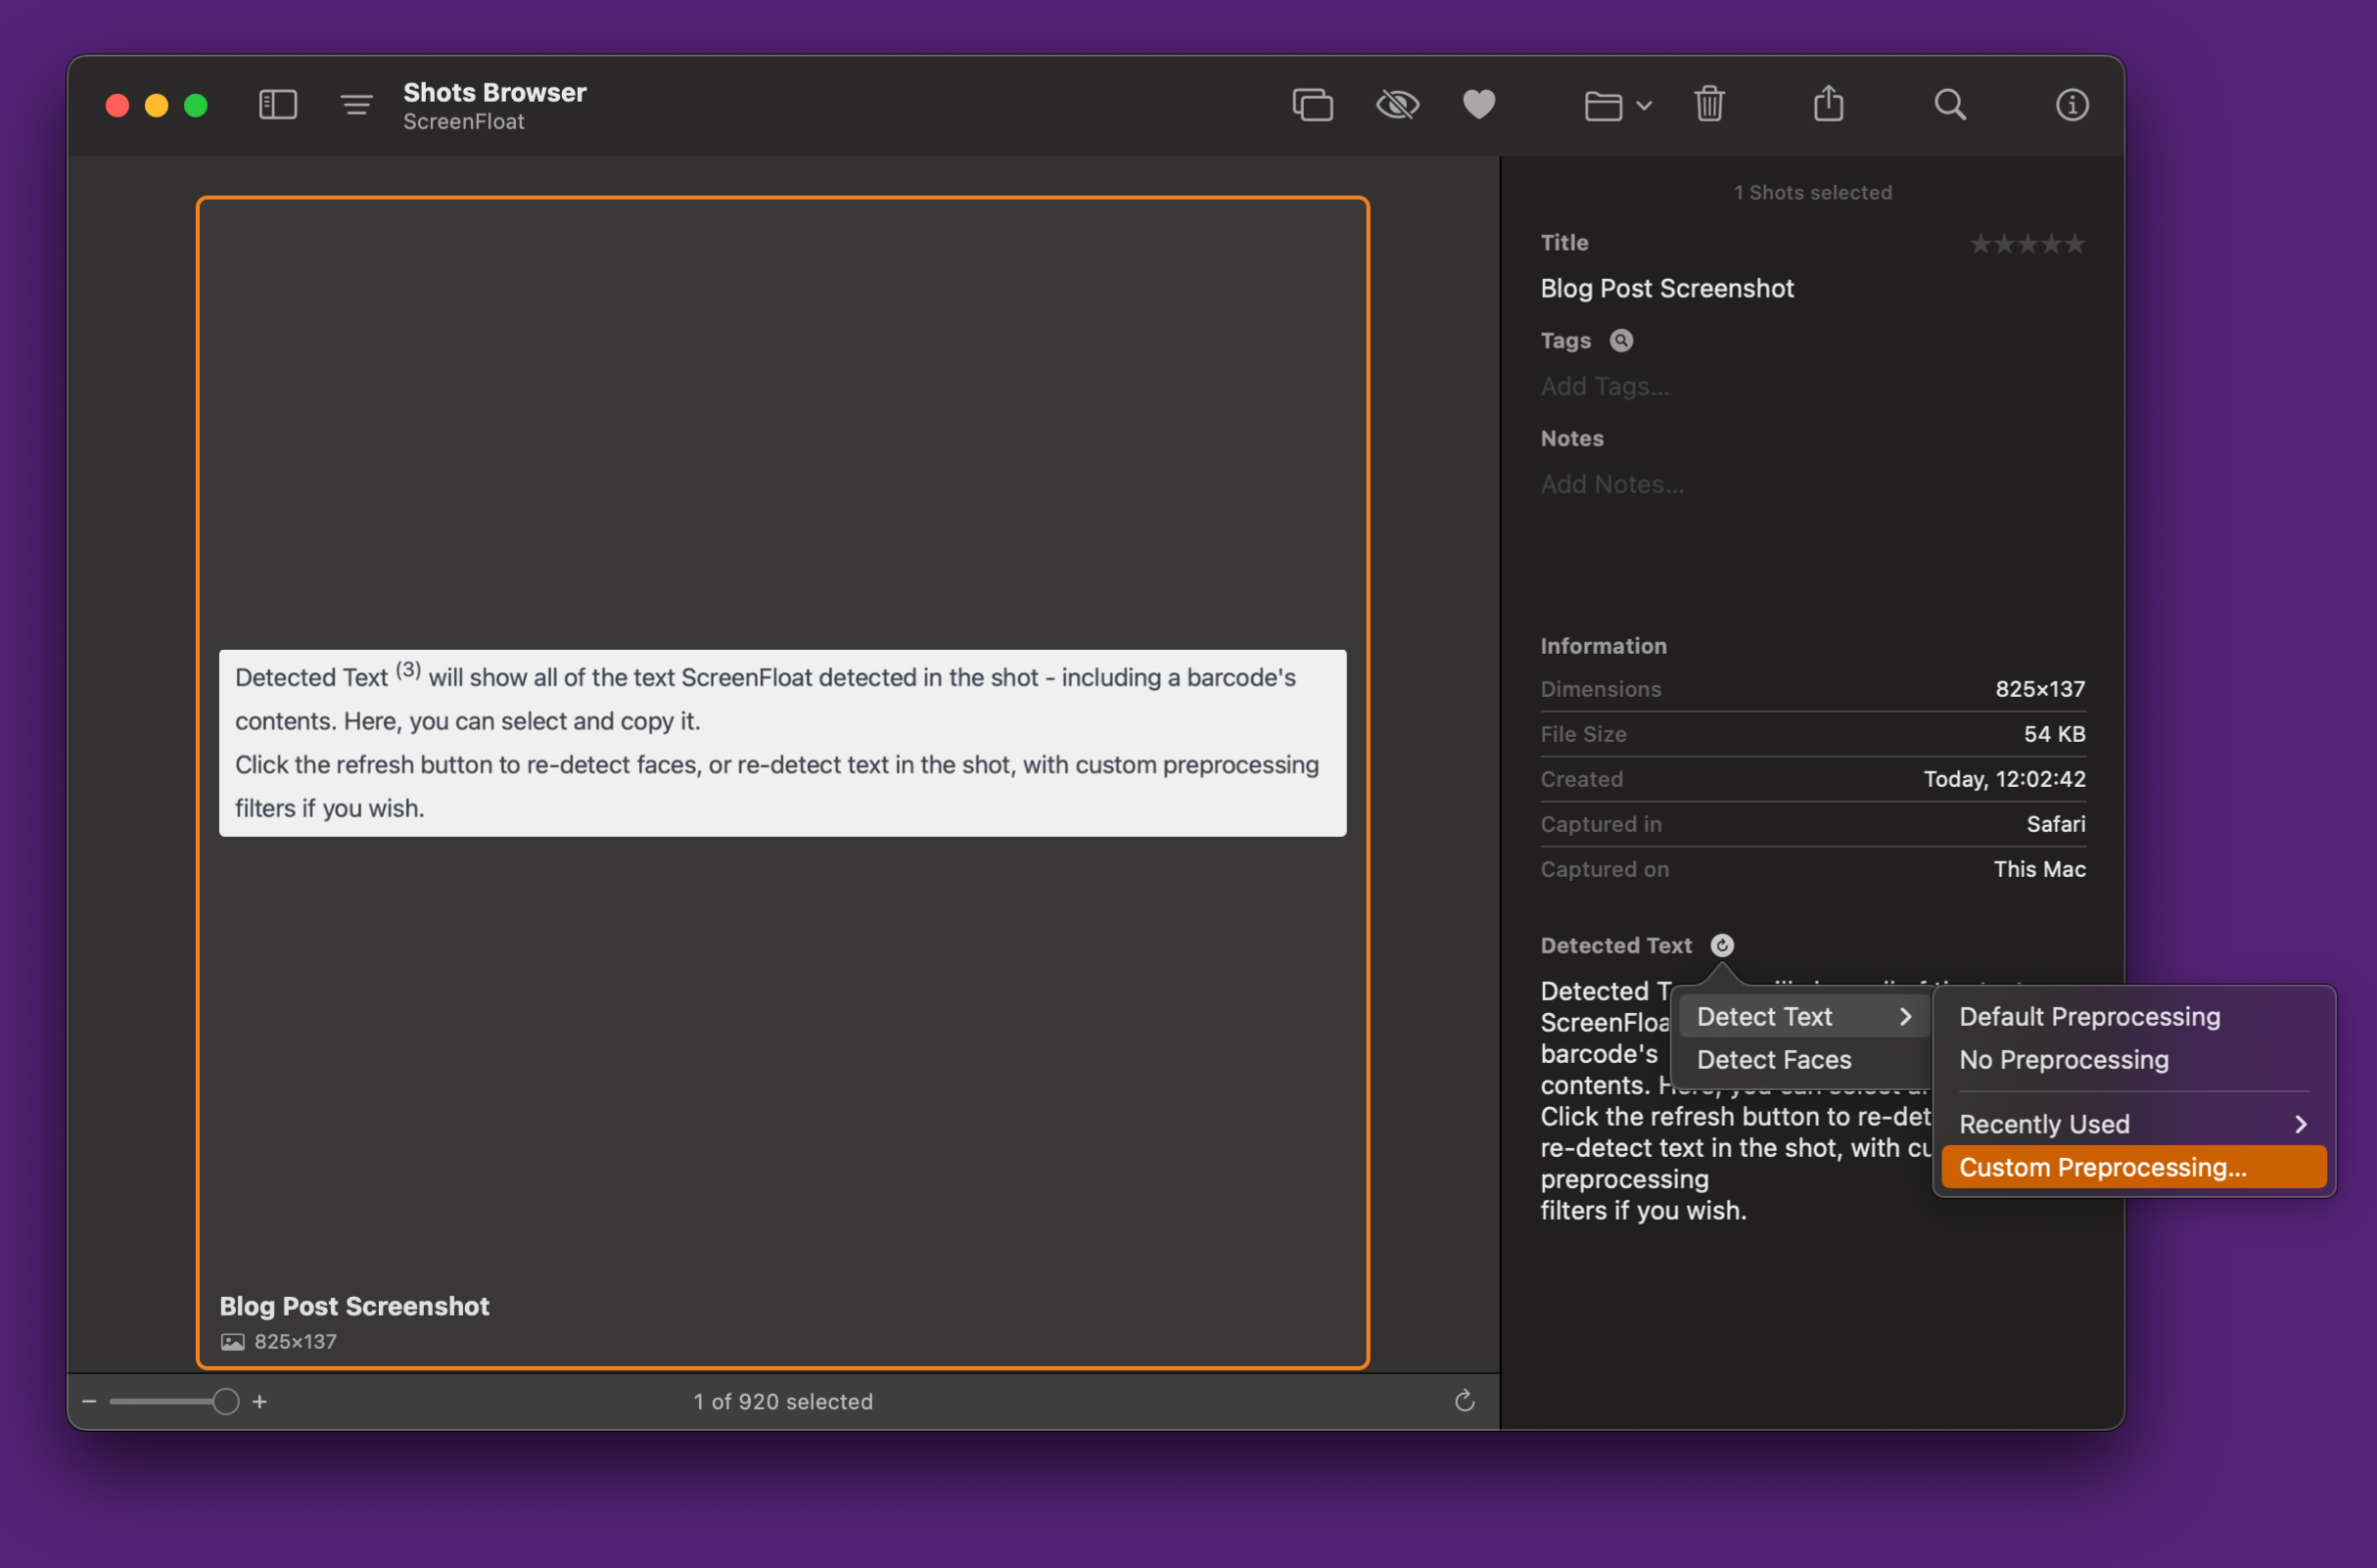
Custom preprocessing is useful in cases where ScreenFloat’s default settings don’t yield the results you’re looking for:
You can also edit detected lines, and omit lines you don’t want detected at all.
Categories, Folders and Smart Folders
Having tons of shots will eventually require some sort of organization. That’s where folders are helpful.
Categories
First of all, ScreenFloat comes with a bunch of helpful pre-defined categories:
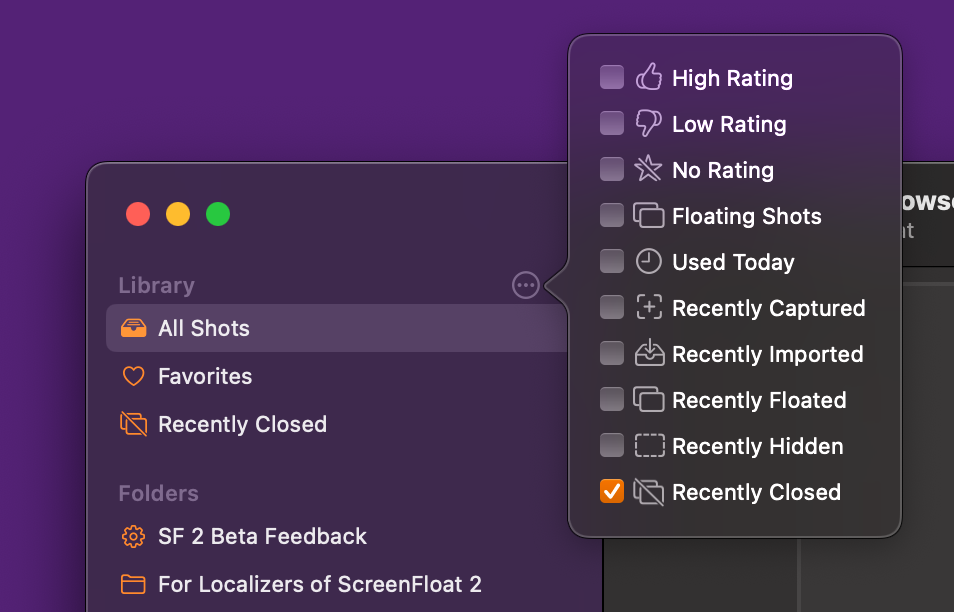

Most of them can be adjusted to your preferences. For instance, if you use the High Rating category, right-click it and you’ll be able to specify what a “high rating” is to you – only five stars? Or four and up?
The Hidden Shots category shows all shots you have hidden from your library. It is not shown by default, can be activated as seen in the screenshot above, and can be protected with a privacy setting (see Settings and Privacy).
The Trash is where all your trashed shots will be kept for a while, until they’re deleted automatically (by default, that’s 14 days, but again, you can adjust this to your liking from 1 day to never. It, too, can be protected with the Privacy setting.
Folders
Folders are your tool to manually collect shots. Create a new folder by clicking the + button next to “Folders” in the navigation panel, or by dragging selected shots over to the Folders section directly.
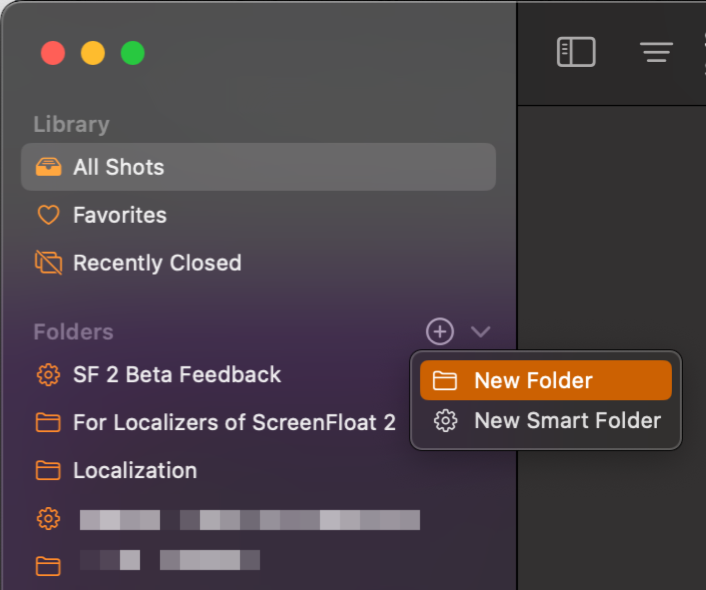
In a folder, you can sort shots manually, or by other criteria we discussed above.
Right-click a folder to be able to rename it, duplicate it, export all shots it contains (which you can also do by dragging the folder to Finder, for example), set it up to show or not show shots hidden from your library, or delete the folder, with the option to deep-delete the shots it contains, too.
Smart Folders
Smart Folders are populated with Shots automatically, based on rules you set up.
Rules can be created with the following shot data:
- Title
- Tags
- Notes
- Rating
- Favorite status
- The app the shot was taken in
- The source of the shot
(screen capture, import, share extension, from shortcuts, from clipboard, from selected text, from text on clipboard, from a video shot’s still image, continuity camera) - Shot Kind
(image or video) - File Size
- Origin
(which Mac the shot was captured on) - Whether it was annotated
- Annotation Text content
- Whether text was detected in the shot
- Detected text content
- Whether the shot contains faces
- Whether the shot contains barcodes
- The number of tags
- Whether the shot is currently floating
- Whether the shot is currently floating, but hidden
- Creation date
- Date favorited
- Date last used
- Date last closed
- Date trashed
- Whether it’s in one or more folders
- Whether it was duplicated
- Additionally, you can specify whether you want hidden or trashed shots included or not.
As an example, you could set up a Smart Folder that collects shots that you took in your browser, which have detected text that contains “http”, to have easy access to all links you have captured.
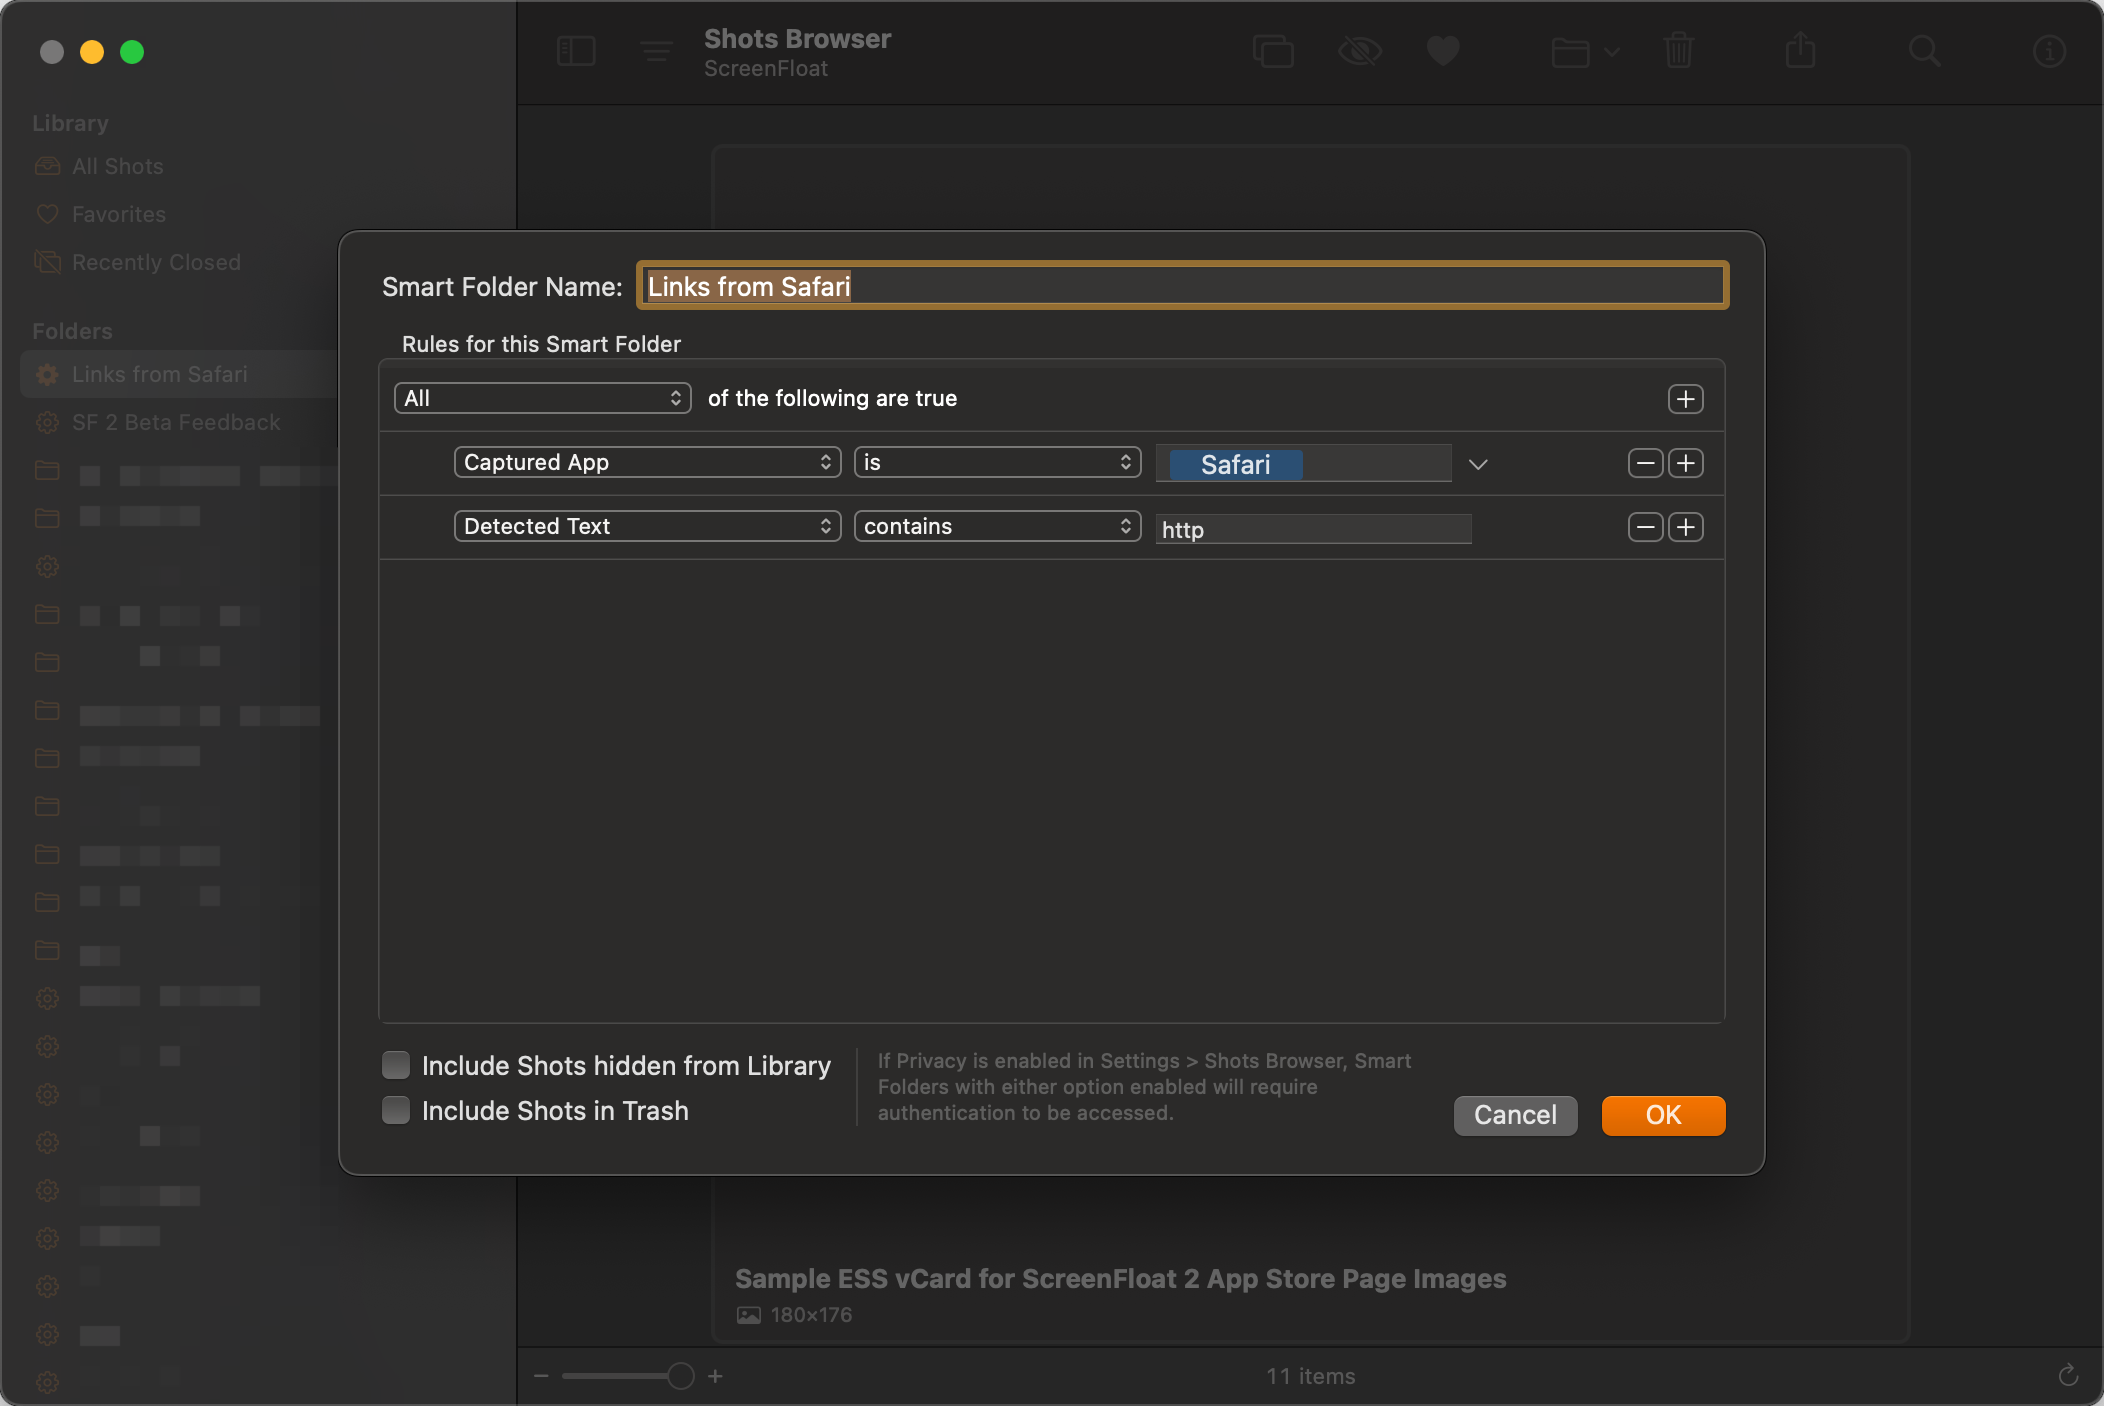
Double- or right-click a Smart Folder to edit its rules.
Drag folders and smart folders around to change the order they’re listed in.
Speaking of Smart Folders, let’s talk about:
Finding Shots
The same rules you already know from Smart Folders can be used to find shots in the Shots Browser.
Click on the loupe button in the Shots Browser to show the search panel, then Advanced… to edit your rules.
If you just need to do a quick search without elaborate rules, enter some text and results appear straight away, with the option to filter the text search further down to titles, notes, tags, detected texts, or text annotations.
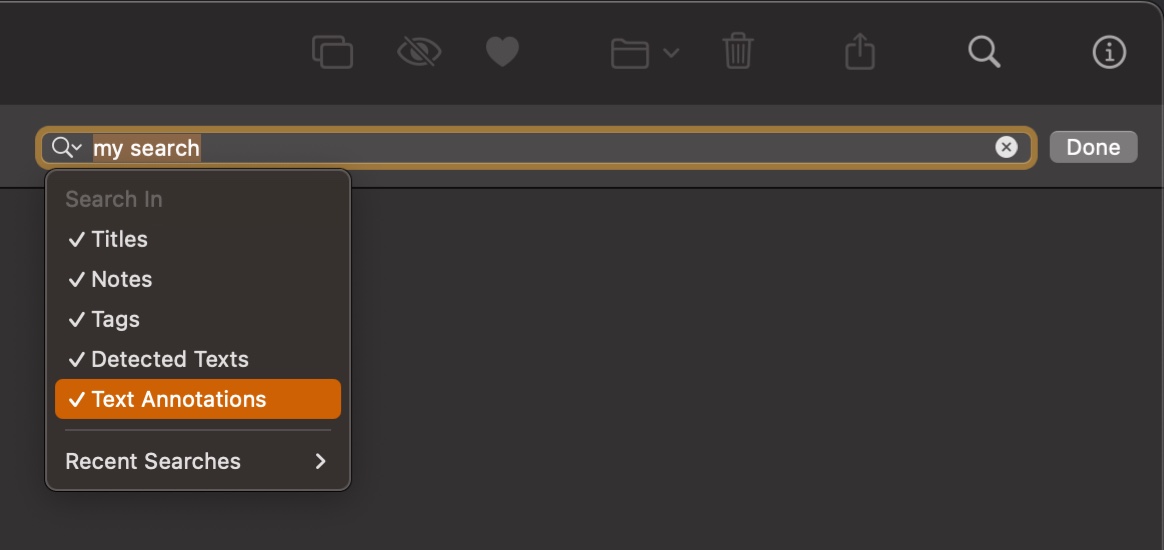
Hold down the option (⌥) key, and the Done button will change to Save, so you can save your search as a Smart Folder.
You can also find your Shots system-wide using Spotlight, which we’ll talk about more in a future installment of this series.
Importing
There are several ways to import image and video files into ScreenFloat.
You can drag files onto ScreenFloat’s app icon, or in Finder, right-click the files and select Open With > ScreenFloat, or Share… > ScreenFloat.
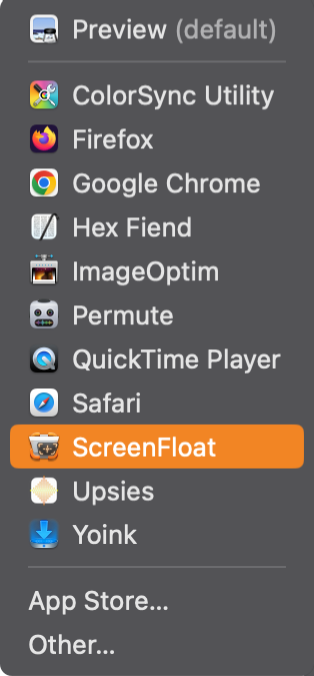
While “Open With” is faster, Sharing gives you more control over the shots to be imported:
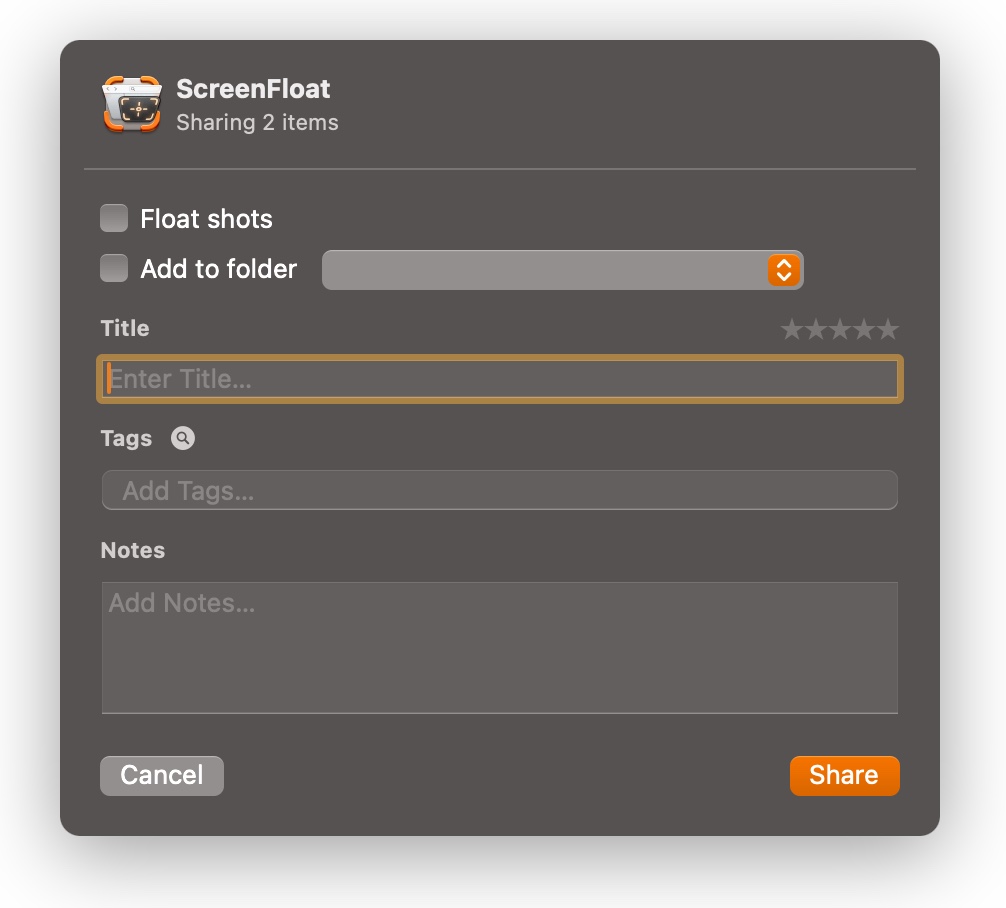
You can also drag to the Shots Browser, allowing you to instantly create folders, or add to existing folders:
Another option is to drag files directly to ScreenFloat’s icon in your menu bar:
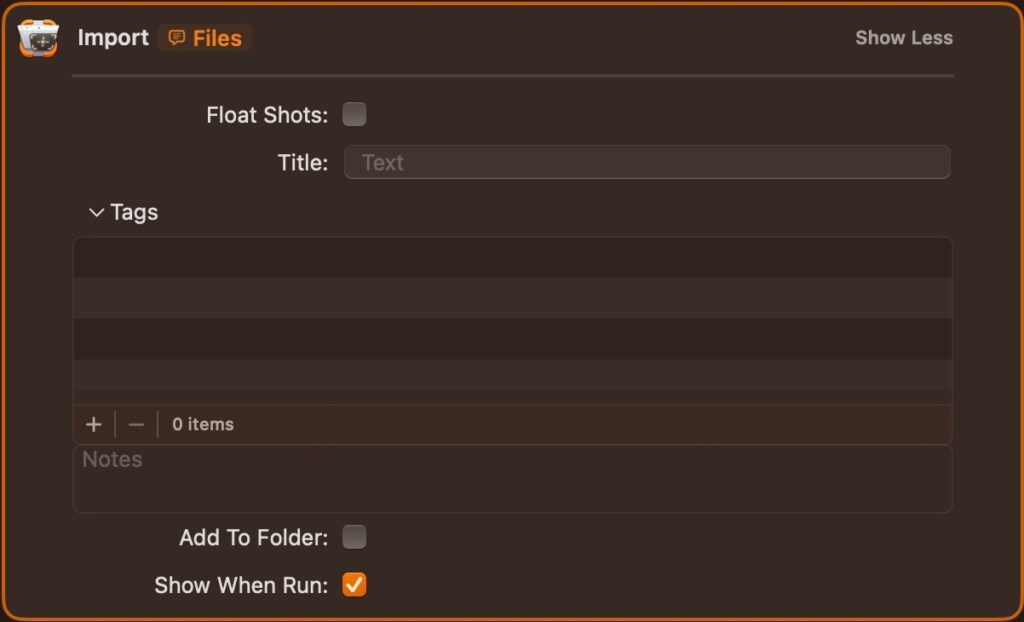
Finally, you can also create a Siri Shortcut to import files into ScreenFloat:
Settings and Privacy
There are a couple of settings for the Shots Browser we should take a look at.
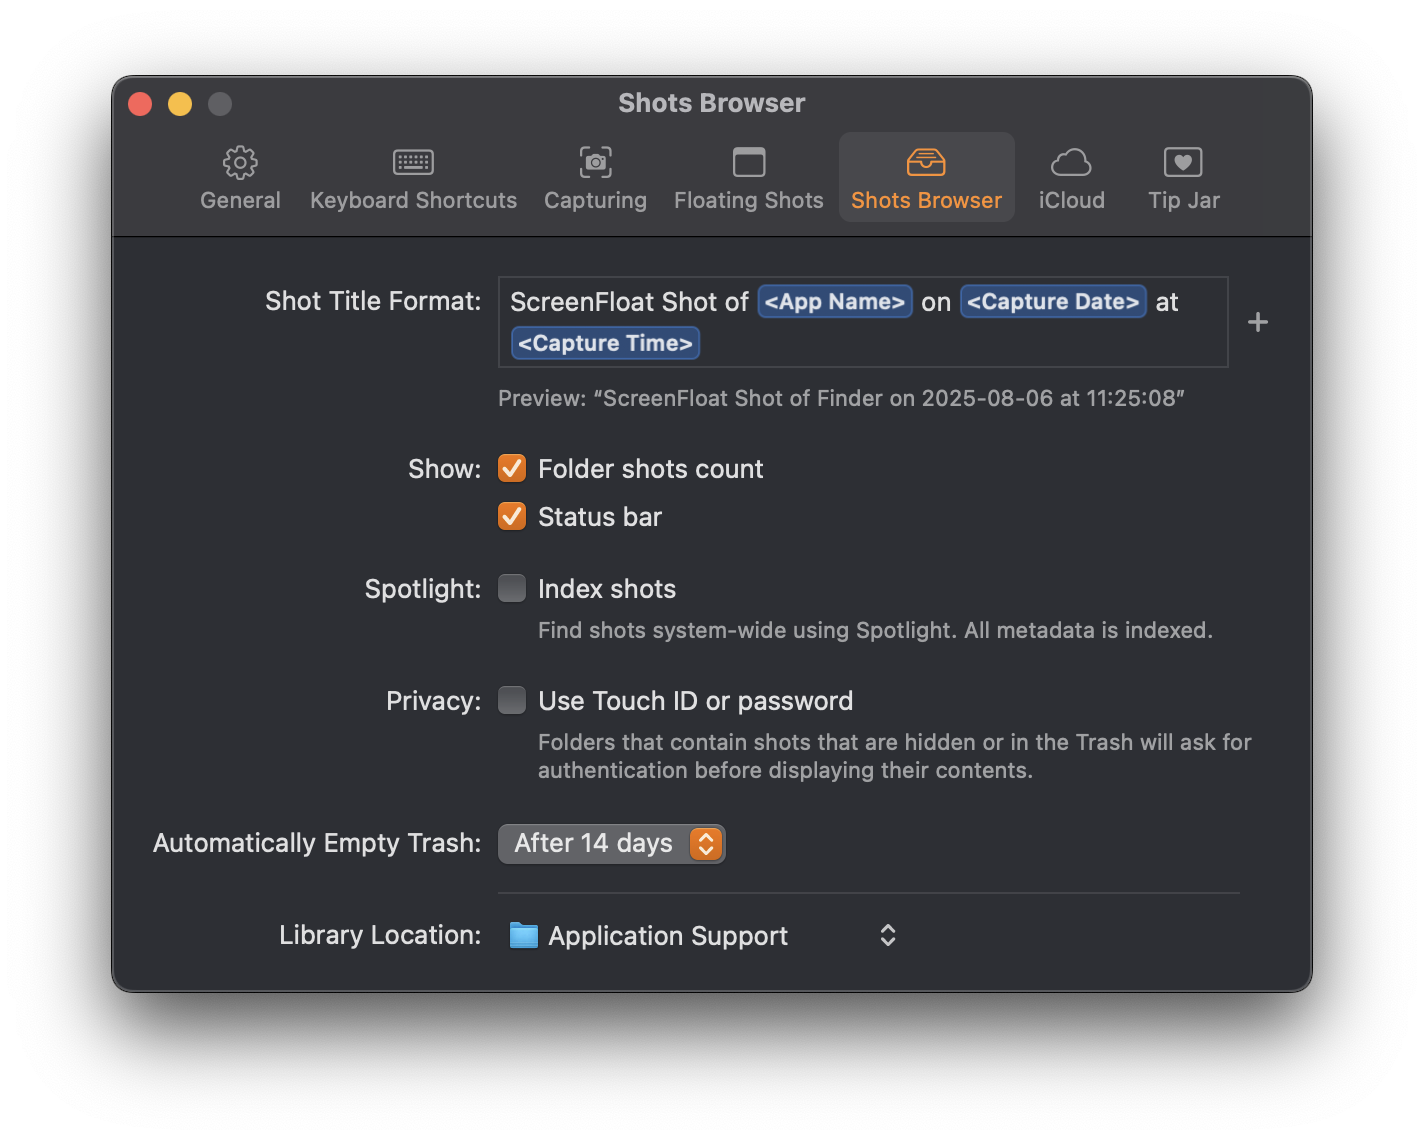
Shot Title Format
Here you can give your file names a custom format, with variables the app fills out for you. The following options are available to you here:
- <App Name>: The name of the captured app
- <Shot Kind>: Like “Image Shot” or “Video Shot”
- <Capture Date>: The date the shot was captured
- <Capture Time>: The time the shot was captured
- <Year>, <Month>, <Day>, <Minute>, <Second>: The components of the capture date/time
- <Unix Timestamp>: A unix timestamp representation of the capture date and time
- <File Size>: The file size of the shot (before the export), like “320KB”
- <Dimensions>: The dimensions of the shot, like “640×480”
- <Width>, <Height>: The components of the dimensions of the shot, like “640”, or “480”
- <Duration>: For recordings, the duration of the video, like “1m22s”
- <Random>: A random, 12-character string
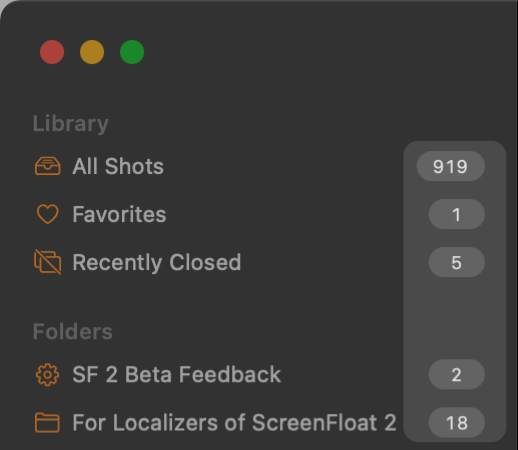
Folder shots count
With this enabled, you’ll see the number of shots in your folders.
Status bar
Enables the status bar at the bottom of the Shots Browser. It shows you the number of shots, how many are selected, or, when searching, how many results there are. Also allows you to manually sync.
Spotlight: Index shots
Enables system-wide Spotlight search of your shots. More on that in a future installment of this series.
Privacy: Use Touch ID or password
With this enabled, (smart) folders that contain trashed or hidden shots will require authentication before displaying their contents.
Automatically Empty Trash
The interval in which the trash should be emptied automatically. Can be set from 1 day to Never.
This can also be changed by right-clicking the Trash in the Shots Browser.
Library Location
By default, ScreenFloat stores its library in your User folder under ~/Library/Group Containers/G78RJ6NLJU.group.at.EternalStorms.ScreenFloat/Library/Application Support/ .
With this, you can move it to a different location. Requires a relaunch.
Repair Tool
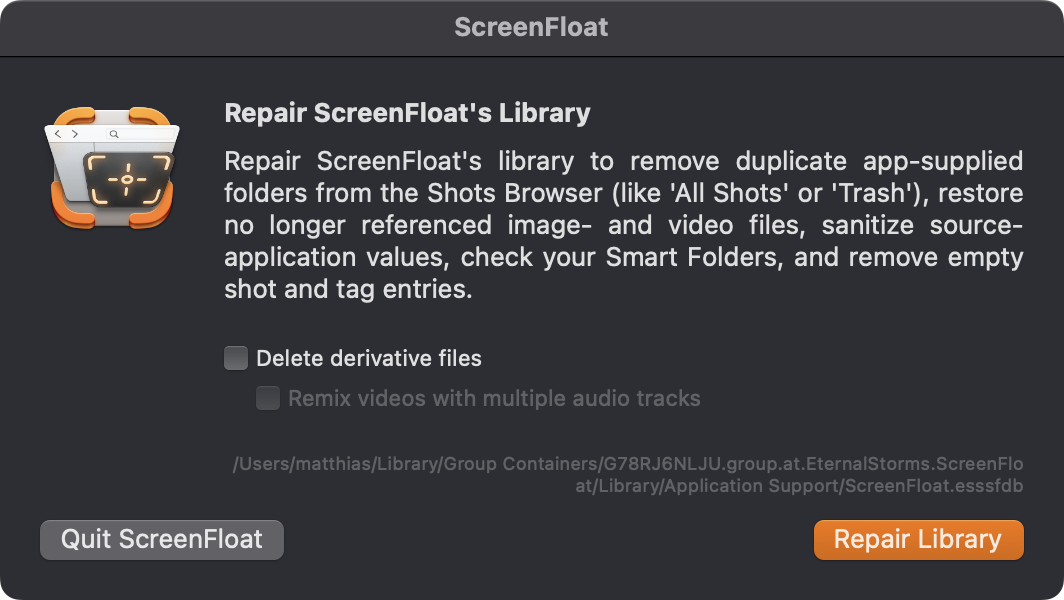
ScreenFloat can attempt to repair itself in certain cases: It checks for duplicate app-supplied Smart folders, like “All Shots”, or “Trash”, or “Favorites”) and removes them, looks for no-longer referenced image- and video files and restores them for you to decide what to do with them, sanitizes tags and source-application values, and checks your Smart folder rules for integrity and validity (where, if ScreenFloat discovers issues, you’ll be able to forward that info to me so I can figure out what’s going on).
Select “Delete derivative files” if you’d like ScreenFloat to re-render all images with annotations from their original sources. This also cleans out superfluous files that are no longer associated with a shot in your library.
Select “Remix videos with multiple audio tracks” to re-render videos with multiple audio tracks into additional files with a single audio track, which ScreenFloat does behind-the-scenes for broader compatibility when sharing.
iCloud Sync
Have your ScreenFloat library with you everywhere, by syncing everything using your iCloud account.
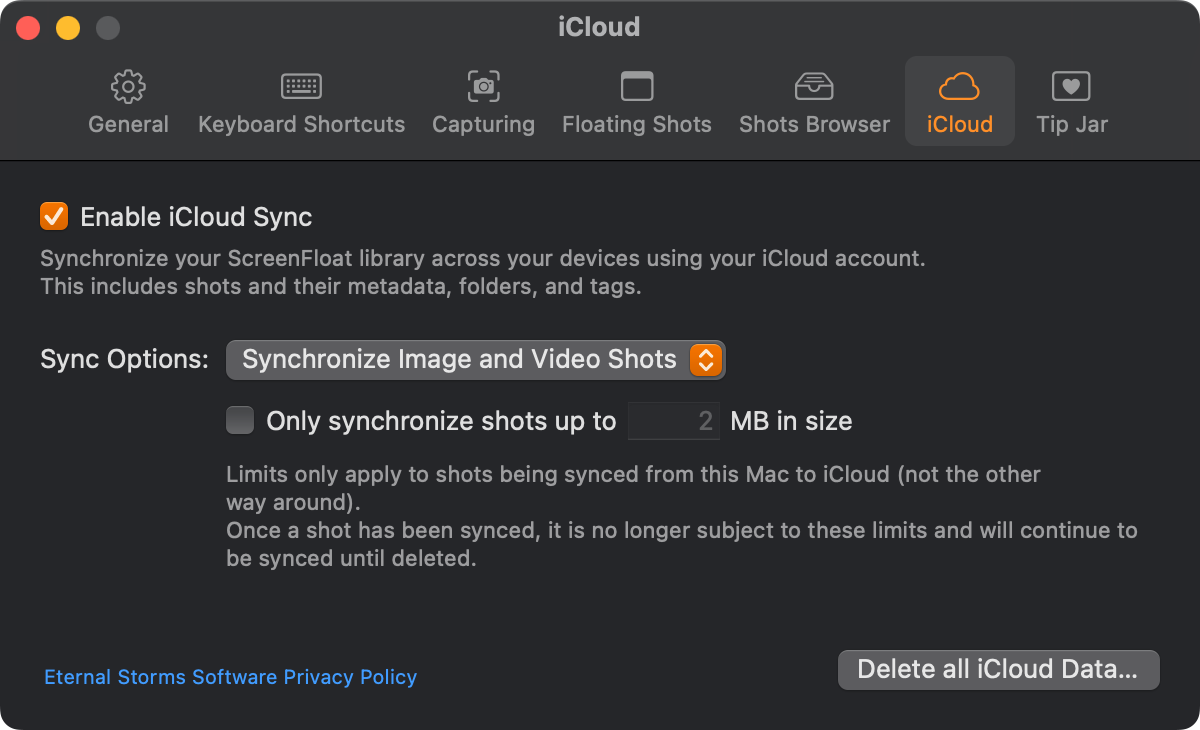
If you choose to use iCloud sync, ScreenFloat synchronizes all your shots by default. But you can fine-tune it to your liking.
You can specify whether to synchronize all shots, image shots only, or video shots only.
Additionally, you can set a file size limit to make ScreenFloat only synchronize shots that have a file size smaller than the limit you set.
Limits only apply to shots going up to iCloud, not coming down from iCloud: If you have a file size limit set to 2 MB, images and videos larger than that will not sync up, but shots in iCloud larger than that will sync down to your Mac. Or, if you choose on one Mac to only synchronize image shots, it means video shots will not be synced up from that Mac to iCloud, but they will sync down from iCloud.
Once a shot has been synced, it is no longer subject to these limits. Basically, if you start synchronizing with no restrictions, and later change your mind to only sync image shots and no video shots, video shots already synced up to iCloud will continue to sync changes and will not be deleted from iCloud unless you manually delete the shot.
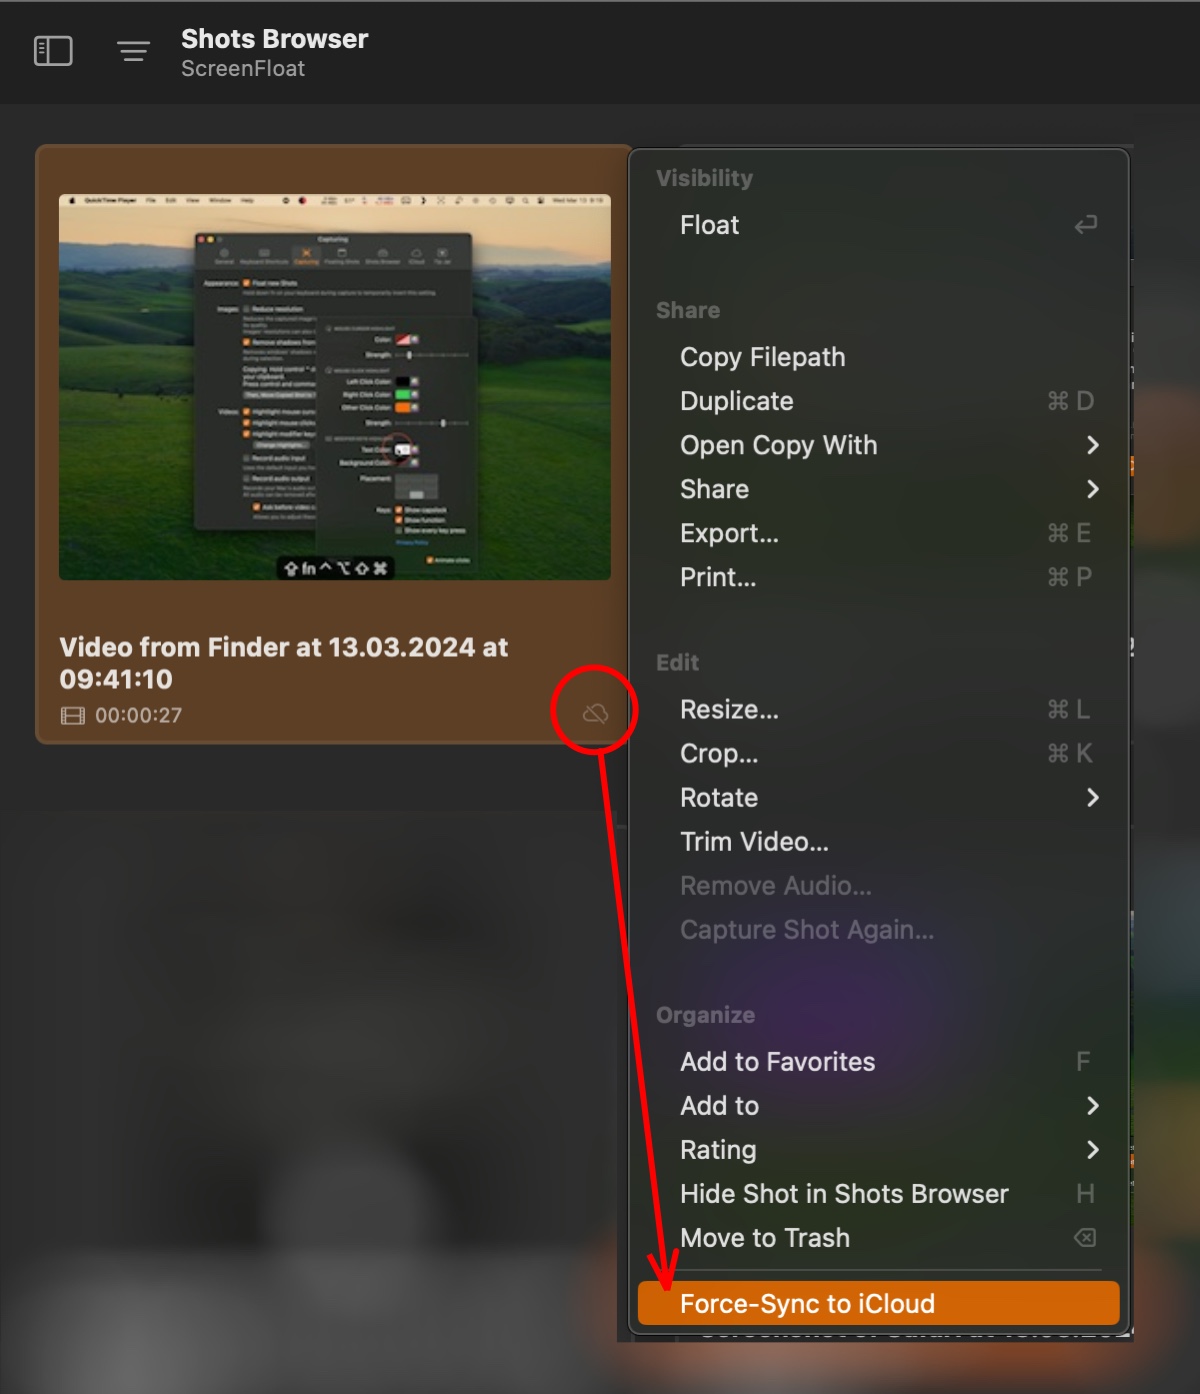
Shots that are excluded from sync because of a limit you have set up can be force-synced in the Shots Browser by right-clicking them:
You can manually start a sync in the Shots Browser, by clicking the little refresh button at the far right of the status bar:
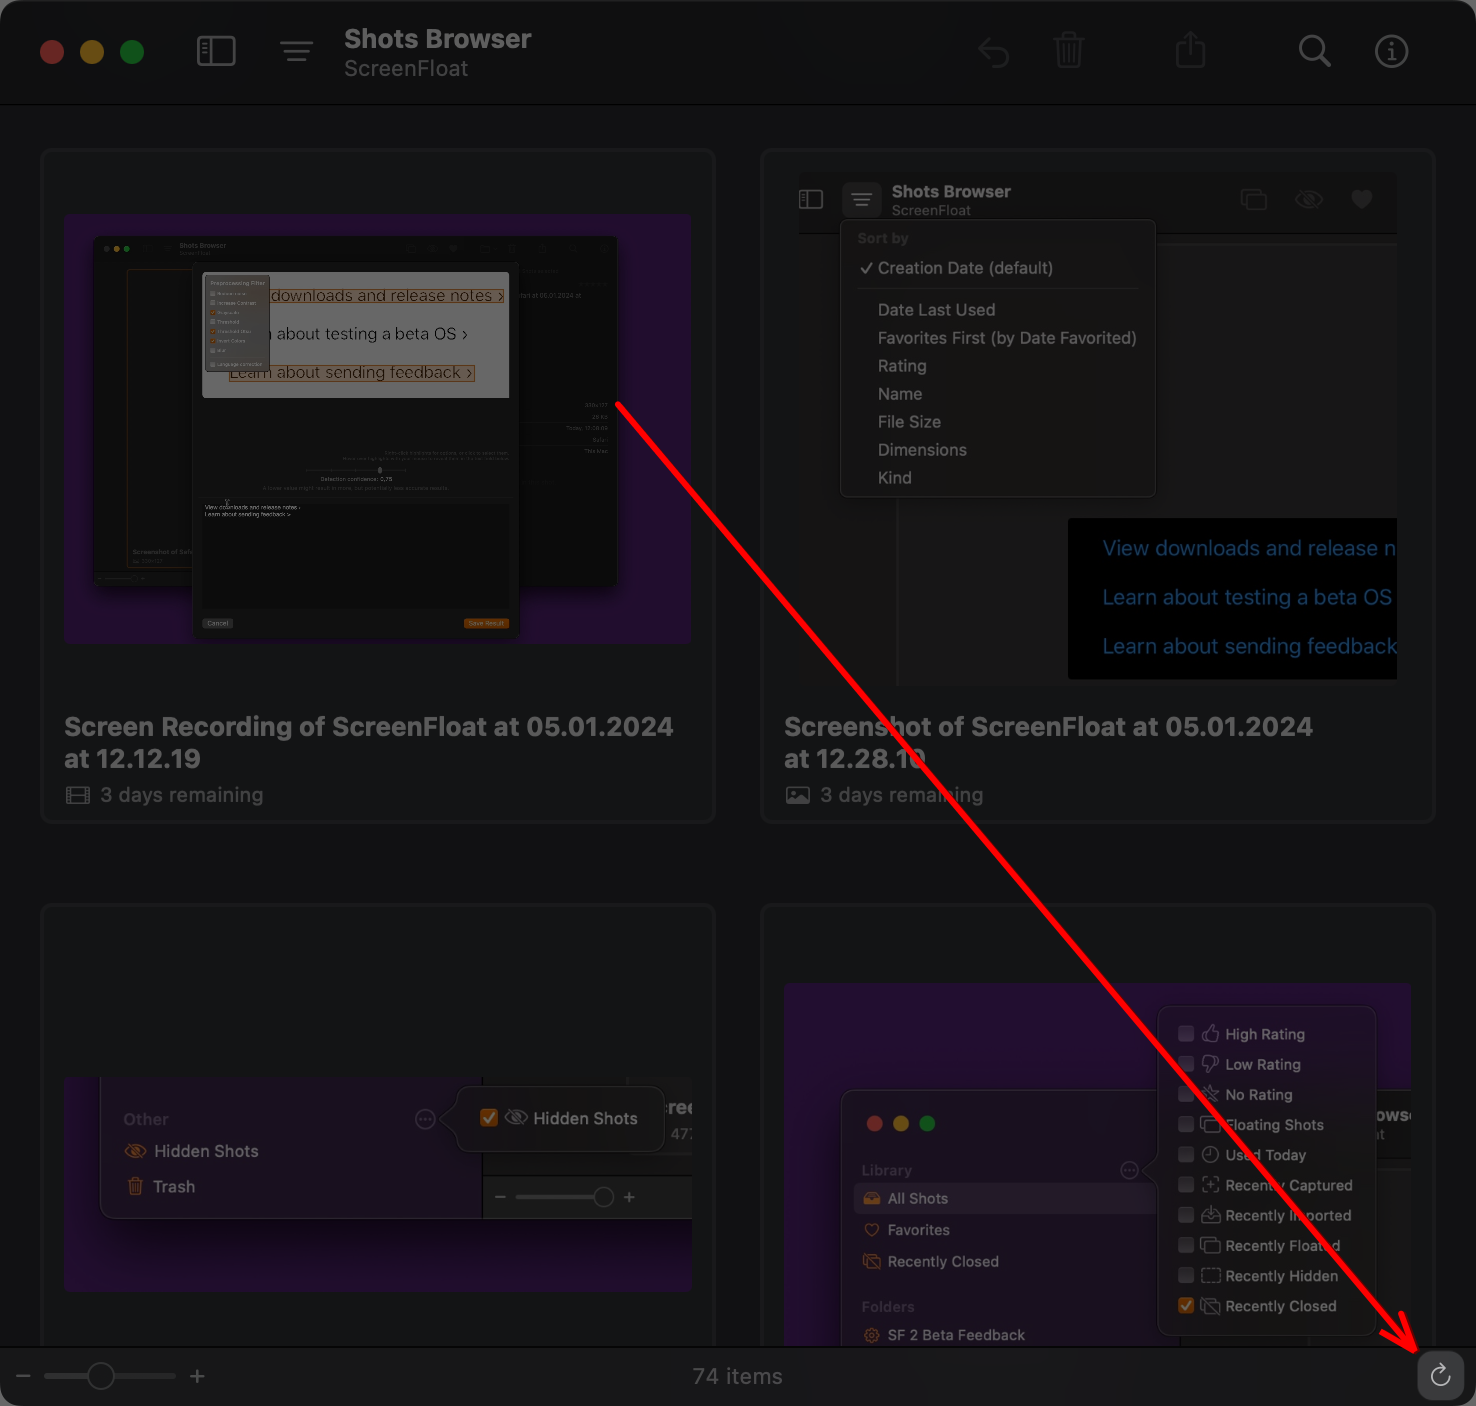
This is also where you’ll be informed about any errors that might occur, in addition to the Settings’ iCloud panel.
What gets synchronized in detail:
- Your shots, their annotations, and metadata (title, notes, detected text/faces/barcodes, etc)
- Your tags and their metadata (favorite status)
- Your folders and smart folders
- Minimal information about the devices you synchronize, to enable filtering by device in smart folders and search.
You can read my Privacy Policy here. The gist: I see nothing, and I want to see nothing. Whenever any of my apps use your internet connection, it’s to realize a feature in the app, not to send me any usage data, tracking data or anything else like that.
The Tags Browser
Using ScreenFloat 1, I always longed for a way to see all my tags and to organize them more precisely. That’s why in ScreenFloat 2, there’s the Tags Browser, which lets you (and me) do exactly that.
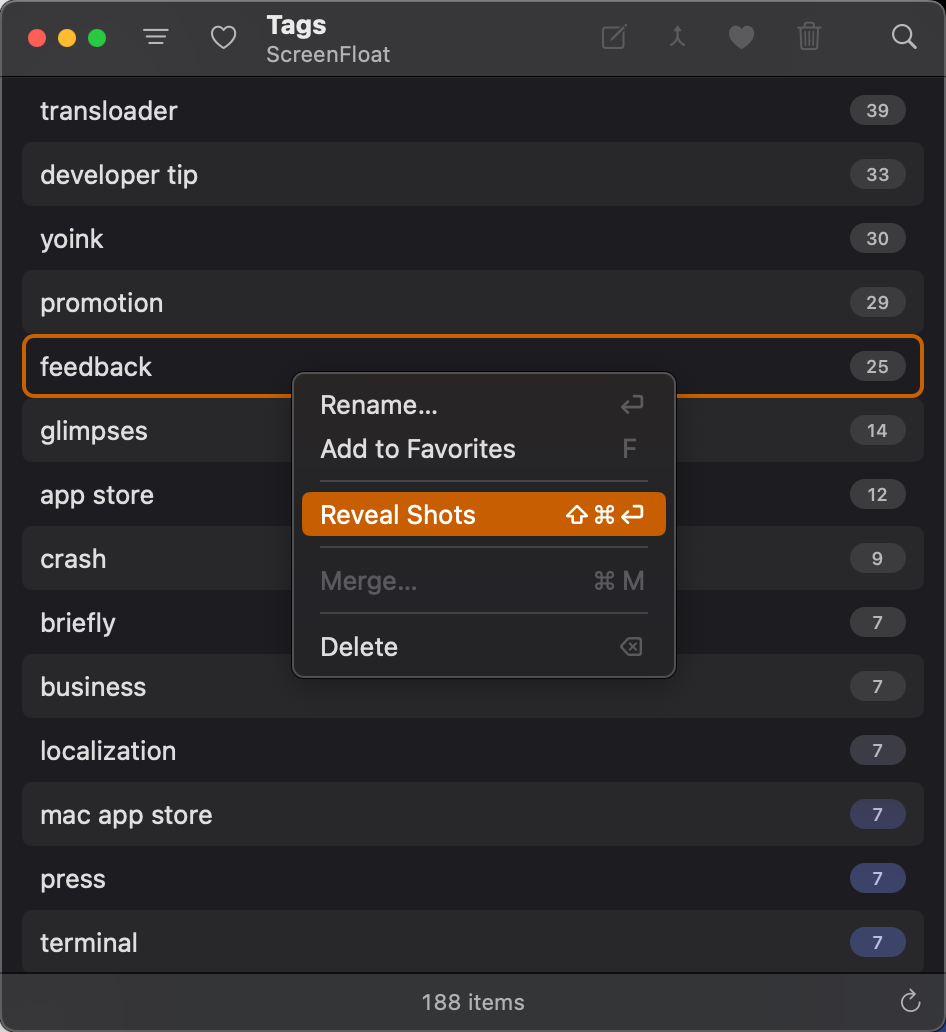
You can rename tags, in case you discover a typo.
You can merge tags, if you’ve accidentally created similar ones. Shots will automatically update to the merged-into tag.
You can delete tags, if you no longer need them. They will be removed from all shots they were assigned to.
You can favorite tags which will help in discovering in the tag menus, or when auto-completing tags in the Shots Browser’s Info panel.
It’s also neat to be able to Reveal Shots tagged with one or more selected tags right from the Tags Browser in the Shots Browser.
It shows you the number of shots tagged with each tag, which helps weed out shots and tags you might no longer need.
Up Next
The next part of this series – Part VII: Integrate – Widgets, Siri Shortcuts, AppleScript, Workflows, Spotlight – takes a detailed look at how ScreenFloat integrates with macOS to make capturing and accessing your shots easy, comfortable, and automated.
Links
ScreenFloat Website (+ free trial & direct purchase)
ScreenFloat on the Mac App Store (one-time purchase, free for existing customers)
ScreenFloat on Setapp (7-day trial, then subscription for 200+ awesome apps)
ScreenFloat Usage Tips
Eternal Storms Software Productivity Apps Bundle (Yoink, ScreenFloat, Transloader and DeskMat at ~20% off)
Contact & Connect
Thank you for your time. I do hope you enjoy ScreenFloat!

[…] Part IV […]
[…] Part IV […]
[…] Part IV […]
[…] Part IV […]
[…] Part IV […]
[…] Part IV […]
[…] Part IV […]
[…] Part VI […]