Let’s take a tour through ScreenFloat and see how it can power up your screenshots, too.
ScreenFloat for Mac – Your Screen Capture Power Tool All-Rounder
ScreenFloat powers up your screenshots by allowing you to take screenshots and recordings that float above everything else, keeping certain information always in sight. Its Shots Browser stores your shots and helps you organize, name, tag, rate, favorite and find them. Everything syncs across your Macs.
Extract, view and copy detected text, faces and barcodes. Edit, annotate, markup and redact your shots effortlessly and non-destructively. Pick colors any time. And more.
Posts in this Series
Part III: Float – Picture-in-Picture for your Screenshots and Recordings
A floating screenshot or recording can help you remember something, copy information over from one app to another, or have reference material visible. It’s also the fastest way to markup, redact, and extract information from shots.
Table of Contents
- OCR, Data Detection, QuickSmart-Redaction
- Floating Shot Visibility
- Color Picker
- Edit and Annotate Shots
- Drag and Drop Sharing
- The “Action” Menu
- Double-Click Workflows
Floating Shots
Shots you take with ScreenFloat float above other windows and apps, and follow you around fullscreen apps and spaces by default:
It’s great for keeping a reference to anything on your screen visible at all times. In the video above, it’s a QR code, but it could be anything else, like banking information, a code sample, or a reference image.
OCR, Data Detection, QuickSmart-Redaction
Shots you capture with ScreenFloat are analyzed for text (and text-contents, like links, emails, numbers and more), barcodes and faces. That makes it very easy to copy the un-copyable, and make redactions very quickly and effortlessly. You can even find your shots based on this data in the Shots Browser and Spotlight.
Copying and Using Text, Links, Addresses, More
To copy all text in a floating shot, click on the gear icon at its top right and select Content > Text > Copy All Text.
As shown in the video above, you can also copy individual lines from that menu, which you can do even easier by just right-clicking directly on the line you’d like to copy.
Better yet: copy, use, view and redact specific text content like links, emails, numbers and addresses directly by right-clicking them:
Viewing Barcodes
ScreenFloat can handle all sorts of barcode content, like vCards, Calendar Events, URLs, and more.
Like Text, Barcodes appear in the Detected Data submenu, for you to access all of them at once:
Like text, you can right-click specific barcodes for direct access so you can Quick Look them, etc.
Convenience Feature: When you only capture a barcode, ScreenFloat will figure you’re interested in its contents, so it pops up the relevant menu automatically:
QuickSmart-Redactions
There’s a chance you might want to remove sensitive information before sharing a screenshot. One way to do that would be to Annotate the image in ScreenFloat and redact manually.
But there’s a quicker way. A smarter way. The QuickSmart way (see what I did there?) !
Right-click a line of text (or links, emails, …), a barcode, or a face, and you’ll have the option to redact it right there:
With a double-click workflow, this can be made even QuickerSmart-er.
Redactions are non-destructive and can always be changed or removed. You can do so by selecting Markup… from the menu.
The kind of redaction used (color-block-out, pixellate, blur) depends on the default you have set for the Redaction tool in Annotations. By default, it’s color-block-out (because it’s the safest method). To change it to pixellate, like I have, select Markup… and double-click the Redaction tool. Select your preferred method in the popover, making it the new default for redactions you make manually in Annotate, as well as QuickSmart redactions.
Copying text or viewing barcodes is also available in paused videos. Redactions/Annotations are only available for screenshots at this time.
Floating Shot Visibility
Move and resize floating shots just like you would any other window: drag them around your screen to move, grab a corner or edge and drag it inwards or outwards to resize.
Floating shots can also be closed, by pressing the x button at the top left. The shot will remain in your Shots Browser, where you can access and re-float it at any time.
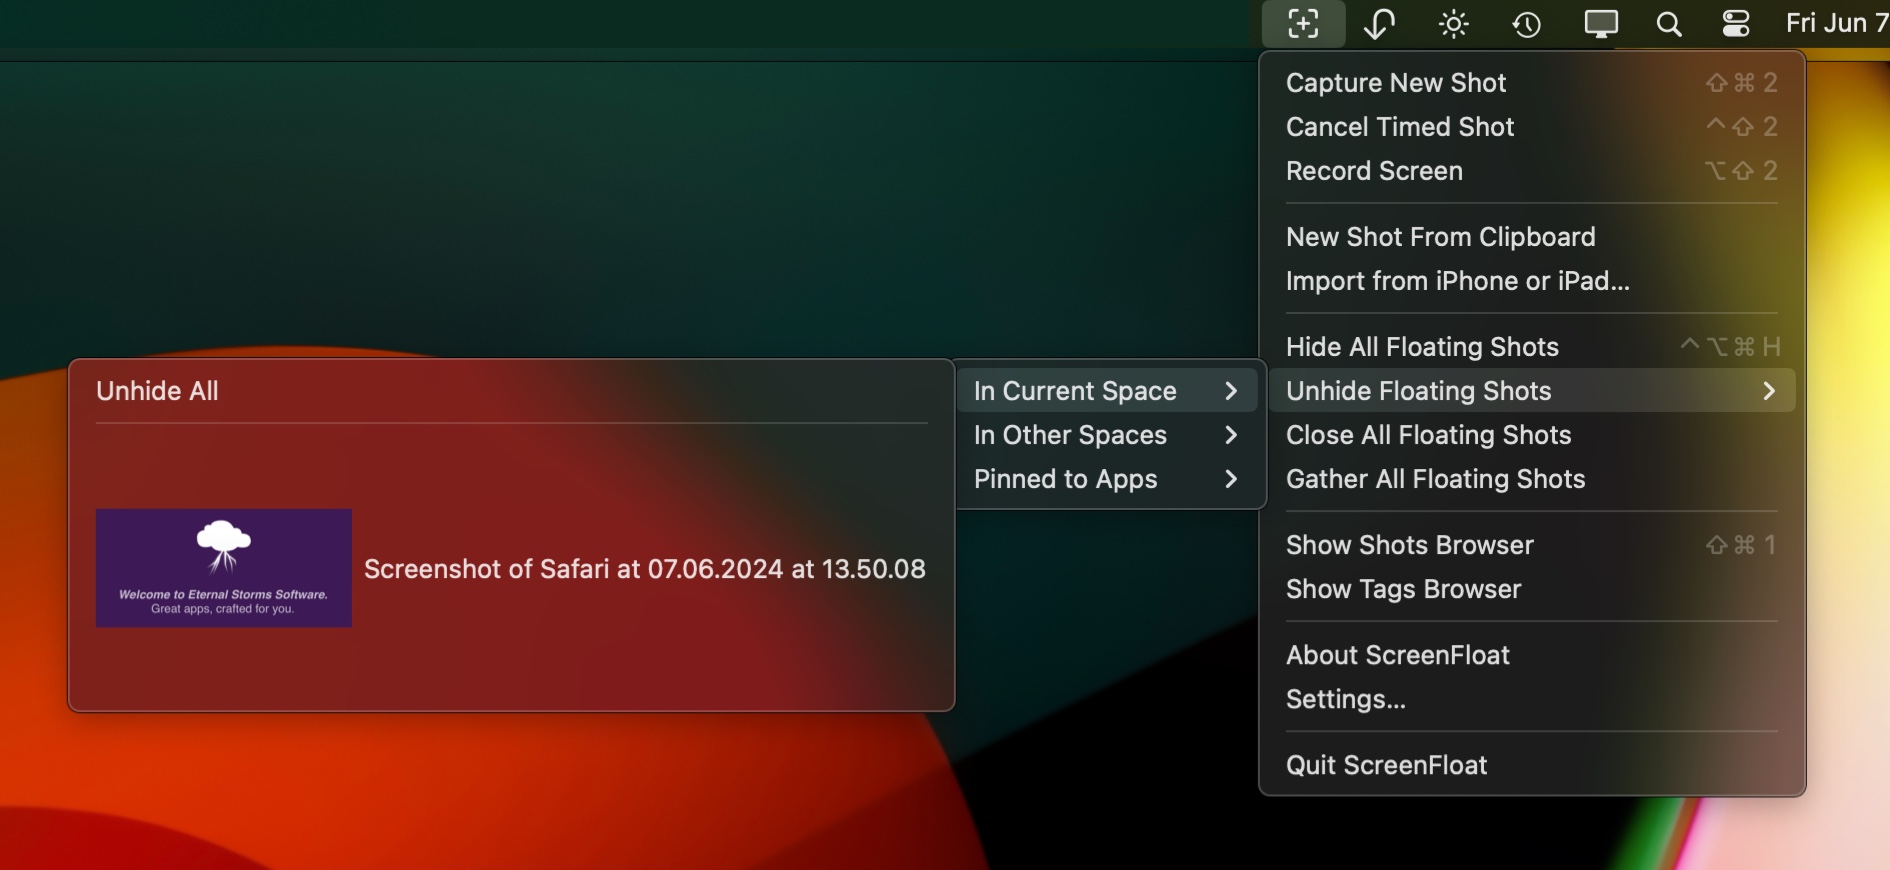
Hiding and Unhiding Shots
Shots can also be hidden. This closes the shot, too, but keeps it around so you can quickly show it again without having to go through the Shots Browser. With a keyboard shortcut (by default control (^) – option (⌥) – command (⌘) – H), or from ScreenFloat’s menu bar icon, you can toggle all currently visible floating shots between hidden and unhidden.
This is perfect for situations where shots might cover parts of your screen you need to get to without moving stuff around, or when you know you don’t need shots right now, but will soon, or repeatedly, even.
Hide a single shot by hovering over its close button, or by right-clicking it.
Unhide individual shots from ScreenFloat’s menu bar icon:
Pin Shots to Spaces
If you don’t want a shot to follow you around as you move between spaces and fullscreen apps, you can pin to the current space: right-click it and select Visibility > In Current Space. Now it will remain on that space, until you set it to follow you again, or if you relaunch ScreenFloat.
Pin Shots to a Apps
Shots you require to be visible only in a certain app can be pinned to that app.
This will automatically hide the shot if the selected app is not frontmost, and show it when it is:
Opacity Scrolling, Ignore Mouse Clicks
Scroll up and down on a floating shot to change its opacity – very useful for revealing what’s underneath, for example, when trying to compare two versions of something.
Speaking of which, you can make floating shots temporarily ignore all mouse input so you can click and drag through them – perfect for drawing through a shot, for instance.
To make the shot accept mouse input again, click on its info panel at the bottom.
If you have a couple of floating shots ignoring mouse clicks, that info panel at the bottom could be distracting. Click on the chevron and select Hide Info Panel, to hide it for all currently floating mouse-click-ignoring shots.
With the info panel gone, you might wonder how to make Shots accept mouse clicks again: click ScreenFloat’s icon in your menu bar and select Stop Ignoring Mouse Clicks:
Work Mode
If you find your floating shots get in your way too often, you can use ScreenFloat’s “Work mode”, which you can activate in Settings > Floating Shots.
With it enabled, floating shots temporarily disappear when you move your mouse cursor over them, and reappear as you move away.
Alternatively to having Work Mode always active, temporarily toggle it by holding down the command (⌘) key on your keyboard as you mouse over.
Color Picker
Floating shots come with a handy color picker. Option (⌥) – click-and-drag anywhere on a floating shot and the picker will pop up.
Release the mouse button when you’re at the color you want to pick. A menu will appear, allowing you to copy the color’s hex-, RGB-, float-, or hsl values, or a sample color image. You can even drag it onto a target in another app, making it easy to use the color right away.
Recently picked colors are saved for you to access from the picker menu itself, or ScreenFloat’s widgets (which we’ll talk about in a later installment of this blog series).
If you’re using a Magic Mouse, you can adjust the color picker’s “crosshair” on the fly by scrolling up or down while you’re picking colors. If not, you can adjust the size in ScreenFloat’s settings.
Edit and Annotate Shots
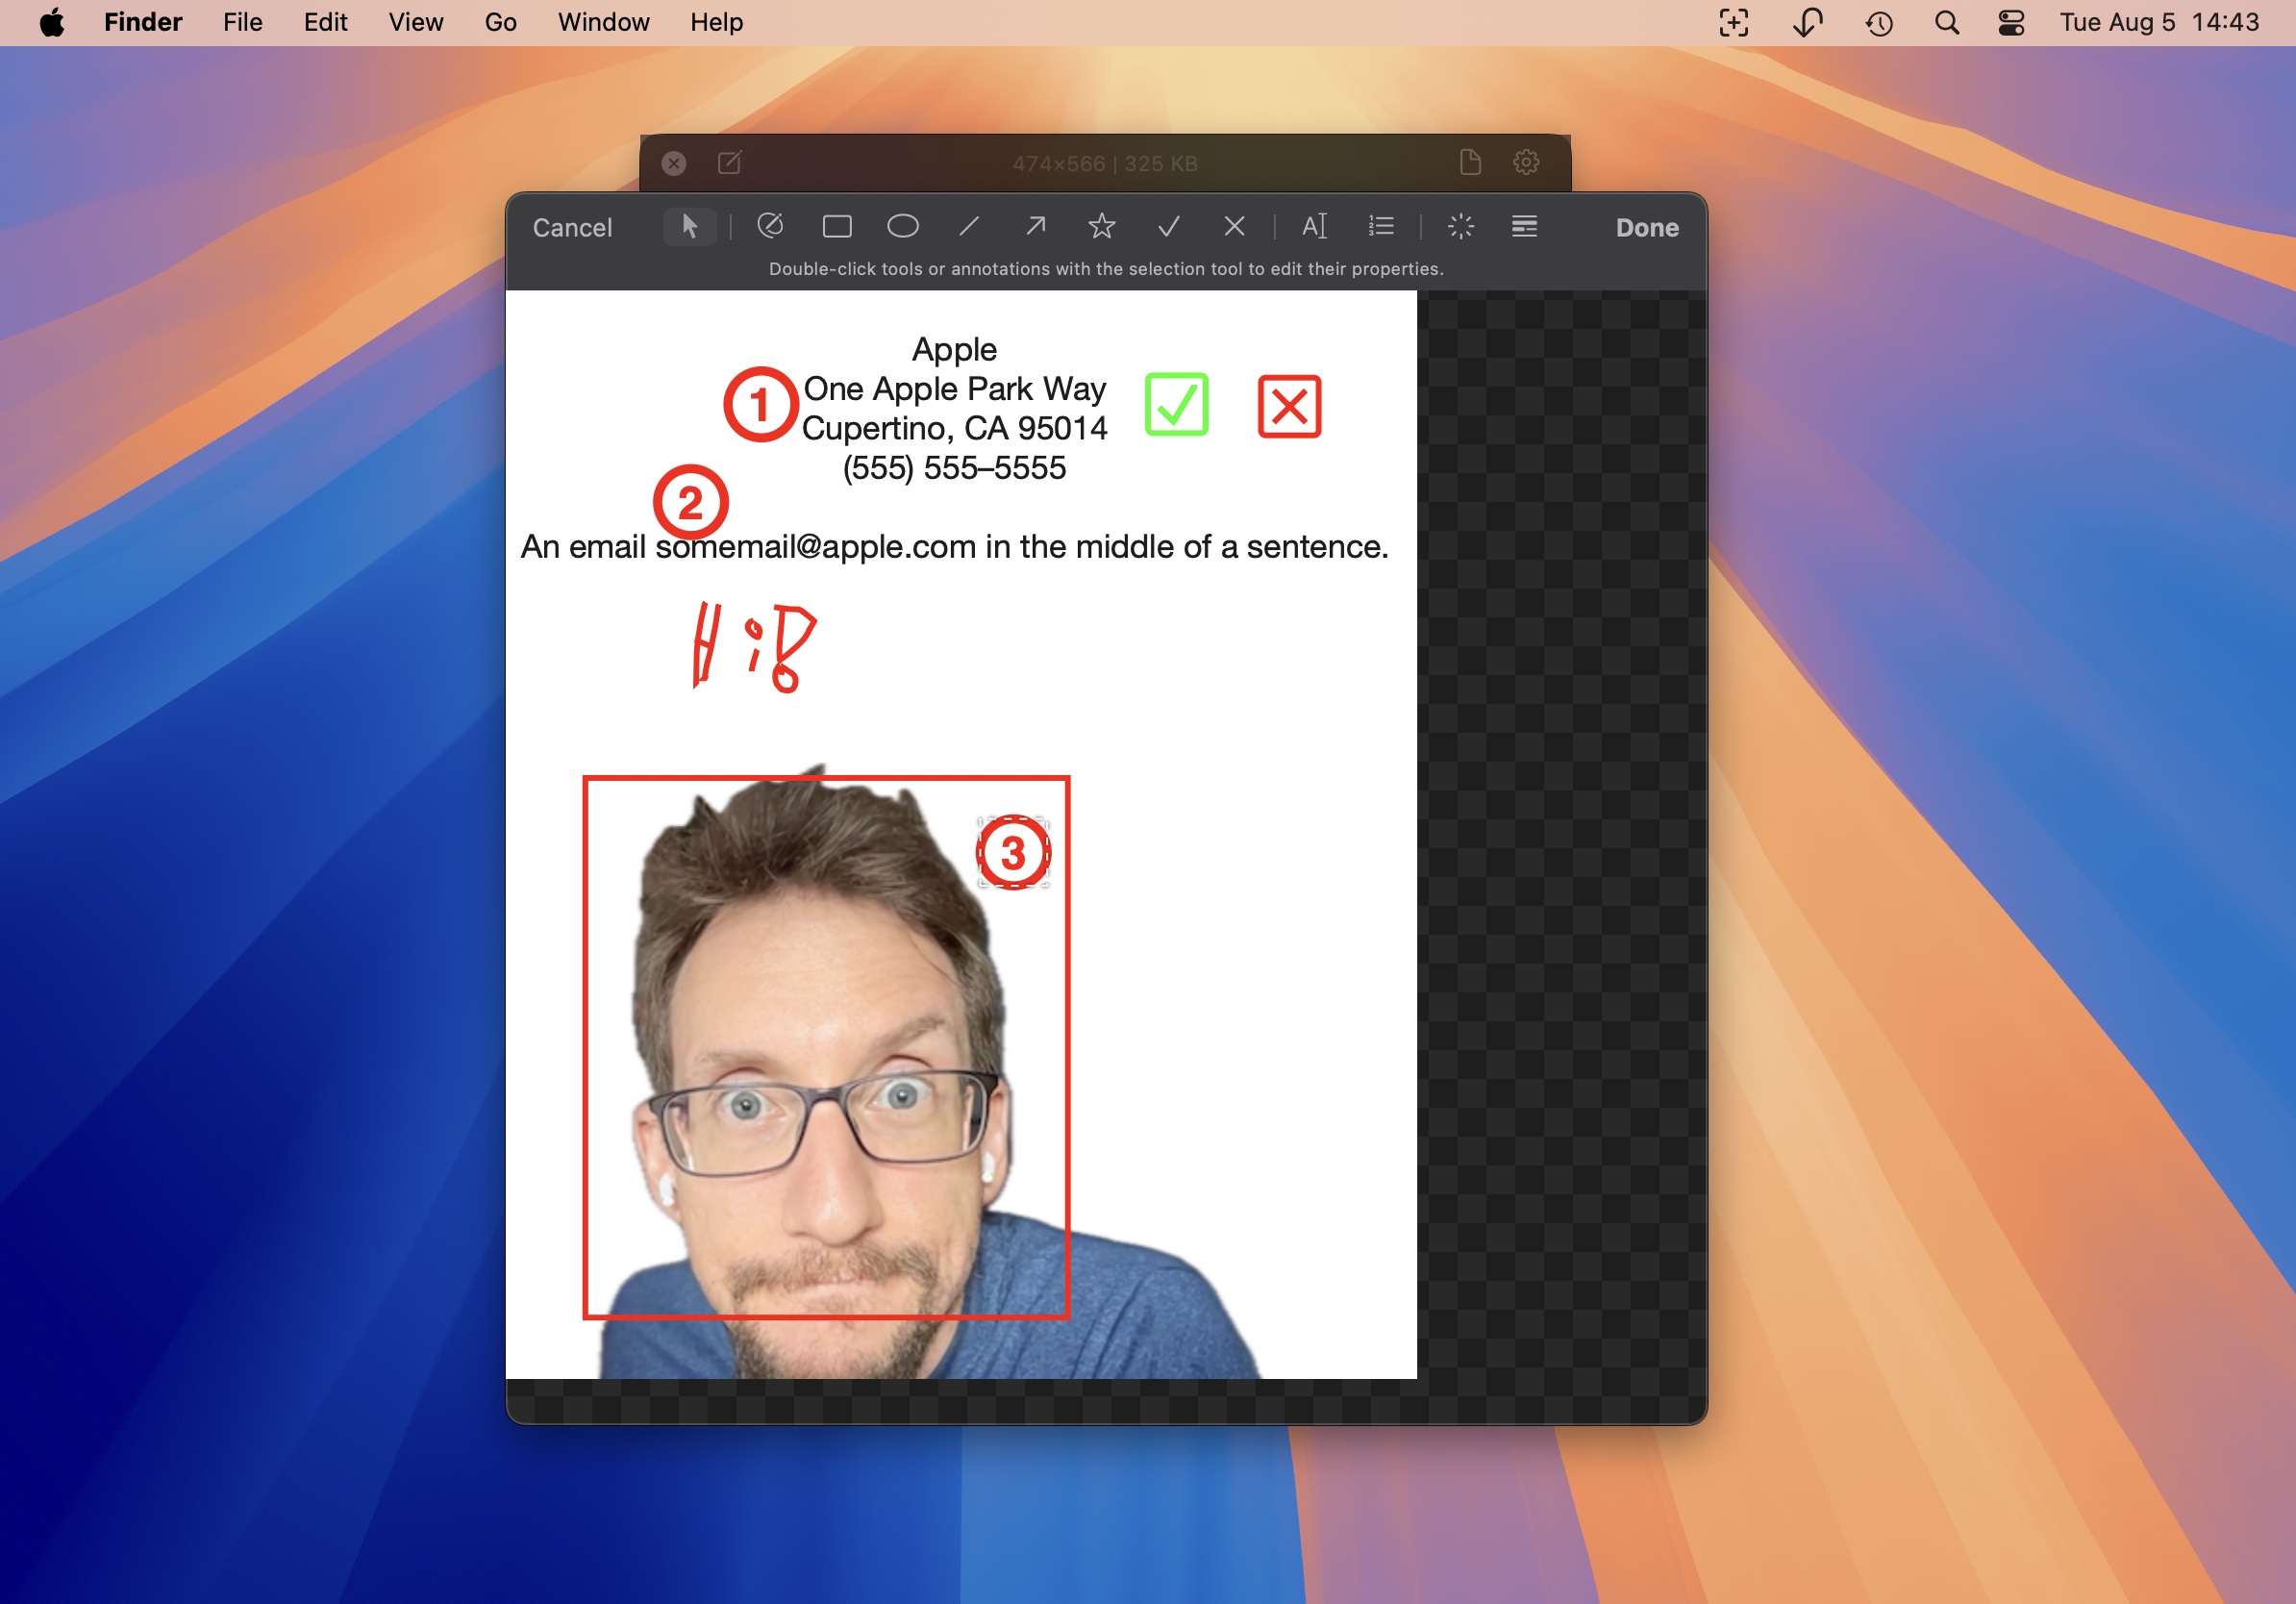
We’ll talk about this in more detail in the next installment of this series, but for now, here’s a short overview of the changes you can make to shots and recordings:
Screenshots
- Crop and “Fold”
- Rotate
- Resize/Scale
- Reduce the shot’s resolution (from a “retina” dpi of 144 or more to 72 dpi)
- Annotate/Markup
- Freedraw
- Lines
- Ovals
- Rectangles
- Arrows
- Stars
- Checkmarks
- X-marks
- Text
- Smart numbered lists
- Highlight
- Redact (block, pixelate, blur)
Markup is non-destructive, so you can always come back later and make changes, or remove them.
If you’re using Sidecar with an iPad, ScreenFloat supports the Apple Pencil’s double-tap to switch through the different tools.
Screenshots can also be annotated using Quick Look in the Shots Browser. This is particularly useful if you like to use an iPad with an Apple Pencil over Continuity Markup. This has been custom fitted so annotations added width Quick Look also are non-destructive.
Screen Recordings
- Crop
- Rotate
- Resize/Scale
- Trim
- Cut video
- Remove (individual or all) audio tracks
Drag and Drop Sharing
Probably nothing is more important than being able to share screenshots and recordings. That’s why in ScreenFloat, it’s extra easy, and extra powerful at the same time.
Drag the little document icon of a floating shot and you’ll be able to drag the shot as-is anywhere you wish. Alternatively, you can long-press-and-drag, if you prefer (or if the document icon is off-screen).
If you require a certain file format, or if you want to reduce the shot’s resolution or dimensions before dragging it somewhere, click the document icon instead, and all sorts of options will become available to you:
- Change the file format (PNG, JPEG, TIFF, PDF, HEIC)
- Reduce the resolution (from 144+ “retina” dpi to 72 dpi)
- Resize the image (by longest/shortest side, or width/height)
- Add a border around the image to prevent “bleeding”
- Whether markup and annotations should be included in the dragged file, or only the underlying image should be shared
- Randomizing the filename
- Whether notes and tags should be included as EXIF and Finder metadata
Click any of the file format options to set it as your default for quick-dragging, should you prefer, say, JPEG over PNG files for sharing.
We’ll talk more about sharing options in a future part of this series.
The “Action” Menu
Right-click any floating shot, or click on the little gear icon in the top right to access the “Action” menu. It contains everything you need for working with your shots.
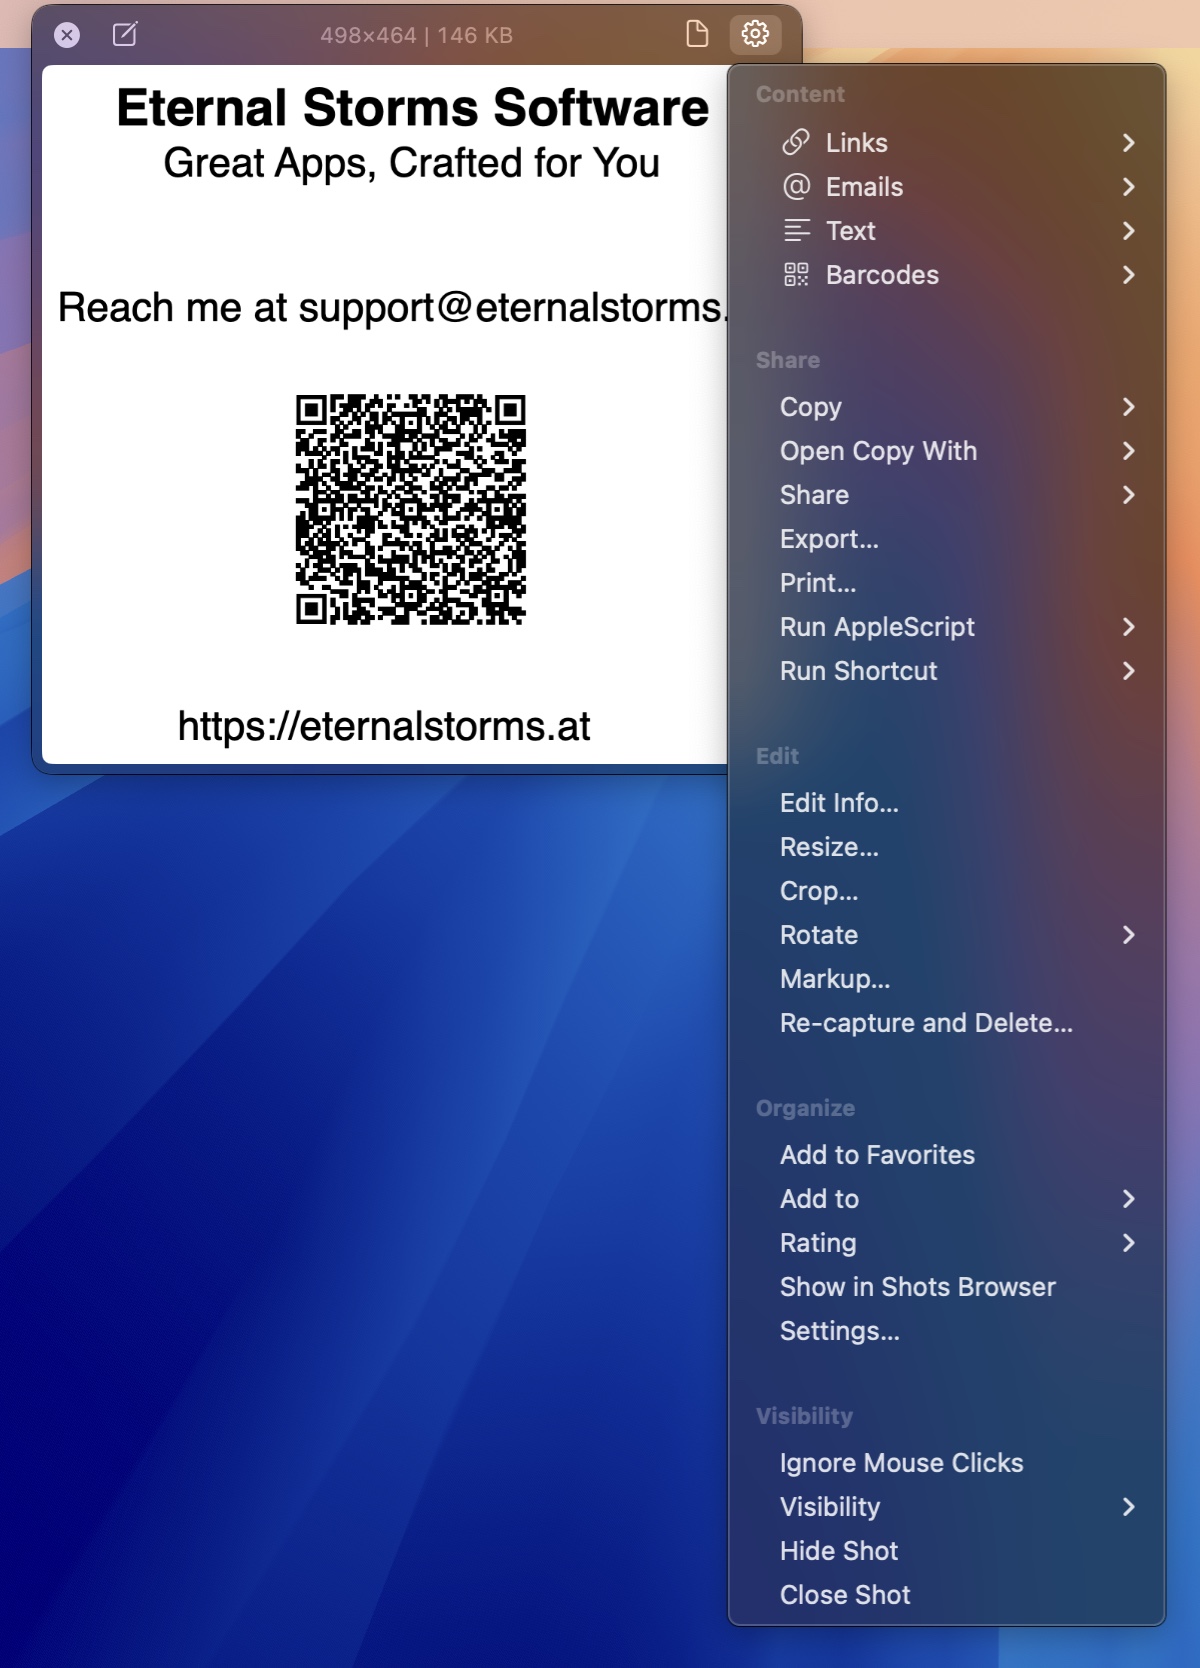
Some of these we’ll talk about in more detail in a future installment of this series, so for now, let’s go over all of them and see what they do.
Content
Any detected content, like text, links, emails, barcodes and faces is shown here for you to easily copy, view, use or redact them.
Share
- Copy: Allows you to copy the PNG/MOV file of the shot, or in case of screenshots, the image data in different formats
- Note: Hold down option (⌥) to change this to Duplicate, allowing you to duplicate the floating shot
- Extract Still Image From Video (recordings only; not shown in the screenshot above): Extract the current frame from the video into a new shot, or copy it to the clipboard
- Open Copy With: Open a copy of the shot with a compatible app
- Share: Your standard share menu, with the additional option of uploading the shot to iCloud and sharing a link to it, instead of a potentially large file.
- Export…: Export the shot to a folder of your choice, into different file formats, quality, and more
- Print…: Print the shot, optionally with its metadata
- Run AppleScript: Run an Apple Script you have placed in ScreenFloat’s Application Scripts folder on with the shot as input. Discussed in a future installment of this series.
- Run Shortcut: Runs a Shortcuts.app shortcut with the shot as input. Discussed in a future installment of this series.
Edit
- Edit Info… : Edit the title, notes, rating and tags of the shot (useful in the Shots Browser)
- Resize… : Resize/scale the shot, and/or reduce its resolution
- Crop…: Crop the shot
- Rotate: Rotate the shot (counter-)clockwise
- Trim Video (recordings only; not shown in the screenshot above): Trim the video’s beginning and end
- Cut Video (recordings only; not shown in the screenshot above): Cut the video, or its individual audio tracks
- Remove Audio (recordings only; not shown in the screenshot above): Remove the video’s audio tracks (all, or individually)
- Markup… : Add or remove annotations and redactions to/from the shot (discussed in the next installment)
- Re-capture and Delete… : Allows you to re-capture the area of this shot was captured in, then deletes the original
- Note: Hold down option (⌥) to change this to Capture Shot Again, which allows you to capture that shot’s screen area again without deletion
Organize
- Add to Favorites: Favorite the shot (useful in the Shots Browser, Widgets)
- Add to: Add the shot to an existing or new folder in the Shots Browser
- Rating: Rate the shot from between 0-5 stars (useful in the Shots Browser, Widgets)
- Show in Shots Browser: Opens the Shots Browser and selects and reveals this shot
- Settings…: Open ScreenFloat’s settings
Visibility
- Ignore Mouse Clicks: makes the shot temporarily ignore mouse input (see above)
- Visibility: Make this shot appear everywhere, only in the current space, or only when the current app is active (see above)
- Hide Shot: Hides this shot, so it disappears, but you can recall it quickly from ScreenFloat’s menu bar icon (see above)
- Close Shot: Closes the Shot to the Shots Browser
Usage Tip: Hold down the option (⌥) modifier on your keyboard to make the visibility setting apply to all floating shots, or option (⌥) and function (fn) to make them apply to all floating shots on that screen.
Double-Click Workflows
For things you find yourself doing repeatedly, you can use double-click workflows.
For instance, if you find yourself always reducing a shot’s resolution and redacting personal information before you mail it to somebody, set up a double-click workflow for it to automate the process. With a double-click workflow, you only have to double-click the floating shot and its resolution will be reduced, personal information redacted, and then attached to a new email, all automatically.
We’ll talk more about these workflows in a future installment of this series – there are a lot of options available.
Up Next
The next part of this series – Part IV: Edit – OCR, Annotate, Crop, Fold, Resize, Rotate, Trim, Cut and Mute – takes a detailed look at all the Editing, Markup and Redaction options available.
Links
ScreenFloat Website (+ free trial & direct purchase)
ScreenFloat on the Mac App Store (one-time purchase, free for existing customers)
ScreenFloat on Setapp (7-day trial, then subscription for 200+ awesome apps)
ScreenFloat Usage Tips
Eternal Storms Software Productivity Apps Bundle (Yoink, ScreenFloat, Transloader and DeskMat at ~20% off)
Contact & Connect
Thank you for your time. I do hope you enjoy ScreenFloat!
[…] Part III […]
[…] Part III […]
[…] Part III […]
[…] Part III […]
[…] Part III […]
[…] Part III […]
[…] Part III […]
[…] Part III […]