Let’s take a tour through ScreenFloat and see how it can power up your screenshots, too.
ScreenFloat for Mac – Your Screen Capture Power Tool All-Rounder
ScreenFloat powers up your screenshots by allowing you to take screenshots and recordings that float above everything else, keeping certain information always in sight. Its Shots Browser stores your shots and helps you organize, name, tag, rate, favorite and find them. Everything syncs across your Macs.
Extract, view and copy detected text, faces and barcodes. Edit, annotate, markup and redact your shots effortlessly and non-destructively. Pick colors any time. And more.
Posts in this Series
Part IV: Edit – OCR, Annotate, Crop, Fold, Resize, Rotate, Trim, Cut and Mute
At some point, you will want to crop, resize, rotate or annotate your shots. Perhaps you might want to trim your videos, or remove individual audio tracks. Read on to learn how ScreenFloat makes this easy and pain-free for you.
Table of Contents
Edit – OCR, Annotate, Crop, Fold, Resize, Rotate, Trim, Cut and Mute
To edit a shot, right-click it (either in the Shots Browser, or a floating shot itself) and select the according option in the menu.
Convenience Feature: Whenever you feel like you might want to create a backup before making changes to a shot (like cutting or trimming a video, or removing its audio tracks), you can duplicate it beforehand. Right-click the shot, hold down the option (⌥) key and select Duplicate.
Crop
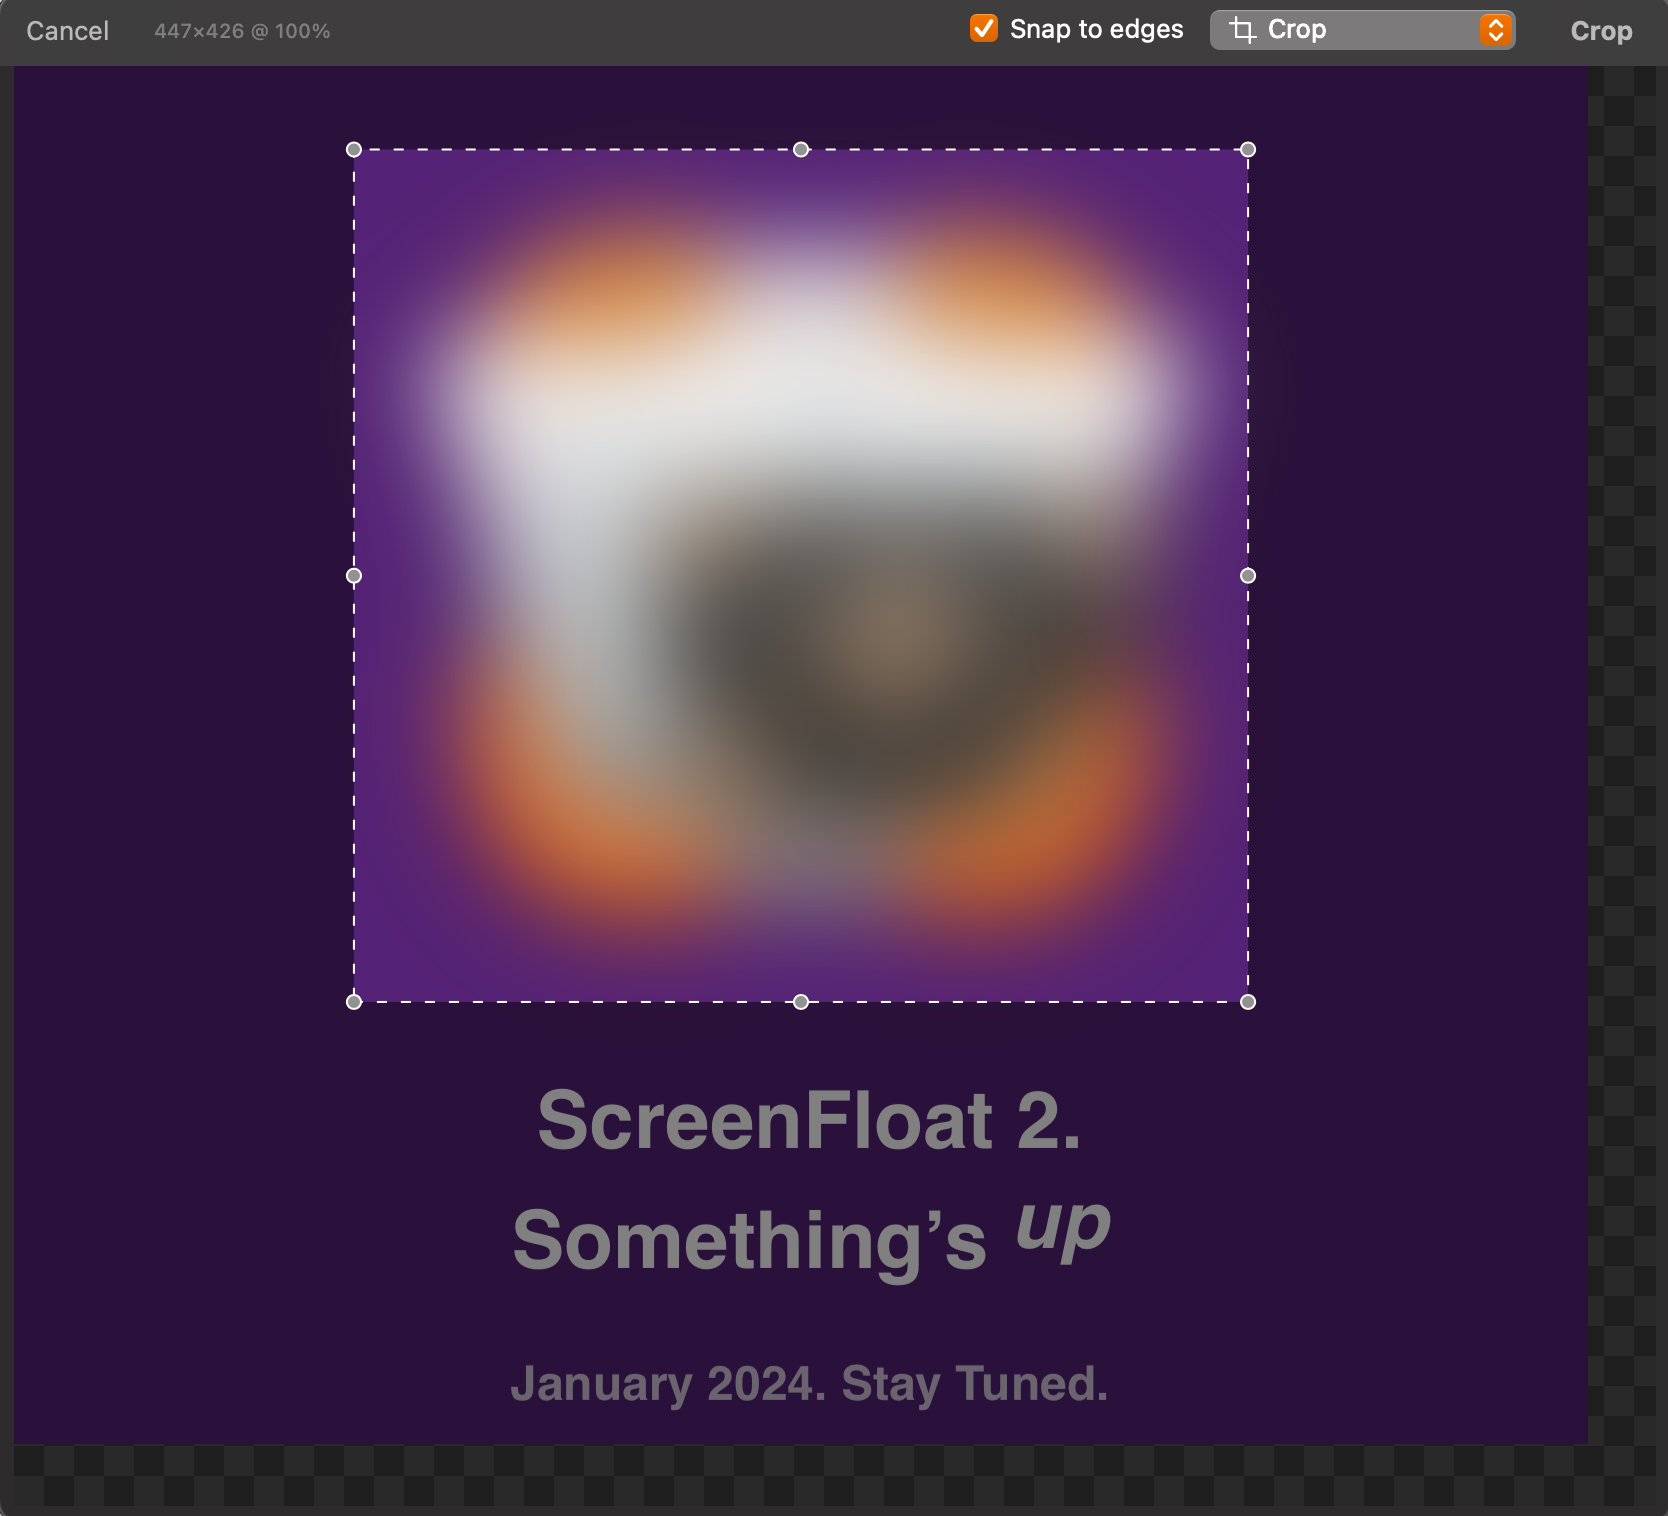
Cropping allows you to crop away unwanted edges of your screenshots or recordings.
- At the top left, you’ll see the dimensions of your selection, and the current zoom level
- Snap to edges can help you crop at just the right edge of a window, for example
- Usage Tip: Hold down the command (⌘) key to temporarily disable snapping while changing the selection rectangle
- While changing the cropping rectangle, hold down the option (⌥) key to change its size around its center point
- Click and drag the area of your selection rectangle to move it around
- Press command(⌘) – c to copy the selected area, or right-click and select Copy
You can adjust the rectangle with your keyboard’s arrow keys, too:
- Up, down, left, right moves the rectangle up, down, left, right by 1px. Hold down the shift (⇧) key to increase it to 5px.
- Up, down, left, right while holding down the option key (⌥) increases or decreases the selection rectangles width or height by 1px. Hold down the shift (⇧) key to increase it to 5px.
Aspect Ratios
In case you require a specific aspect ratio, ScreenFloat has you covered for the most popular of them. Right-click the cropping area and select it.
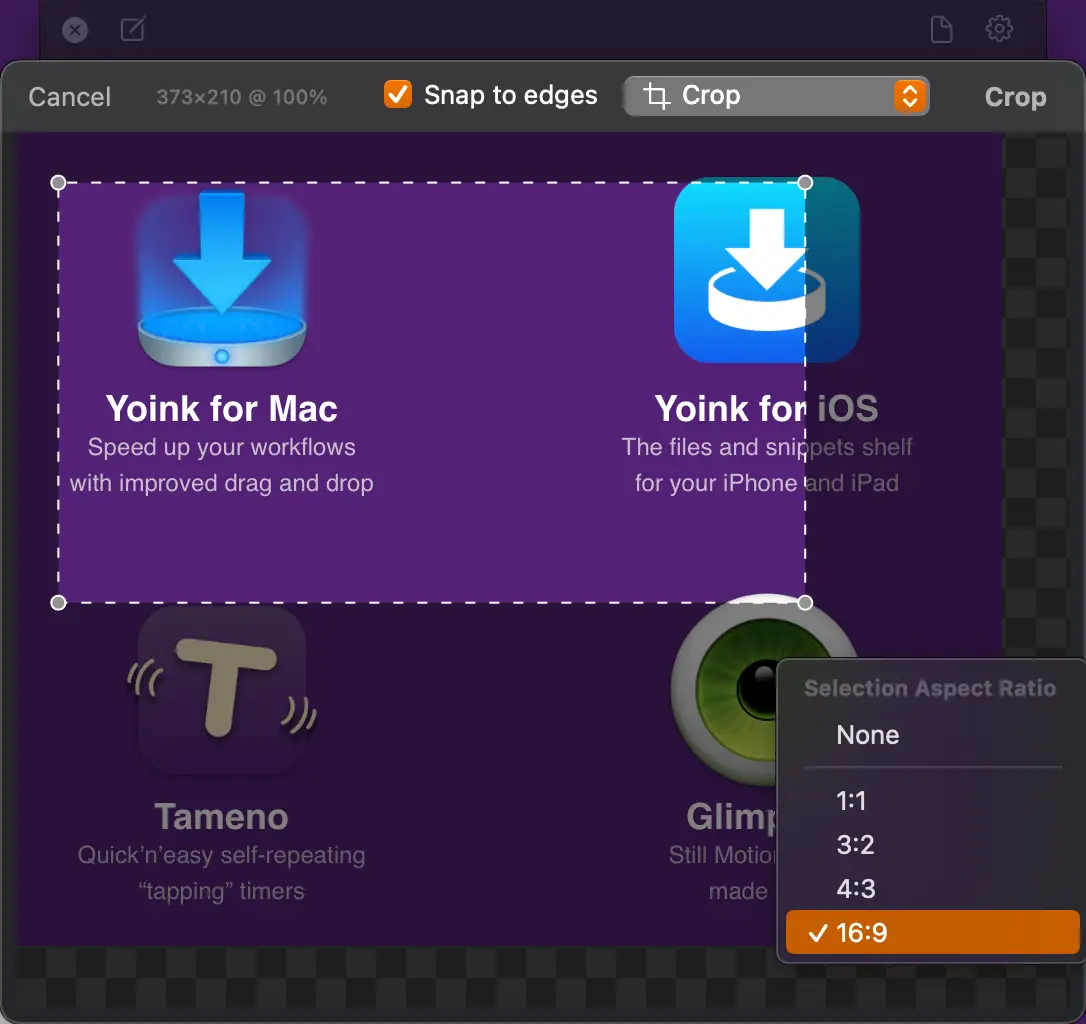
Hold down the option key (⌥) to invert the ration (i.e. 16:9 -> 9:16). Just like when recapturing shots, you can also save and use custom ratios when cropping.
Fold
“Folding” is a concept I came up with trying to remove unwanted parts from screenshots. You fold to remove a vertical or horizontal middle section of an image, and stitch the remaining two parts back together, as if nothing was ever in between.
Before I confuse you even more, here’s a video of it in action:
Note how, in the beginning, there is the “Ratings”bar, and the “Also Included In” bar below Yoink’s icon – both of which I don’t need in our screenshot right now.
So I Crop the shot and select Fold Vertically, which allows me to select a vertical portion of the screenshot I want to remove along the entire width of it. I click Fold, and those two bars that were there before are now gone, and the image is stitched back together.
I then go in a second time and Fold Horizontally, because the screenshot is unnecessarily wide. So I select a horizontal portion along the entire height of the screenshot and click Fold to remove that as well.
Voilá, my finished screenshot! And I didn’t have to manually fumble around to re-align things.
Folding is only available for image shots.
Resize
Resizing screenshots is one of the most common things to do, so it better be quick and easy.
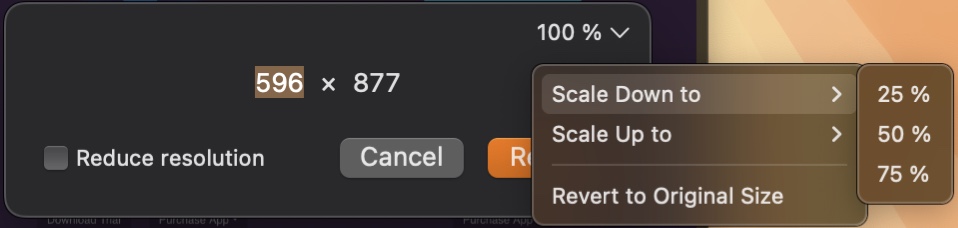
Width and height are ratio locked when you resize a shot, which means that when you enter a new width, the new height will be auto-calculated for you, and vice-versa.
I’ve often found myself in Preview.app wanting to resize to exactly half, or a quarter of the current size. So in ScreenFloat, you can do that, without having to wreck your brain about what half of 200px is. Just select 50% from the menu and it’ll do the math for you.
If you’re scaling an image up, ScreenFloat has the option to make the image larger using the MetalFX Spatial Upscaler, which can yield nicer results than without (depends on the source material). Here’s an example of a screenshot of the word “macOS” having been upscaled without and with the MetalFX Spatial Upscaler:
Reduce Resolution
When you take a screenshot on a Mac’s retina display, its resolution is usually 144 dpi, resulting in a nice and crisp screenshot.
In some situations, you don’t require that high a resolution. Select Reduce resolution, and the shot will be rendered down to 72 dpi, making the file size smaller, but also reducing the quality of the shot.
Rotate
There’s not much to say about this one – you can rotate your image- and video shots clockwise and counterclockwise. That’s it. That’s the feature.
Trim Video
Another one of those self-explanatory things: trim screen recordings’ beginnings and ends, by selecting the section of the recording you’d like to keep.
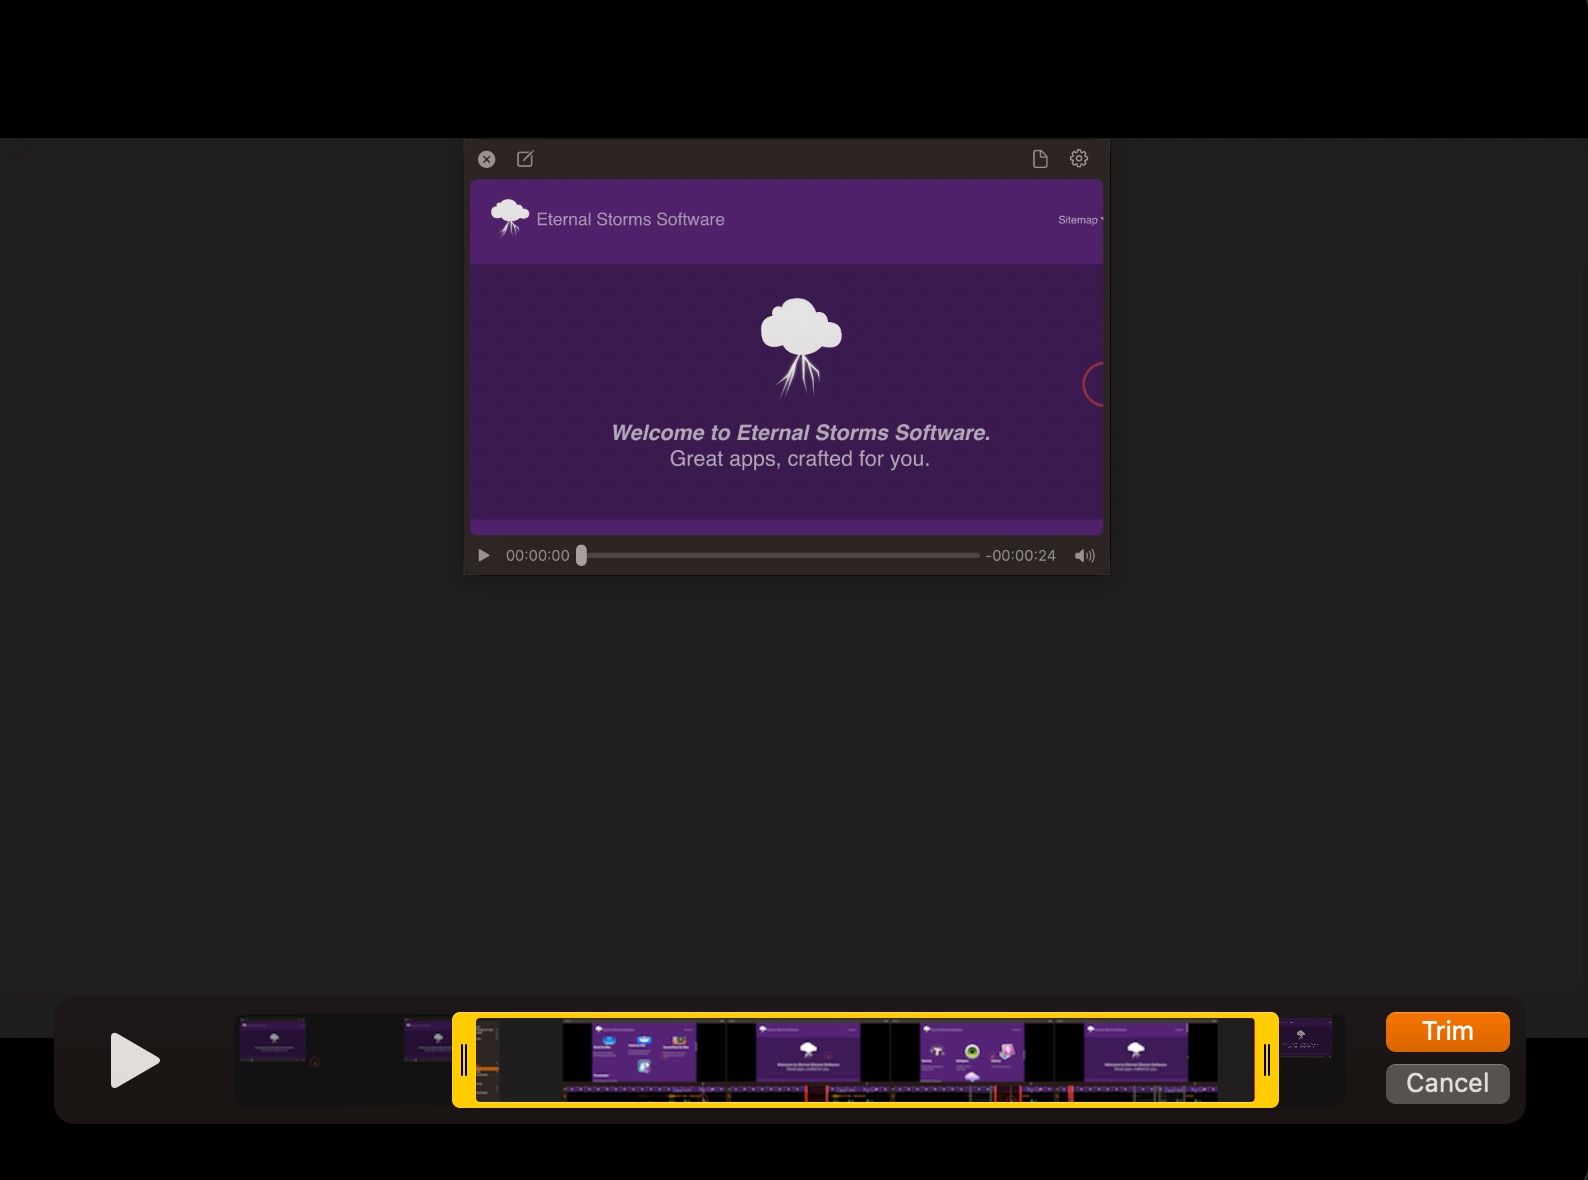
Cut Video
Cut out parts of a screen recording you don’t want to keep: an entire section of video along with all its audio, or maybe just an unintended cough in the microphone audio track; or a notification sound in the system audio track, for example:
You can do this all with your mouse cursor, or frame-by-frame with your keyboard:
- Press the space bar ␣ to play/pause the video
- Press the left ← / right → arrow keys to advance / step through your recording one frame at a time
- Press X to insert a new cut
- Press command – X ⌘ X to move the right end of the selected cut to the playhead
- Press option – X ⌥ X to move the left end of the selected cut to the playhead
- Press shift – command – right arrow ⇧ ⌘ → to move the right end of the selected cut to the right (increasing the cut)
- Press shift – command – left arrow ⇧ ⌘ ← to move the right end of the selected cut to the left (decreasing the cut)
- Press option – shift – left arrow ⌥ ⇧ ← to move the left end of the selected cut to the left (increasing the cut)
- Press option – shift – right arrow ⌥ ⇧ → to move the left end of the selected cut to the right (decreasing the cut)
- Press shift – left arrow / right arrow ⇧ ← / ⇧ → to move the entire cut along the timeline
- Press V to toggle the video track of the selected cut (a dotted line across the track means it will be cut from the recording)
- Press S to toggle the system audio track of the selected cut
- Press M to toggle the microphone audio track of the selected cut
- Press tabulator ⇥ or shift – tabulator ⇧ ⇥ to switch between all cuts
- Press backspace ⌫ to delete the selected cut
Edit Markers
While recording, you can place edit markers on your recording’s timeline so that later on, you’ll know where to cut.
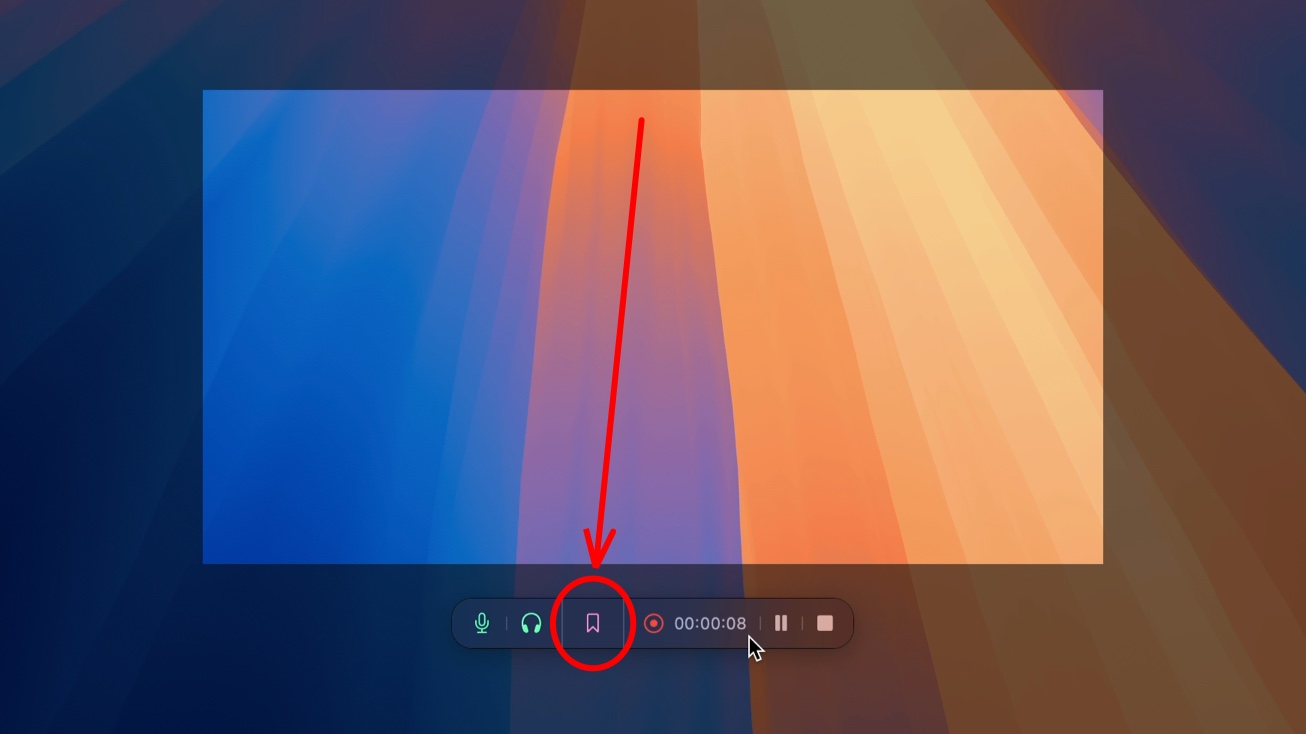
ScreenFloat places markers automatically for you when you change your audio settings, pause the recording, and switch apps or spaces.
In the Cut editor, it’ll look something like this:
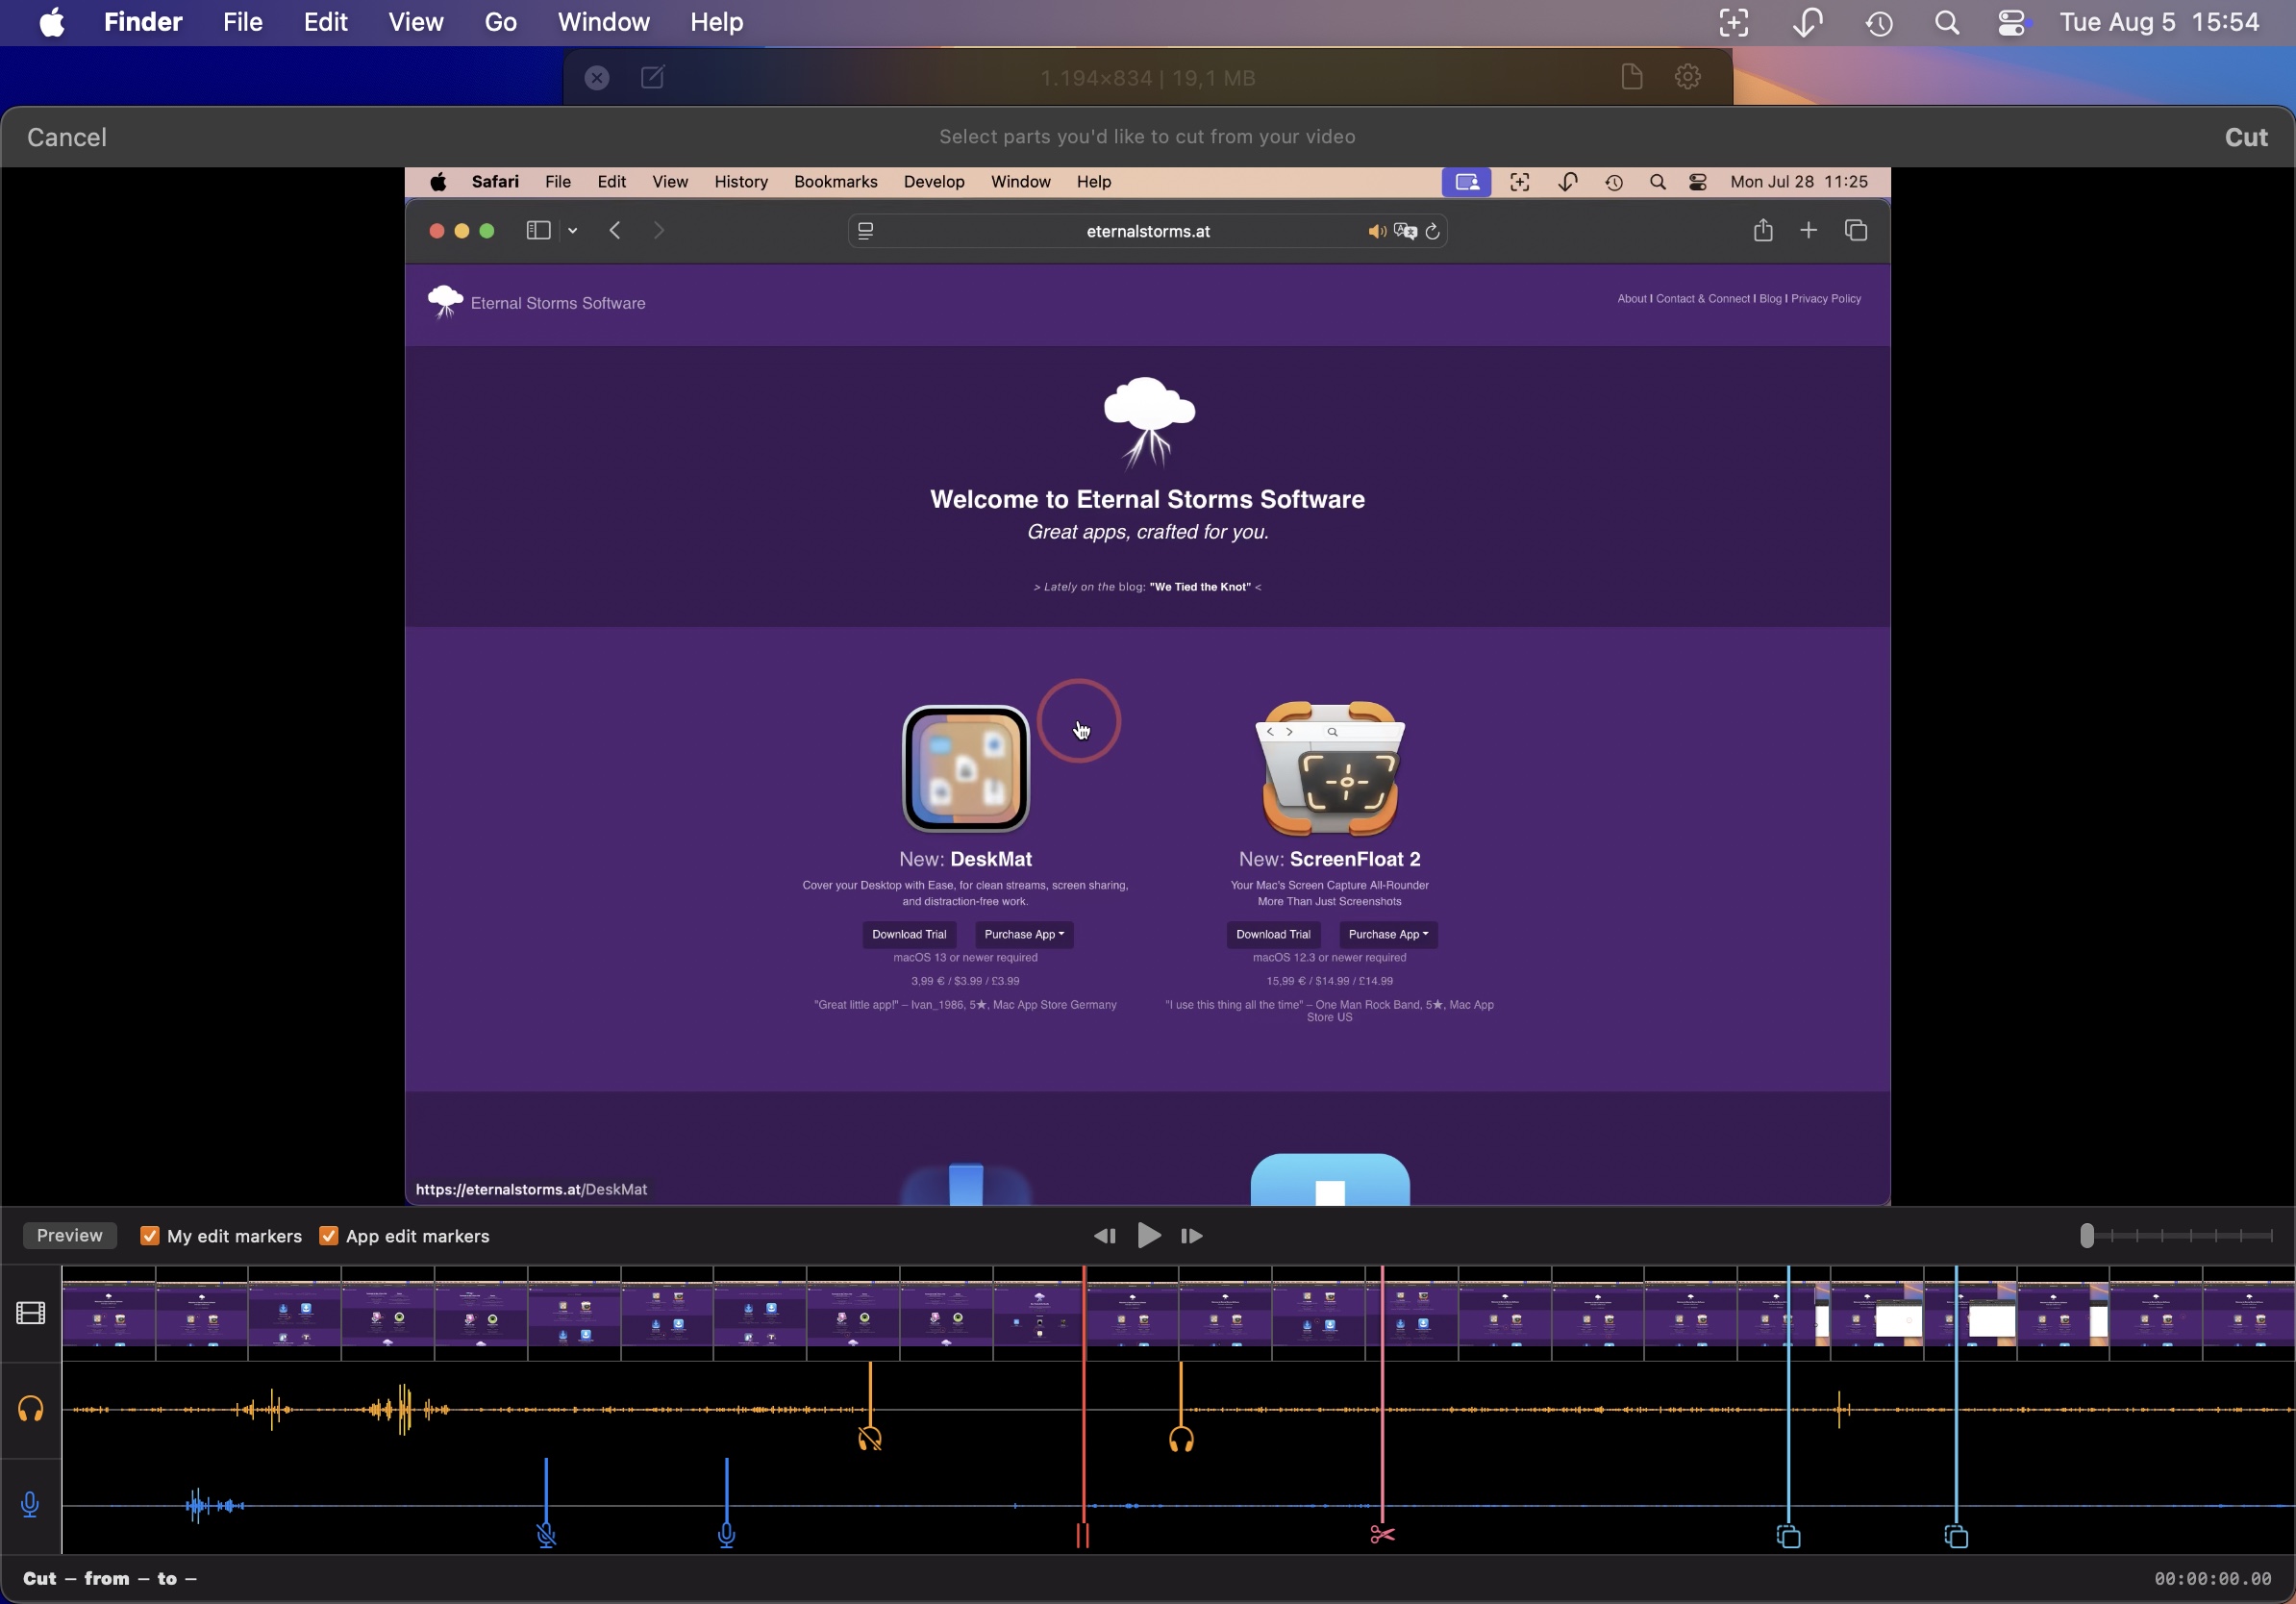
At the bottom of the editor is the timeline. The first row is the video track (white icon), the second is system audio (orange icon) and the third is microphone audio (blue icon).
From left to right, you see the edit markers. The first two are dark blue, with a mic off and on symbol, indicating that here the mic was turned off and then on again.
Following that, there’s an orange marker with a headphones off icon – here, the system audio was turned off. Then there’s a red marker with a pause icon: the recording was paused here. After that, system audio was activated again, a custom (pink) marker was manually placed, and lastly, the active app or space was switched, and then again.
Toggle markers on and off in the timeline using the checkboxes “My edit markers” and “App edit markers”.
Hover over a marker to learn what it means; for instance, a “switched app” marker will tell you what app was switched to.
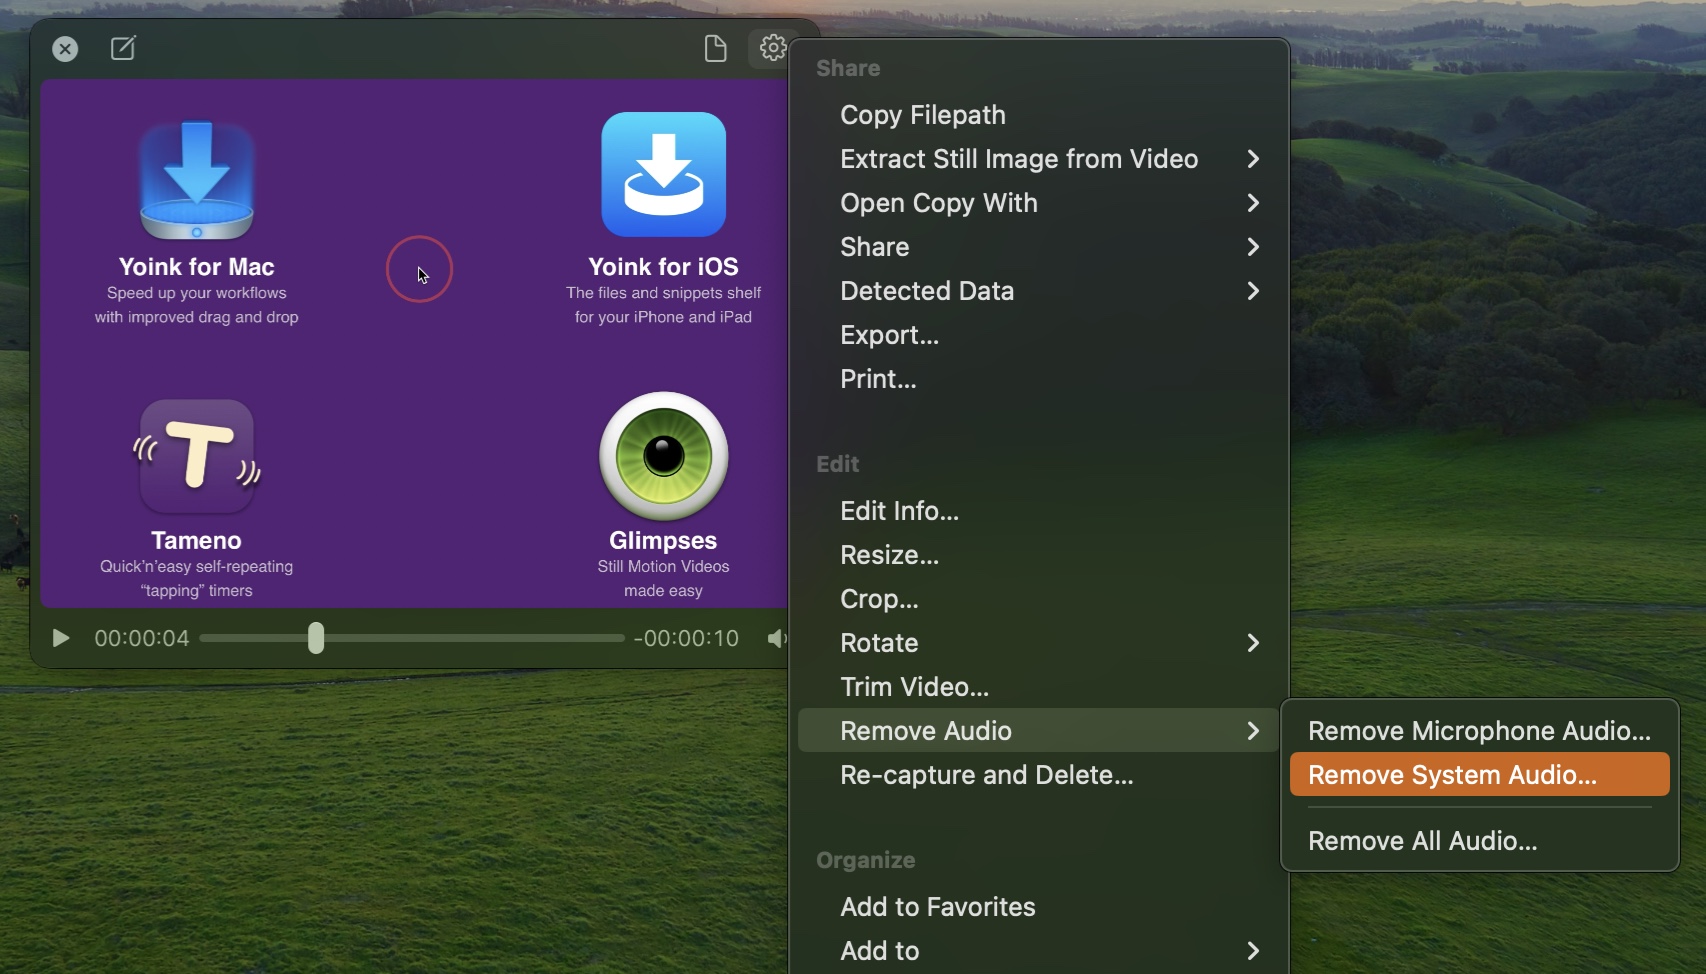
Remove Audio
You can remove a recording’s audio tracks. It is handy when you’ve recorded your microphone along with your recording for internal purposes only, but want to send the video to someone else. Remove its audio tracks, and send it. And if you duplicate the shot first, you’ll still have the original screen recording with the audio track for later.
You can choose between removing all audio tracks, only the microphone track, or only the system audio track:
OCR, Annotations / Markup and Redactions
All redactions and annotations are entirely non-destructive. That means you can always go back in and make changes, or remove annotations entirely and restore the original shot.
QuickSmart Redaction
Let’s begin with “QuickSmart” redaction. Right-click a text line or data (like a link, email, address or number), face or QR code and redact it without any further effort on your part.
I couldn’t decide between “quick” and “smart”, so I just used both. Usually, names are hard, but I got definitely lucky that time.
The type of redaction (blockout, pixellate, blur) used for QuickSmart-redaction is based on what you’ve set up the redaction tool to be when manually annotating. But we’ll get to that in a bit. **
Annotate, Markup, Redact
To begin, right-click a shot (floating, or in the Shots Browser) and select Markup… .
At the top, you’ll find your tools. From left to right, they are:
– Select: Select, move and manipulate one or multiple annotations space bar on your keyboard
– Freedraw 1 on your keyboard
– Rectangle 2
– Oval 3
– Line 4
– Arrow 5
– Star 6
– Checkmark 7
– X-Mark 8
– Text
– Smart Numbered List
– Highlight 9 on your keyboard
– Redact 0
Double-click any of these tools (or press their number on the keyboard twice) to adjust their properties for future annotations. These are the tool’s defaults and used for every new annotation.
Use the Select tool and double-click an annotation (or multiple) to change their properties. This will only affect them, and not become your new defaults.
In the screenshot above, I double-clicked the Redact tool to be able to switch between the Redaction Styles blockout, pixellate, and blur.
If I choose Blockout, the Blockout Color will come into play, which will be used to completely block the part you overlay with this redaction.
** Like I said above, the Redaction Style you select here will be used for QuickSmart redaction, when you right-click a line of text, face or barcode in a floating shot and redact it.
The line-based tools (from freedraw to x-mark) all offer the following properties:
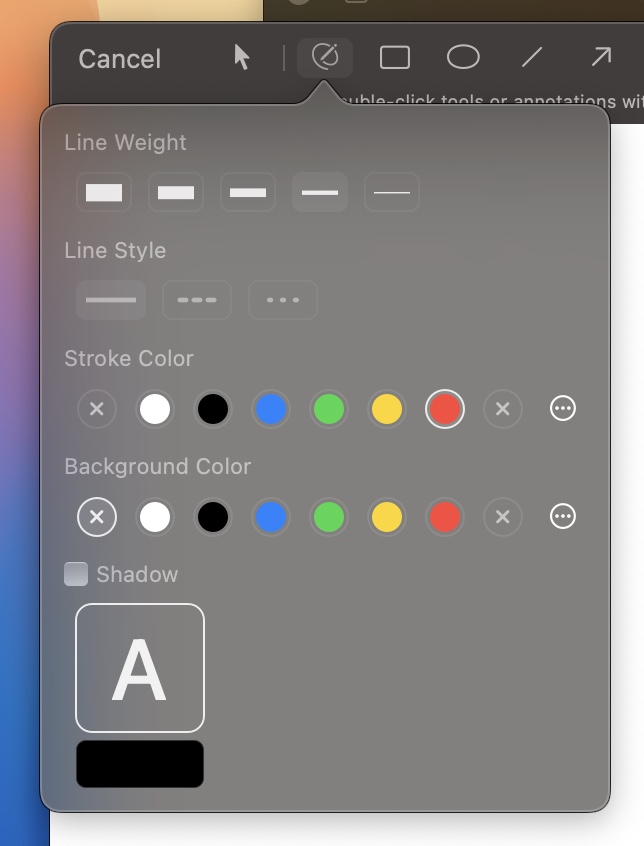
– Line Width: How thick a line to draw (1px, 3px, 6px, 9px, 12px)
– Line Style: Solid, dashed and dotted.
– Stroke Color: The color of the line you’re drawing, the rectangle’s bounds or circle’s outline.
– Background Color: A background for the entire annotation, based on its bounding box.
– Fill Color: Rectangles, Ovals, Arrows, Stars, Check- and X-Marks also offer a fill color.
– Rectangle Corners: For rectangles, you can choose between sharp and rounded corners.
– Arrow Style: For arrows, you can choose between “line arrow”, “shape arrow” and “back-and-forth” arrow
– Check- and X-Mark Corners: Choose between sharp, rounded rect, circle or none.
– Shadow: Add a drop shadow to your annotation object
The Shadow Well works like this: Click-and-drag to move the shadow around. Scroll up and down to adjust its blur. Right-click to reset its position to the center.
Text Annotation
You can change the font, the size, and text- and background colors, and add a drop shadow.
Smart Numbered Lists
This allows you to add self-increasing numbers (or letters) to your image, for example, when writing a mail with instructions on how to perform an action on the computer, you could use this to add steps, like 1, 2, 3, and then reference them in the mail.
You can choose between numbers (1-x) or letters (A-Z, then A1, B1, … Z1, A2, B2, etc), and change their borders, colors, and add drop shadows.
Highlight
You draw a highlight around an object you’d like to draw attention to, by “tuning out” the rest of the image.

You can change the corners of the highlight (sharp, rounded or oval), and the dimming color (all alpha values supported).
Redact
Use the Redact tool to obscure something in a screenshot you don’t wish to share with blockout, pixellate or blur.
Note: Researchers have been able to reverse blur- and pixellate effects to some extent, so for sensitive information, consider using blockout – a solid color to block out what’s underneath.
Select
Use the Select tool to select existing annotations and move them around, manipulate them, or edit their properties.
As you can see above, it’s easy to go back into an already annotated shot and change or remove its annotations, and edit those annotations’ properties with a simple double-click.
Tips
– Annotating supports undo and redo. Press command (⌘) – Z to undo, command (⌘) – shift (⇧) – Z to redo, or right-click to reveal the contextual menu and select it there
– With the Select tool, hold down the option (⌥) key on your keyboard and click-and-drag an annotation (or multiple) to duplicate it and its properties (alternatively, select them and press command (⌘) – D)
– Select all annotations easily by click-dragging with the Select tool onto the background, or by pressing command (⌘) – A on your keyboard
– Delete annotations by selecting them and pressing the backspace / delete key on your keyboard
– If you have an iPad and use Sidecar, you can use your Apple Pencil to make annotations, and you can switch between your current tool and the Select tool by double-tapping the Pencil. Hold down the command (⌘) key and double-tap to select the next tool, or hold down the option (⌥) key and double-tap to select the previous tool (from left to right)
– Move annotations around by click-and-dragging them, or with the arrow keys on your keyboard
– Remember that you can always export and drag shots to other apps with and without annotations
– Annotations/markup and redactions are non-destructive – you’ll always be able to restore the original image, or go in and make changes
– Change an arrow’s direction by holding down the option (⌥) key on your keyboard when you start to draw it (video – first we draw an arrow without the option key pressed, then with)
Up Next
The next part of this series – Part V: Share – Drag and Drop, Link Sharing, Export – takes a detailed look at everything you can do with a simple double-click onto a floating shot. Definitely take a look, there’s a lot of neat stuff there!
Links
ScreenFloat Website (+ free trial & direct purchase)
ScreenFloat on the Mac App Store (one-time purchase, free for existing customers)
ScreenFloat on Setapp (7-day trial, then subscription for 200+ awesome apps)
ScreenFloat Usage Tips
Eternal Storms Software Productivity Apps Bundle (Yoink, ScreenFloat, Transloader and DeskMat at ~20% off)
Contact & Connect
Thank you for your time. I do hope you enjoy ScreenFloat!
[…] Part V […]
[…] with the release of version 2, I took a closer look and found that it includes a variety of other features for working with screenshots that are actually quite […]
[…] Part V […]
[…] Part V […]
[…] Part V […]
[…] Part V […]
[…] Part IV […]
[…] Part V […]
[…] Part IV […]
[…] Read more about cutting videos in Part IV of my “Get to Know ScreenFloat 2” Blog Post series: Edit – OCR, Annotate, Crop, Fold, Resize, Rotate, Trim, Cut and Mute. […]