ScreenFloat for Mac v2.3.7 is now available, a maintenance update improving various areas of the app, and fixing a couple of bugs.
“The most used tool on my Mac”
wendylou @ Mac App Store
What is ScreenFloat?
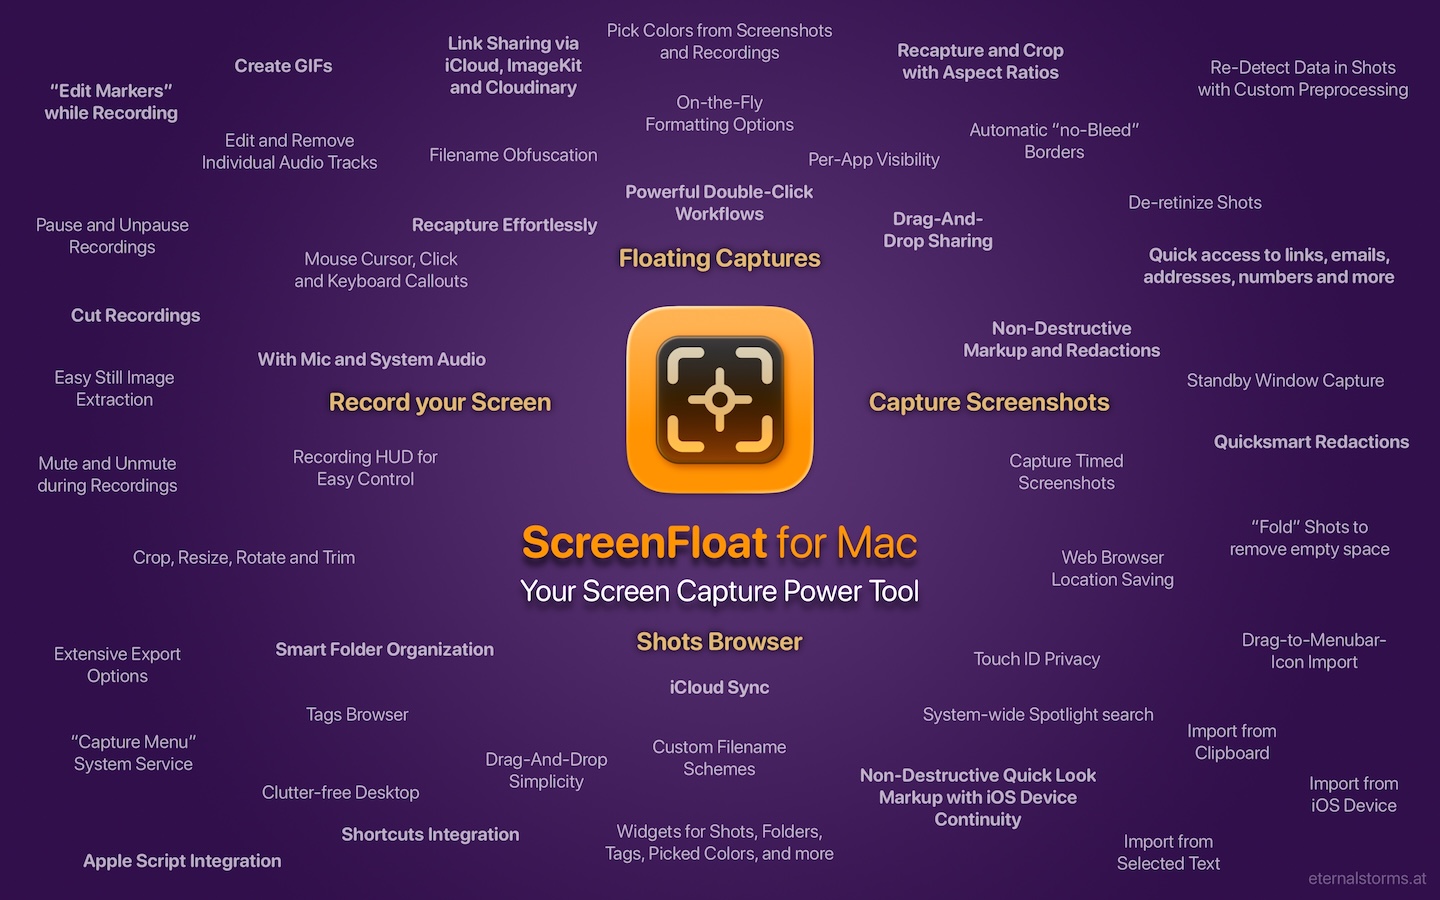
ScreenFloat is your Mac’s Screen Capture Power Tool.
Capture screenshots and recordings that float above other windows, allowing you to reference anything on your screen, anywhere. It’s like Picture-in-Picture, only for screen captures.
It keeps your Desktop clutter-free, as every capture you make is stored in its Shots Browser, where you can manage, organize and find your shots. They’re also synced across your Macs over iCloud.
Easily copy the non-copyable, as ScreenFloat recognizes text, barcode and faces in your shots, which also allows you to effortlessly redact sensitive parts of your screenshots.
Add non-destructive annotations, redactions and markup, crop, “fold“, resize, or de-retinize your shots. Quickly pick colors.
Mute, trim and cut your recordings with the aid of “edit markers” you can place while recording.
Create shareable and embeddable links for your captures using iCloud, ImageKit.io or Cloudinary.com.
And so much more.
A screenshot is just a screenshot. Until you use ScreenFloat.
Tip: Check out the Get to Know ScreenFloat 2 Blog Post series for a deep-dive into its functionality and what it can do for you.
“A brilliant app”
Prof. Brian Whalley @ Mac App Store
What’s New in ScreenFloat v2.3.7
- A new, fast way to copy floating shots easily (or their text content)
This, of course, is in addition to the contextual menu, and the double-click actions available - When zooming in while cropping shots, the selection rectangle no longer zooms with the view
- Streamlined copying shots; there’s no need anymore to explicitly copy the file, or the data
- Fixes a bug where ScreenFloat wouldn’t remember ImageKit.io and Cloudinary credentials
- and more!
👉 For the full release notes, please click here 👈
“Brilliant. Useful. Amazing.”
dan38882 @ Mac App Store
Links and Availability
ScreenFloat is a one-time purchase on the Mac App Store or my website for currently USD 17.99 / EUR 19,99 / GBP 17.99.
It is also part of Setapp.
There is no difference in functionality between the different versions.
As with all previous updates, v2.3.7 is completely free for existing customers.
A free, 28-day trial is available for download.
ScreenFloat requires macOS 12.3 Monterey (macOS 14 Sonoma recommended for full functionality)
A (free) iCloud account is required if you want to sync your ScreenFloat library across your Macs.
ScreenFloat is currently localized in English, German, Chinese (Simplified), and Dutch.
🔗 ScreenFloat Website + Free Trial + Direct Purchase
🖥️ ScreenFloat on the Mac App Store
➡️ ScreenFloat on Setapp (offers a 7-day trial for all 200+ apps, including my Mac apps Yoink and Transloader)
🤩 Eternal Storms Software Productivity Bundle on the Mac App Store (includes ScreenFloat, Yoink for Mac, Transloader and DeskMat at ~20% off)
📖 Get to Know ScreenFloat 2 Blog Post Series | User Guide
💡 ScreenFloat 2 Usage Tips
A note on in-app purchases in the Mac App Store version: These are completely voluntary tips you can give me to support me and the development of my apps beyond the one-time purchase price. No additional functionality can be unlocked by giving tips. Your one-time purchase gives you to the complete functionality of ScreenFloat.
“An app that I honestly don’t know how I lived without it”
Chariklia M. @ Setapp
I hope you enjoy ScreenFloat (and my other apps) : )
“One of my most used Apps!”
paradox2222 @ Mac App Store