Long story short, I done goofed: A bug snuck into my trial time code and ended it early for some users. If you experienced this, please feel free to re-download the trial from the website (direct download here) for another, full 28-day trial. My apologies for the inconvenience!
Let’s take a tour through ScreenFloat and see how it can power up your screenshots, too.
ScreenFloat for Mac – Your Screen Capture Power Tool All-Rounder
ScreenFloat powers up your screenshots by allowing you to take screenshots and recordings that float above everything else, keeping certain information always in sight. Its Shots Browser stores your shots and helps you organize, name, tag, rate, favorite and find them. Everything syncs across your Macs. Extract, view and copy detected text, faces and barcodes. Edit, annotate, markup and redact your shots effortlessly and non-destructively. Pick colors any time. And more.
Part VII – Widgets, Siri Shortcuts, AppleScript, Workflows, Spotlight
ScreenFloat integrates perfectly with macOS, so you can easily and comfortably capture and access your shots any way you want to. Read on to learn how.
ScreenFloat offers you a number of widgets, ranging from quick access to capturing your screen and managing your floating shots, over quickly accessing your shots, to folders and picked colors.
Command and Control
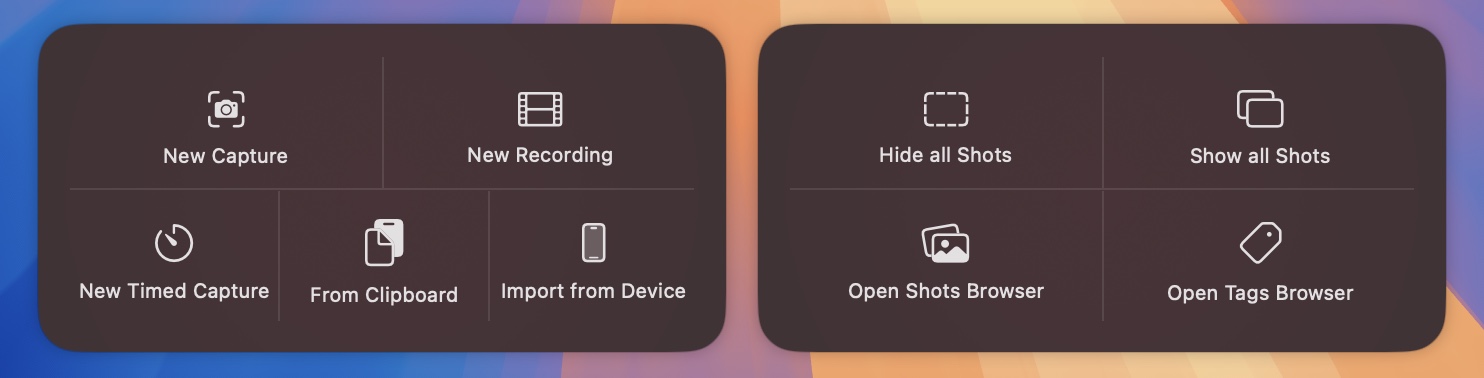
These widgets allow you to control all aspects of ScreenFloat – capture new shots and recordings, manage your floating shots and open the Shots- and Tags Browser. These might be especially useful placed on your Desktop, if you’re on macOS 14 Sonoma or newer.
Quick Access to Shots
With “Shot”-family of widgets, you get quick access to:
Favorite Shots
Recently Captured Shots
Shots in a specific folder
Recently closed floating shots
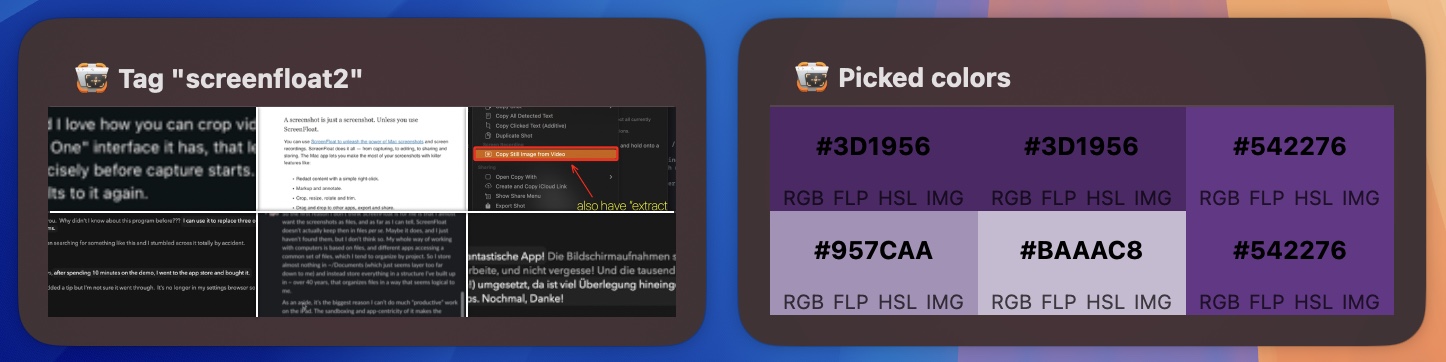
Shots tagged with a specific tag
Clicking a shot will reveal it in the Shots Browser.
Tags and Colors
And lastly, you can have quick access to your favorite tags, and recently picked colors. Clicking a tag in the Favorite Tags widget will reveal it in the Tags Browser. The color widget allows you to copy a color’s hex-, rgb-, float- or hsl values, or a sample color image.
Siri Shortcuts
To integrate capturing your screen into a Shortcut, ScreenFloat comes with a couple of useful Shortcuts to help you do that.
Here are ScreenFloat’s shortcuts available to you:
Capture Shot Allows you to automate capturing a screenshot, timed screenshot, or screen recording.
Options include:
Float shot whether to float the new shot after capture or not
Title
Notes
Tags
Recapture previous area if, instead of starting a new capture, the last known screen area should be preselected for the capture
Add to Folder select a folder to add the newly created shot to
After Capture what should happen right after capture. Current options are: do nothing, Annotate Shot, Crop Shot, Resize Shot, Reduce resolution, Trim Recording, Cut Recording, Create iCloud Link, Create ImageKit Link, Create Cloudinary Link
New Shot from Clipboard Create a new shot from the contents of your clipboard: images, videos, or text.
Import Files Import specific image or video files into ScreenFloat, with the same options as Capture Shot.
Hide / Unhide Floating Shots, Close All Floating Shots Manage your floating shots’ visibility.
URL Scheme
ScreenFloat’s URL scheme gives you access to all of ScreenFloat’s capturing functionality from the comfort of a URL, allowing you to automate captures in your own style.
For all the available options and instructions, please click here.
AppleScript
ScreenFloat allows you to run Application Scripts (AppleScripts that reside in a special folder on your Mac) as a double-click workflow, passing in a copy of the double-clicked shot, along with a couple of other parameters. For all the details and instructions, click here.
This opens up a wide possibility of options to you, like creating your own Link Share service, uploading the shot to your server and copying a link to it to your clipboard, or direct-pasting shots into the active app’s window.
As coincidence has it, here are, coincidentally, two sample scripts that allow you to do exactly that.
Sample AppleScript to upload the double-clicked Shot to FTP server and copy link to pasteboard (direct download) Uses the passed-in fileURL and uploads it to your FTP server, copying the link to it to your clipboard afterwards
Sample AppleScript to direct-paste the double-clicked Shot into the active app’s active window (direct download) Emulates a command-v keypress for the active app. Best used together with a Copy Shot double-click action so you don’t have to copy the fileURL in the script.
You can also run Shortcuts with your shots as a double-click action. Read on for more information on both AppleScripts and Shortcuts as Double-Click actions.
Double-Click Workflows
From time to time, you’ll find yourself doing something over and over again, like resize an image before you send it in an email, or crop an image before you annotate it, or duplicate a screen recording before you remove its audio tracks. ScreenFloat speeds that up by providing customizable double-click workflows for your floating shots.
Setting up Double-Click Workflows
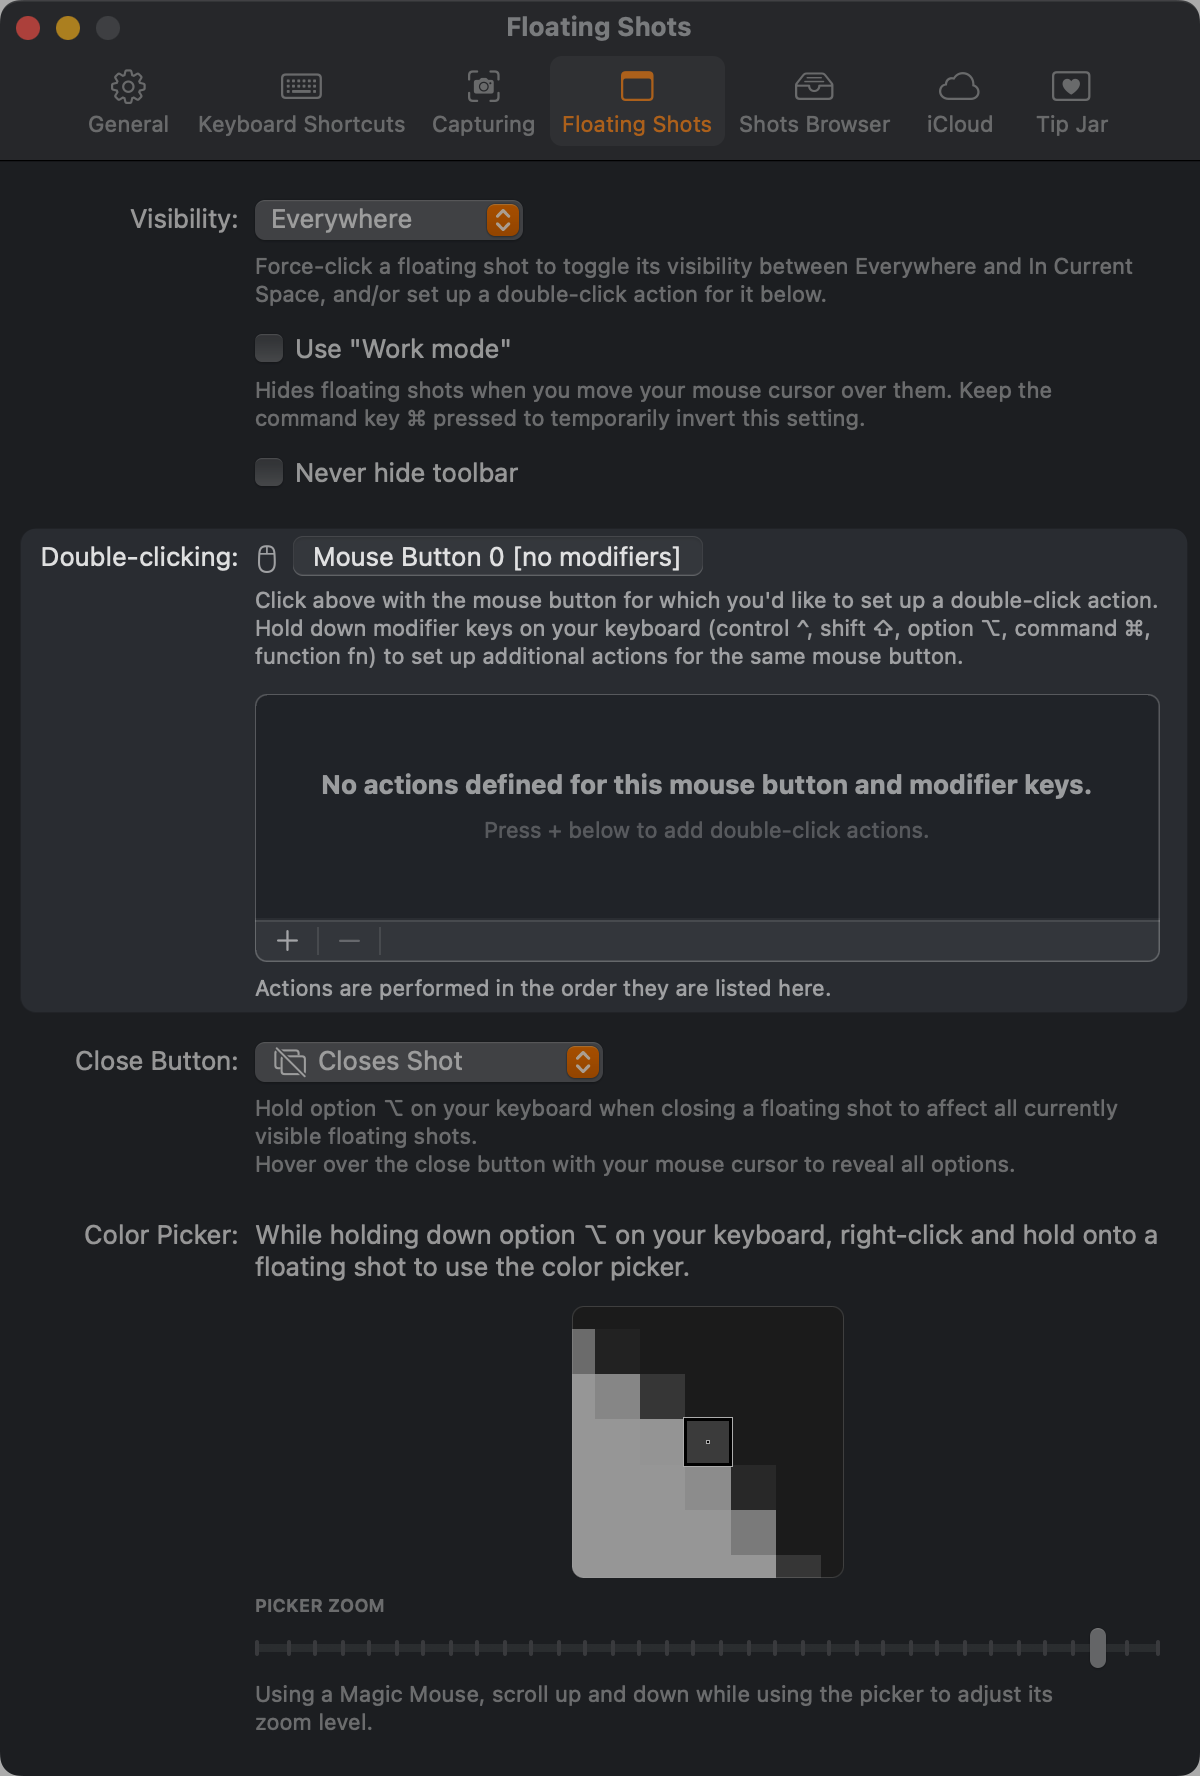
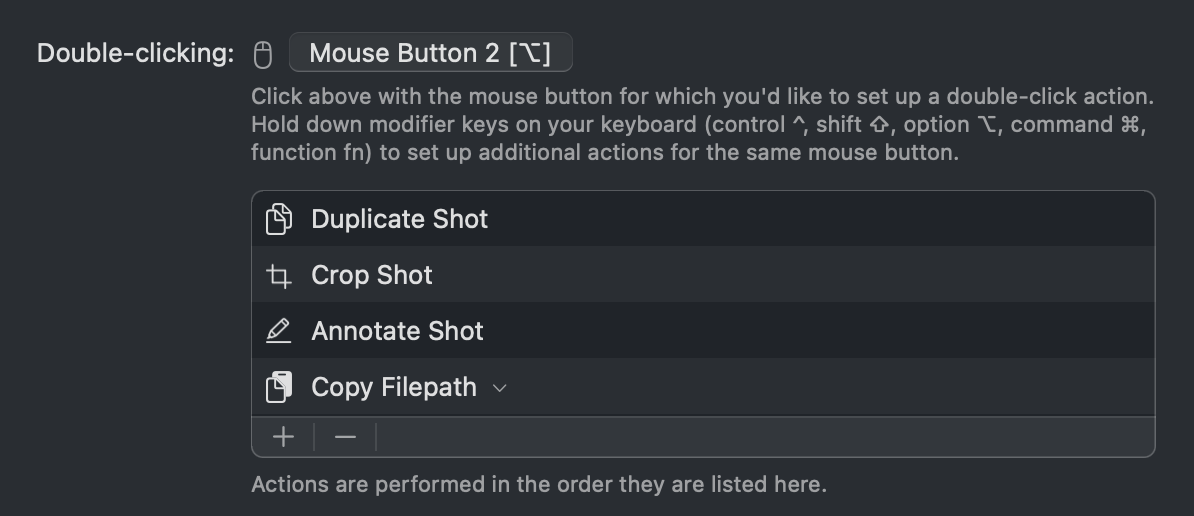
Double-Click workflows are set up in ScreenFloat’s settings. You can reach them by clicking on ScreenFloat’s menu bar icon in the right portion of your menu bar; or by right-clicking any floating shot; or by pressing command (⌘) – , in the Shots Browser. Select Floating Shots, and you’ll be ready to get going:
You can set up double-click workflows for different mouse buttons, and different modifier keys on your keyboard (command (⌘), option (⌥), control (^), shift (⇧) and fn). For instance, you can set up workflows for your left mouse button with no modifier keys pressed (a simple double-click onto the floating shot), or your middle mouse button with command (⌘) and shift (⇧) pressed. This allows you to set up not just one, but multiple double-click workflows, tailored to different situations or requirements.
To add a double-click action to a workflow, hold down the modifier keys of your choice (or none) and press the mouse button area at the top of the list with the desired mouse button. Then press the + button at the bottom of the list to select actions you’d like to perform on the floating shot you double-click.
Switching through a couple of double-click actions for different mouse buttons and modifier keys.
The – button allows you to remove selected actions from the current workflow, remove all actions from the current workflow, or completely reset all your double-click workflows.
Available Actions
Actions in a workflow are performed in the order they appear in the list when you add them. This order is more or less pre-defined and cannot be changed: for instance, the Duplicate Shot action is always added to the top of the list, and thus, performed first when the double-click workflow runs. On the other hand, Copy as File is performed last, so you can have a double-click workflow where you crop, resize and annotate a shot, and after that, that newly edited shot is copied.
Here, we set up a workflow for when we double-click a shot with the middle mouse button and the option modifier key pressed. It will duplicate the shot first, then allow for cropping and annotation, then copies the resulting image file.
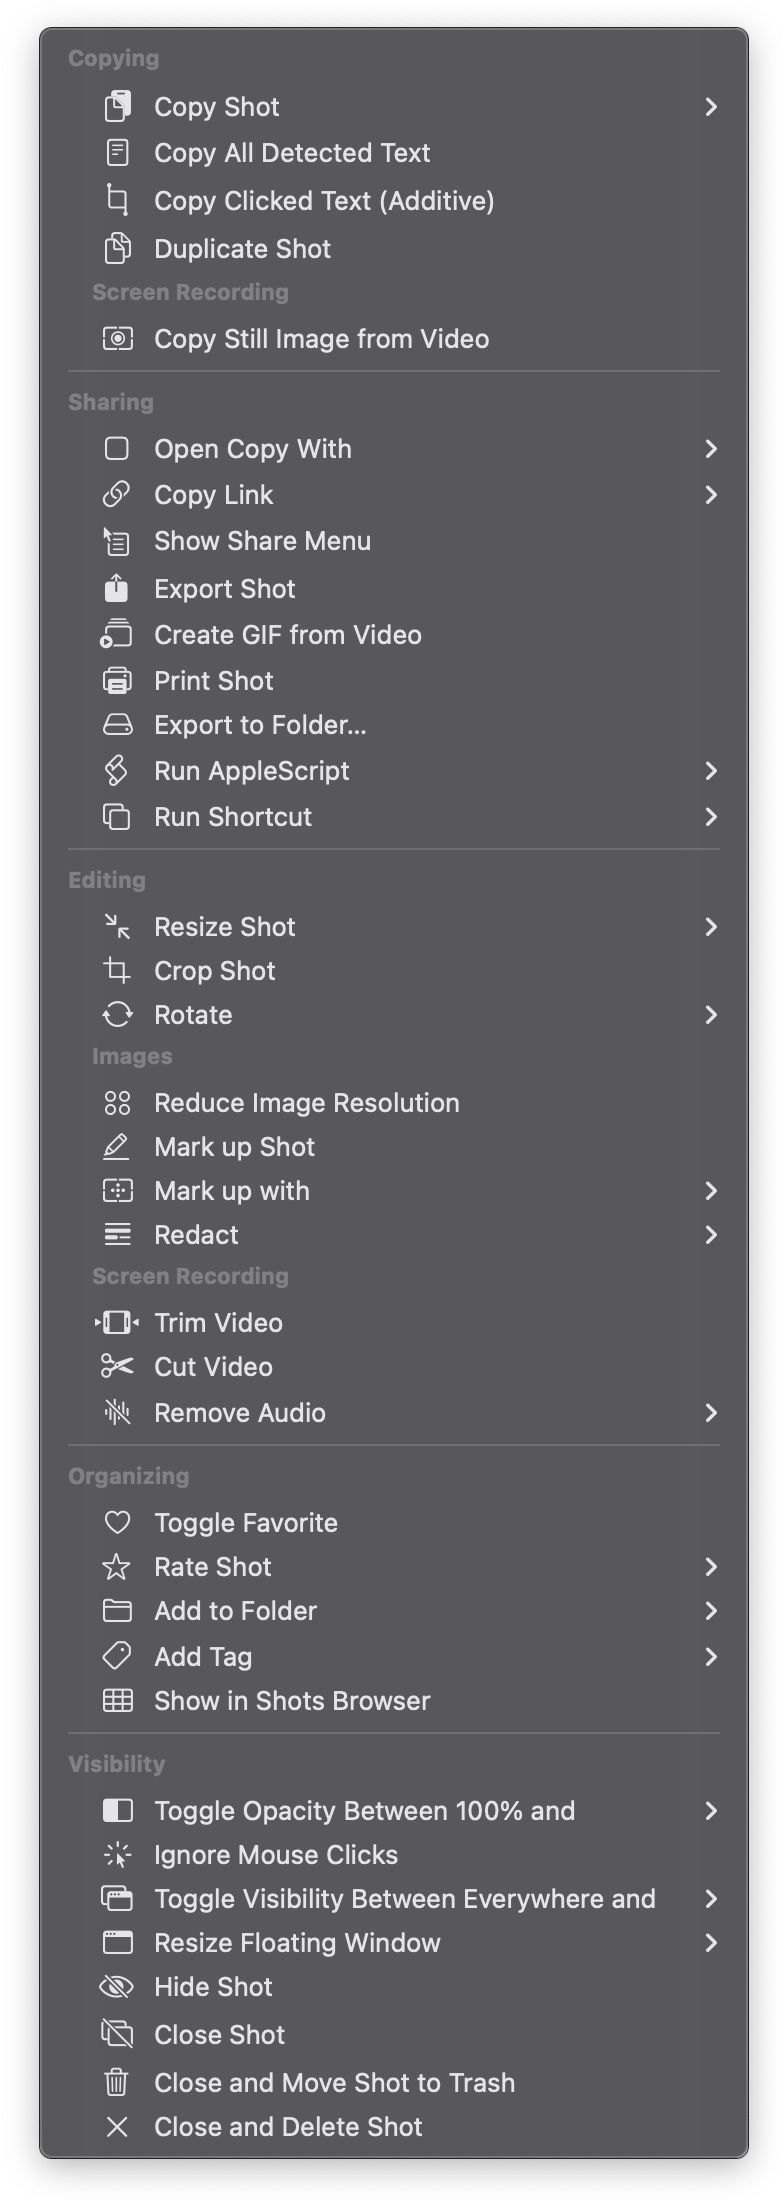
Let’s go over the list of available actions.
Some of these actions are only available when image shots are double-clicked: – Reduce image resolution – Annotate Shot while others are only available for screen recordings: – Copy Still Image from Video – Create GIF from Video – Trim Video – Cut Video – Remove Audio (All, System, Mic)
Let’s go over them:
Copy Shot Copy the shot as a file path, or as data (in the case of images)
Copy Clicked Text (Additive) When you double-click a text line in a shot with this active, that text line gets copied. Double-click another in the same shot, and it gets added to the previous copy.
Copy Still Image from Video Copies the currently displayed frame in a floating video shot.
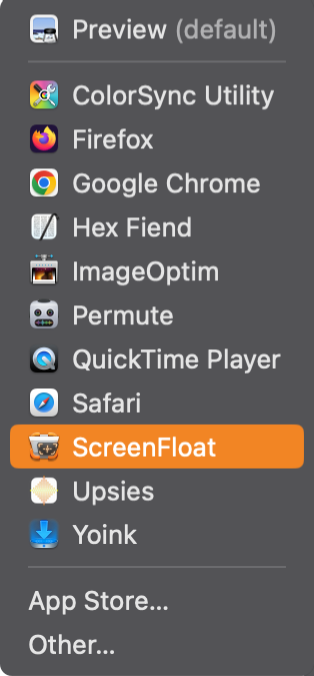
Open Copy With Allows you to specify two apps: one for image shots, and one for video shots.
Export to Folder Lets you select a folder on your disk to save the double-clicked shot to in its native PNG format right away.
Run AppleScript Run an AppleScript with a copy of the double-clicked shot. Read instructions here.
Run Shortcut Run a Siri Shortcut with a copy of the double-clicked shot.
Resize Shot Allows you to specify a percentage to resize to (25%, 50%, 75%, 125%, 150%, 175%, 200%), or to resize it manually.
Rotate Rotate the shot clockwise, or counterclockwise.
Mark up with Adds the selected symbol (checkmark, xmark, or smart numbered list) to the shot at the clicked location.
Redact Redacts the clicked information, text, barcode or face.
Rate Shot Specify a rating to give the shot when double-clicking it (from no rating to 1-5 stars).
Add to Folder Specify a folder the shot should be added to, or let the double-click show the folders menu so you can select one on the fly.
Add Tag Specify a tag to tag the double-clicked shot with, or show the Tags menu to select one on the fly.
Toggle Opacity Between 100% and Select an opacity level all the way down to 40% to toggle between with a double-click.
Ignore Mouse Clicks Makes the double-clicked shot ignore mouse clicks until reverted.
Toggle Visibility Between Everywhere and Select “Current Space” or “Currently Active App” as an option. Double-click to set it to, say, Currently Active App, then double-click it again to toggle it back to Everywhere.
Resize Floating Shot Window Allows you to resize the floating shot window down or up in increments, or reset it to 100%.
Some actions are mutually exclusive. For instance, you can’t have both Copy All Detected Text and Copy Clicked Text in one and the same action, because one would override the other, and only the last operation would “take”.
Running a double-click workflow on a floating image shot that automatically reduces the shot’s resolution to 72 dpi, then asks me to resize it, then to crop/fold it, and then shows the Share menu.
Spotlight
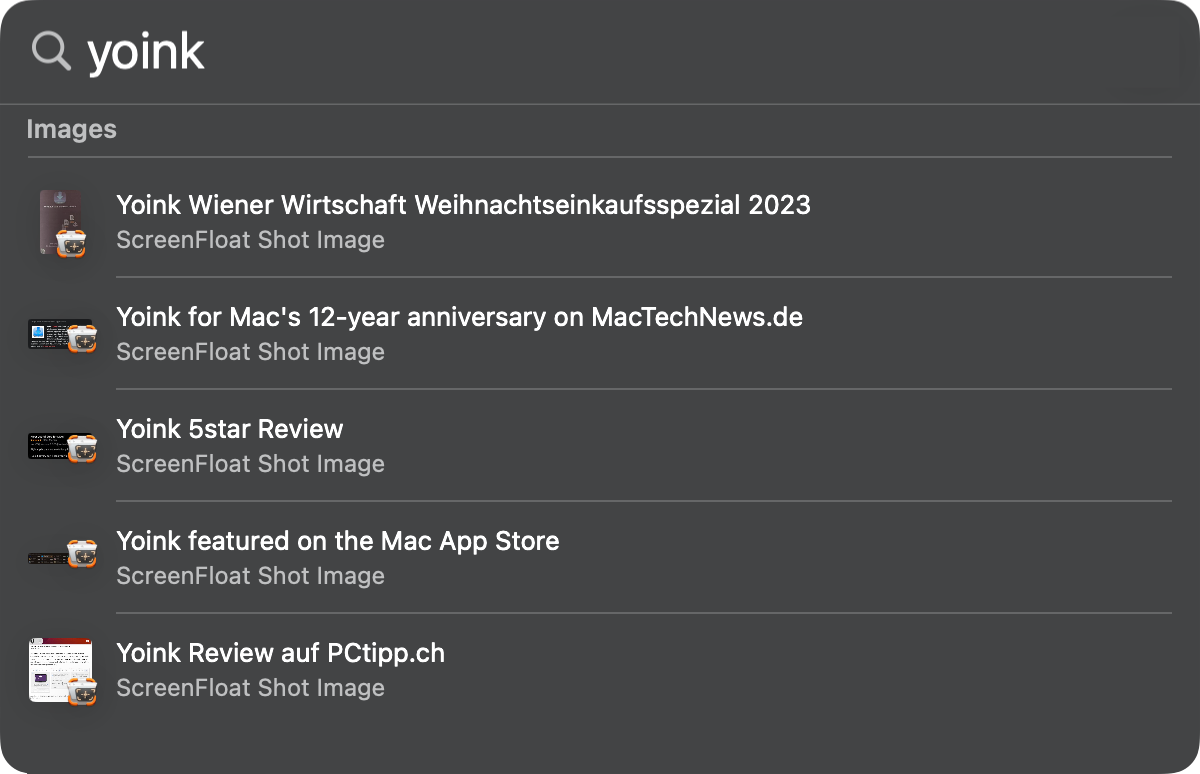
ScreenFloat optionally indexes your shots and their metadata with Spotlight, so you can find them system-wide.
ScreenFloat Shot search results in Spotlight
The neat thing about this is that it not only allows you to search by shots’ metadata (title, notes, tags), but also their detected text/barcode content, as well as any text annotations you have made.
Selecting a search result reveals it in your Shots Browser, where a double-click onto it, or the enter/return key on your keyboard will float it right away if you like.
Application Services
ScreenFloat comes with a couple of system services that make it easier to import and float image or video files, even text, or extract still images from videos.
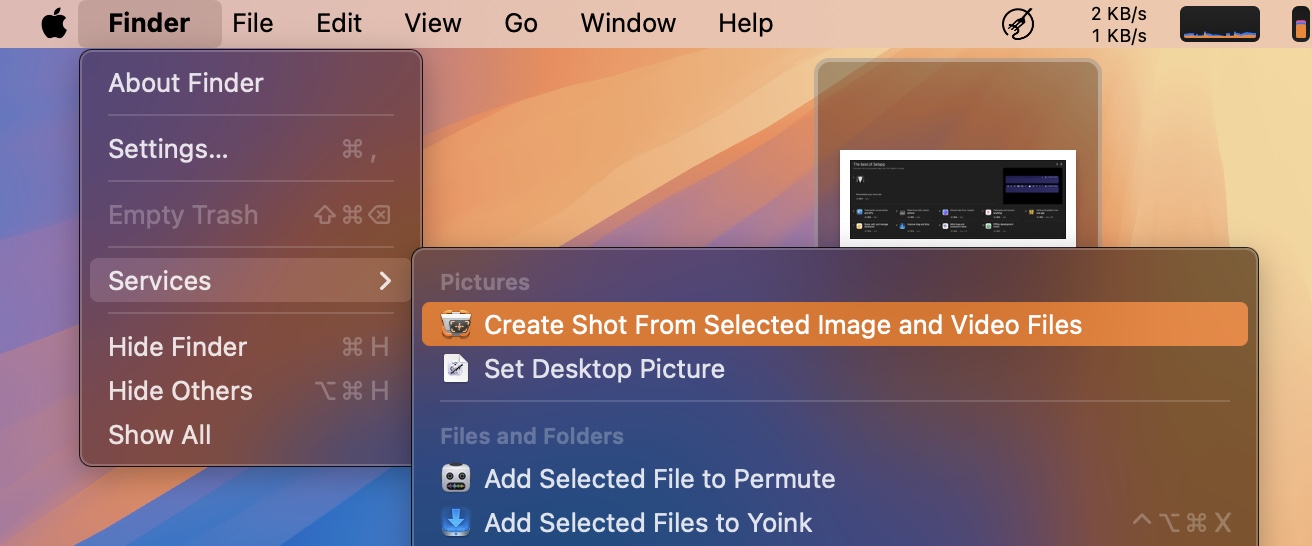
Float Image/Video File from Finder
To float an image or video file in ScreenFloat (and import it along the way), select the file(s) in Finder, then select Finder > Services > Create Shot From Selected Image and Video Files in your menu bar.
Create a Floating Shot from Selected Text
Quickly make a floating note of some text with ScreenFloat – select the text and select Services > Create Shot from Selected Text in the application’s app menu. (By the way, you can also do this for text copied to your clipboard from ScreenFloat’s menu bar icon.)
Extract Still Images from Movies playing in QuickTime Player
It’s easy enough to just take a screenshot of the player window with ScreenFloat to capture a still image of the playing video, but it’s even easier with ScreenFloat’s service. Select QuickTime Player > Services > Extract Still Image From QuickTime Player Movie and ScreenFloat will create a still image of the playing movie at the current playback position.
Capture menus and submenus
Capturing a menu and its submenus on its own has become increasingly difficult – perhaps even impossible – with the more recent versions of macOS. It’s very tricky to capture the menu itself without its host window. ScreenFloat offers a system-wide service that allows you to capture a menu and its submenus in its entirety, or just specific submenus, when you don’t need the entire hierarchy.
Note on how it works: After you select the service “Capture Contextual menu…”, ScreenFloat will wait 10 seconds for a menu to appear (if there’s no menu after 10 seconds, ScreenFloat will cancel the capture). Once a menu appears, you have 3 seconds to navigate to the next submenu, and then again 3 seconds to navigate to the next submenu, and so on. After 3 seconds of no change in menus, the capture will be made.
That’s a Wrap
Whew, what a journey. Congratulations, you now know everything there is to know about ScreenFloat – you can now get the most out of it, I’m sure! Consider these posts living documents that I’ll keep up-to-date with the changes made to the app, so you’ll always know where to go if something’s unclear. Speaking of unclear, if you have any feedback or questions, please do not hesitate to write me – I’d love to hear from you.
Let’s take a tour through ScreenFloat and see how it can power up your screenshots, too.
ScreenFloat for Mac – Your Screen Capture Power Tool All-Rounder
ScreenFloat powers up your screenshots by allowing you to take screenshots and recordings that float above everything else, keeping certain information always in sight. Its Shots Browser stores your shots and helps you organize, name, tag, rate, favorite and find them. Everything syncs across your Macs. Extract, view and copy detected text, faces and barcodes. Edit, annotate, markup and redact your shots effortlessly and non-destructively. Pick colors any time. And more.
Part IV: Edit – OCR, Annotate, Crop, Fold, Resize, Rotate, Trim, Cut and Mute
At some point, you will want to crop, resize, rotate or annotate your shots. Perhaps you might want to trim your videos, or remove individual audio tracks. Read on to learn how ScreenFloat makes this easy and pain-free for you.
To edit a shot, right-click it (either in the Shots Browser, or a floating shot itself) and select the according option in the menu.
Convenience Feature: Whenever you feel like you might want to create a backup before making changes to a shot (like cutting or trimming a video, or removing its audio tracks), you can duplicate it beforehand. Right-click the shot, hold down the option (⌥) key and select Duplicate.
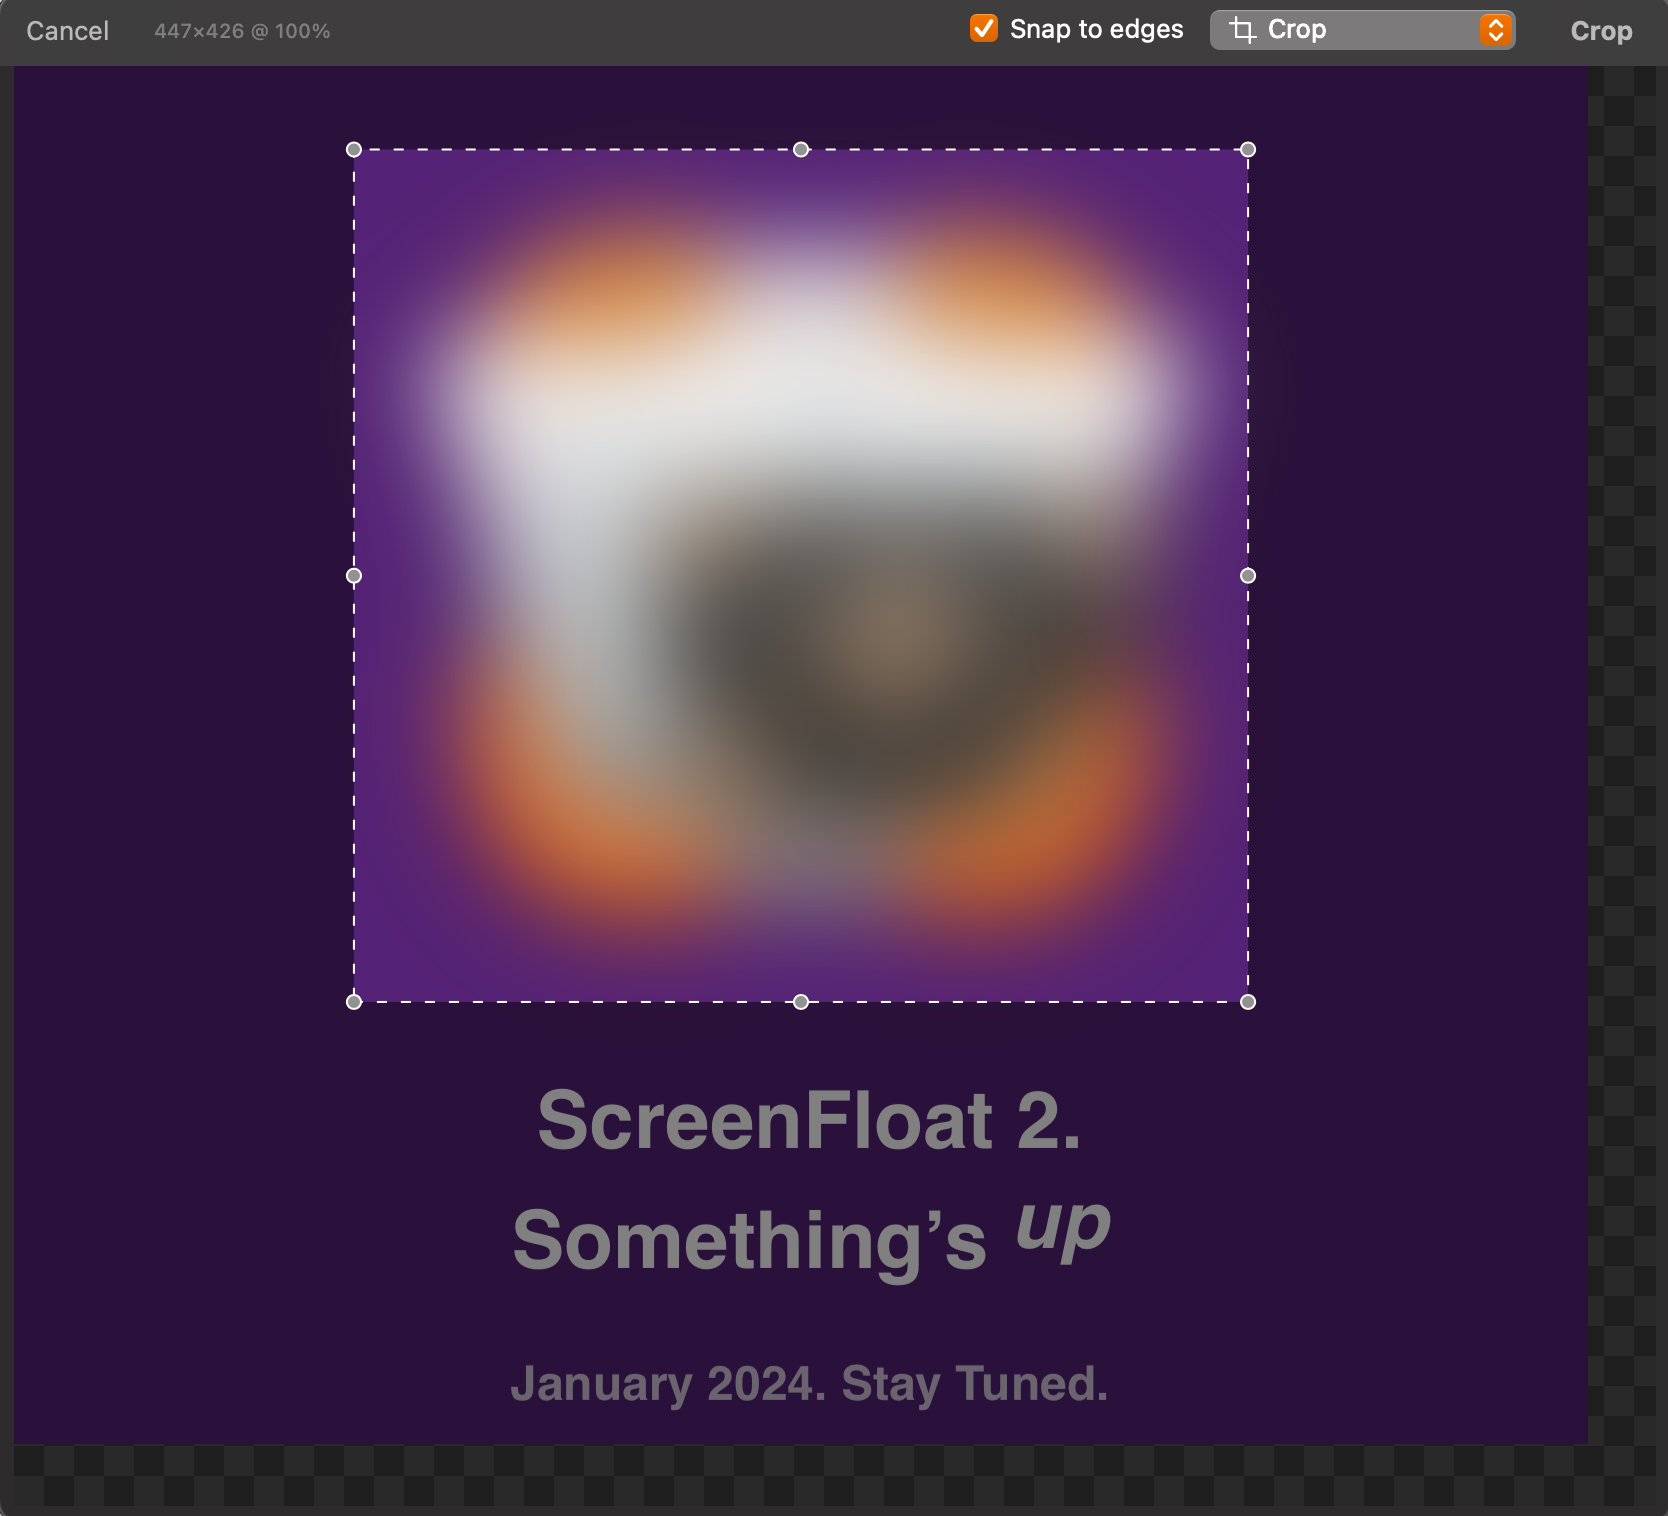
Crop
Cropping allows you to crop away unwanted edges of your screenshots or recordings.
At the top left, you’ll see the dimensions of your selection, and the current zoom level
Snap to edges can help you crop at just the right edge of a window, for example
Usage Tip: Hold down the command (⌘) key to temporarily disable snapping while changing the selection rectangle
While changing the cropping rectangle, hold down the option (⌥) key to change its size around its center point
Click and drag the area of your selection rectangle to move it around
Press command(⌘) – c to copy the selected area, or right-click and select Copy
You can adjust the rectangle with your keyboard’s arrow keys, too:
Up, down, left, right moves the rectangle up, down, left, right by 1px. Hold down the shift (⇧) key to increase it to 5px.
Up, down, left, right while holding down the option key (⌥) increases or decreases the selection rectangles width or height by 1px. Hold down the shift (⇧) key to increase it to 5px.
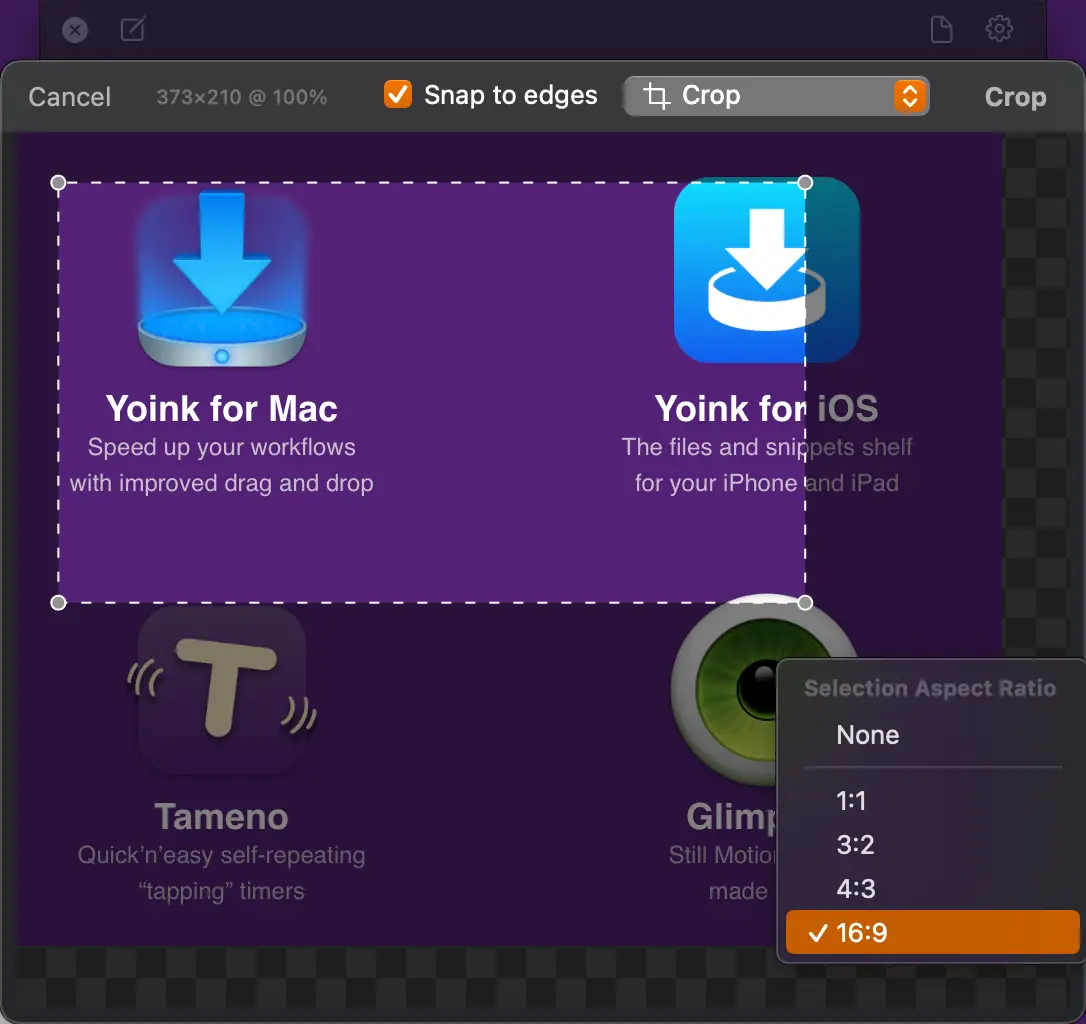
Aspect Ratios In case you require a specific aspect ratio, ScreenFloat has you covered for the most popular of them. Right-click the cropping area and select it.
Hold down the option key (⌥) to invert the ration (i.e. 16:9 -> 9:16). Just like when recapturing shots, you can also save and use custom ratios when cropping.
Fold
“Folding” is a concept I came up with trying to remove unwanted parts from screenshots. You fold to remove a vertical or horizontal middle section of an image, and stitch the remaining two parts back together, as if nothing was ever in between. Before I confuse you even more, here’s a video of it in action:
Note how, in the beginning, there is the “Ratings”bar, and the “Also Included In” bar below Yoink’s icon – both of which I don’t need in our screenshot right now. So I Crop the shot and select Fold Vertically, which allows me to select a vertical portion of the screenshot I want to remove along the entire width of it. I click Fold, and those two bars that were there before are now gone, and the image is stitched back together. I then go in a second time and Fold Horizontally, because the screenshot is unnecessarily wide. So I select a horizontal portion along the entire height of the screenshot and click Fold to remove that as well. Voilá, my finished screenshot! And I didn’t have to manually fumble around to re-align things.
Folding is only available for image shots.
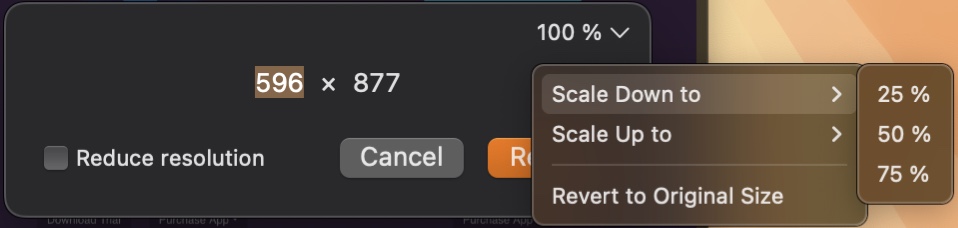
Resize
Resizing screenshots is one of the most common things to do, so it better be quick and easy.
Width and height are ratio locked when you resize a shot, which means that when you enter a new width, the new height will be auto-calculated for you, and vice-versa. I’ve often found myself in Preview.app wanting to resize to exactly half, or a quarter of the current size. So in ScreenFloat, you can do that, without having to wreck your brain about what half of 200px is. Just select 50% from the menu and it’ll do the math for you.
If you’re scaling an image up, ScreenFloat has the option to make the image larger using the MetalFX Spatial Upscaler, which can yield nicer results than without (depends on the source material). Here’s an example of a screenshot of the word “macOS” having been upscaled without and with the MetalFX Spatial Upscaler:
Reduce Resolution
When you take a screenshot on a Mac’s retina display, its resolution is usually 144 dpi, resulting in a nice and crisp screenshot. In some situations, you don’t require that high a resolution. Select Reduce resolution, and the shot will be rendered down to 72 dpi, making the file size smaller, but also reducing the quality of the shot.
Rotate
There’s not much to say about this one – you can rotate your image- and video shots clockwise and counterclockwise. That’s it. That’s the feature.
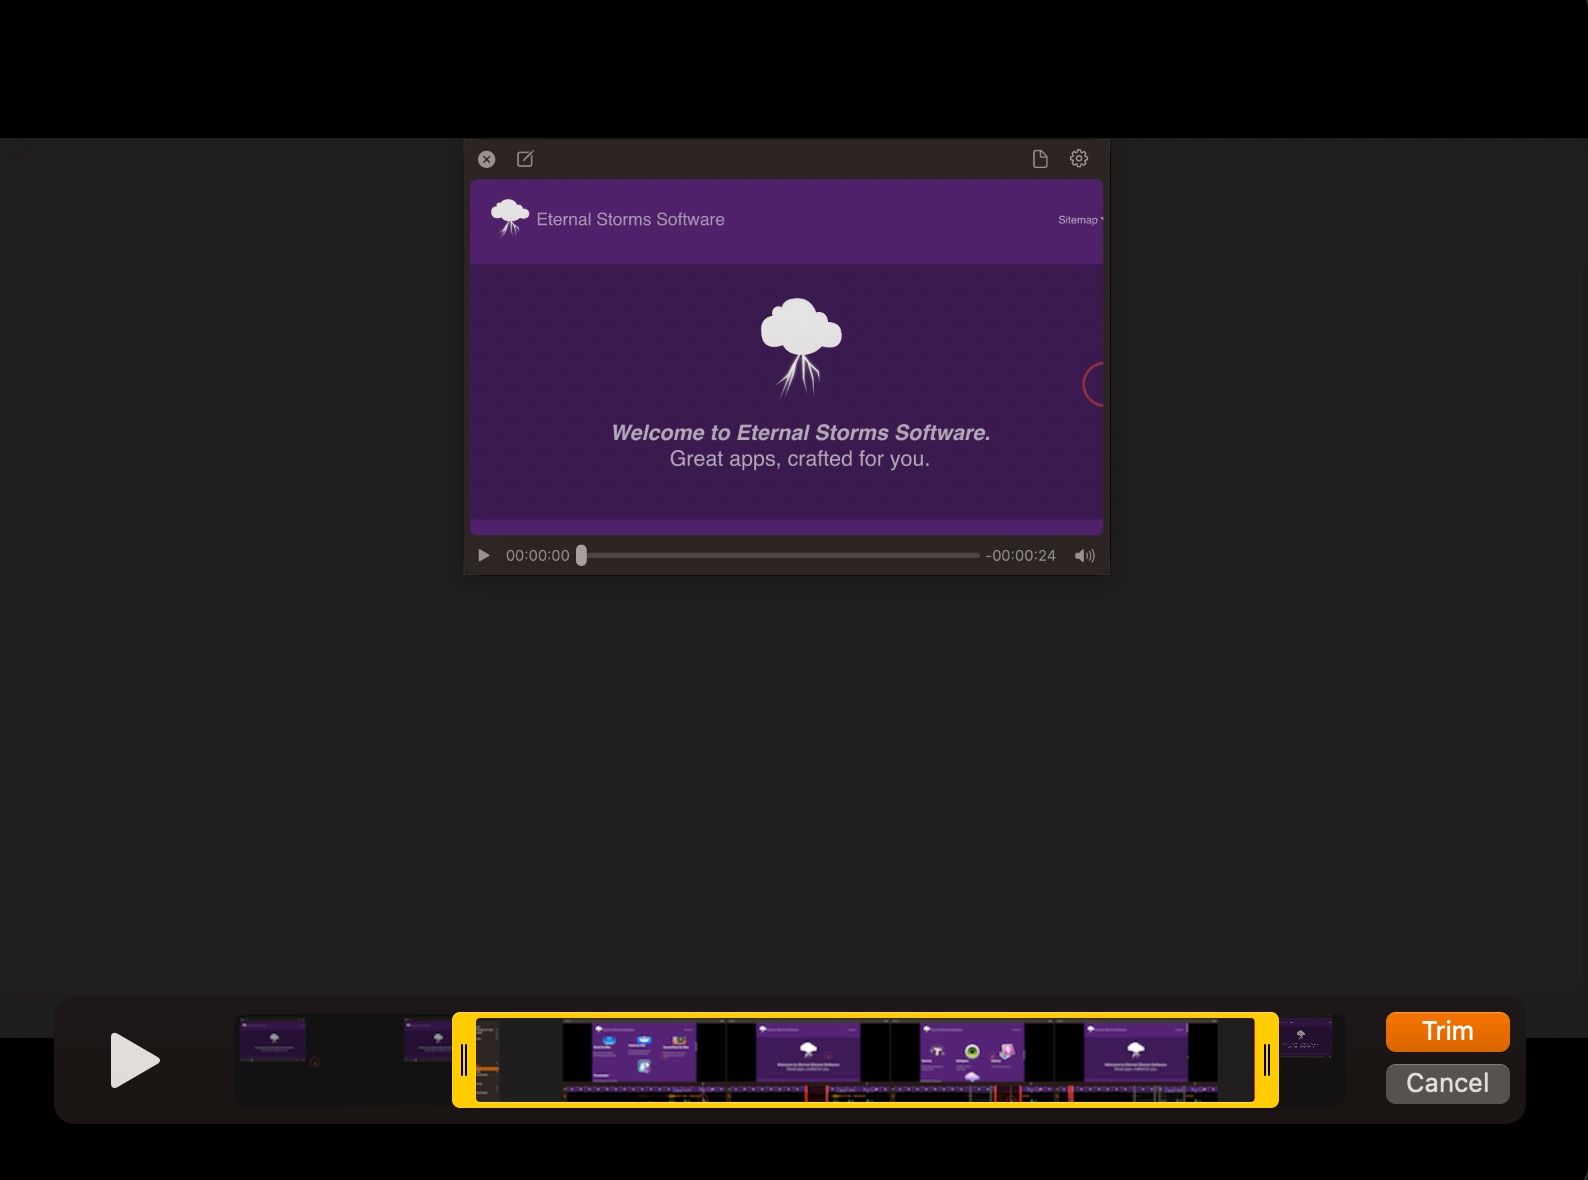
Trim Video
Another one of those self-explanatory things: trim screen recordings’ beginnings and ends, by selecting the section of the recording you’d like to keep.
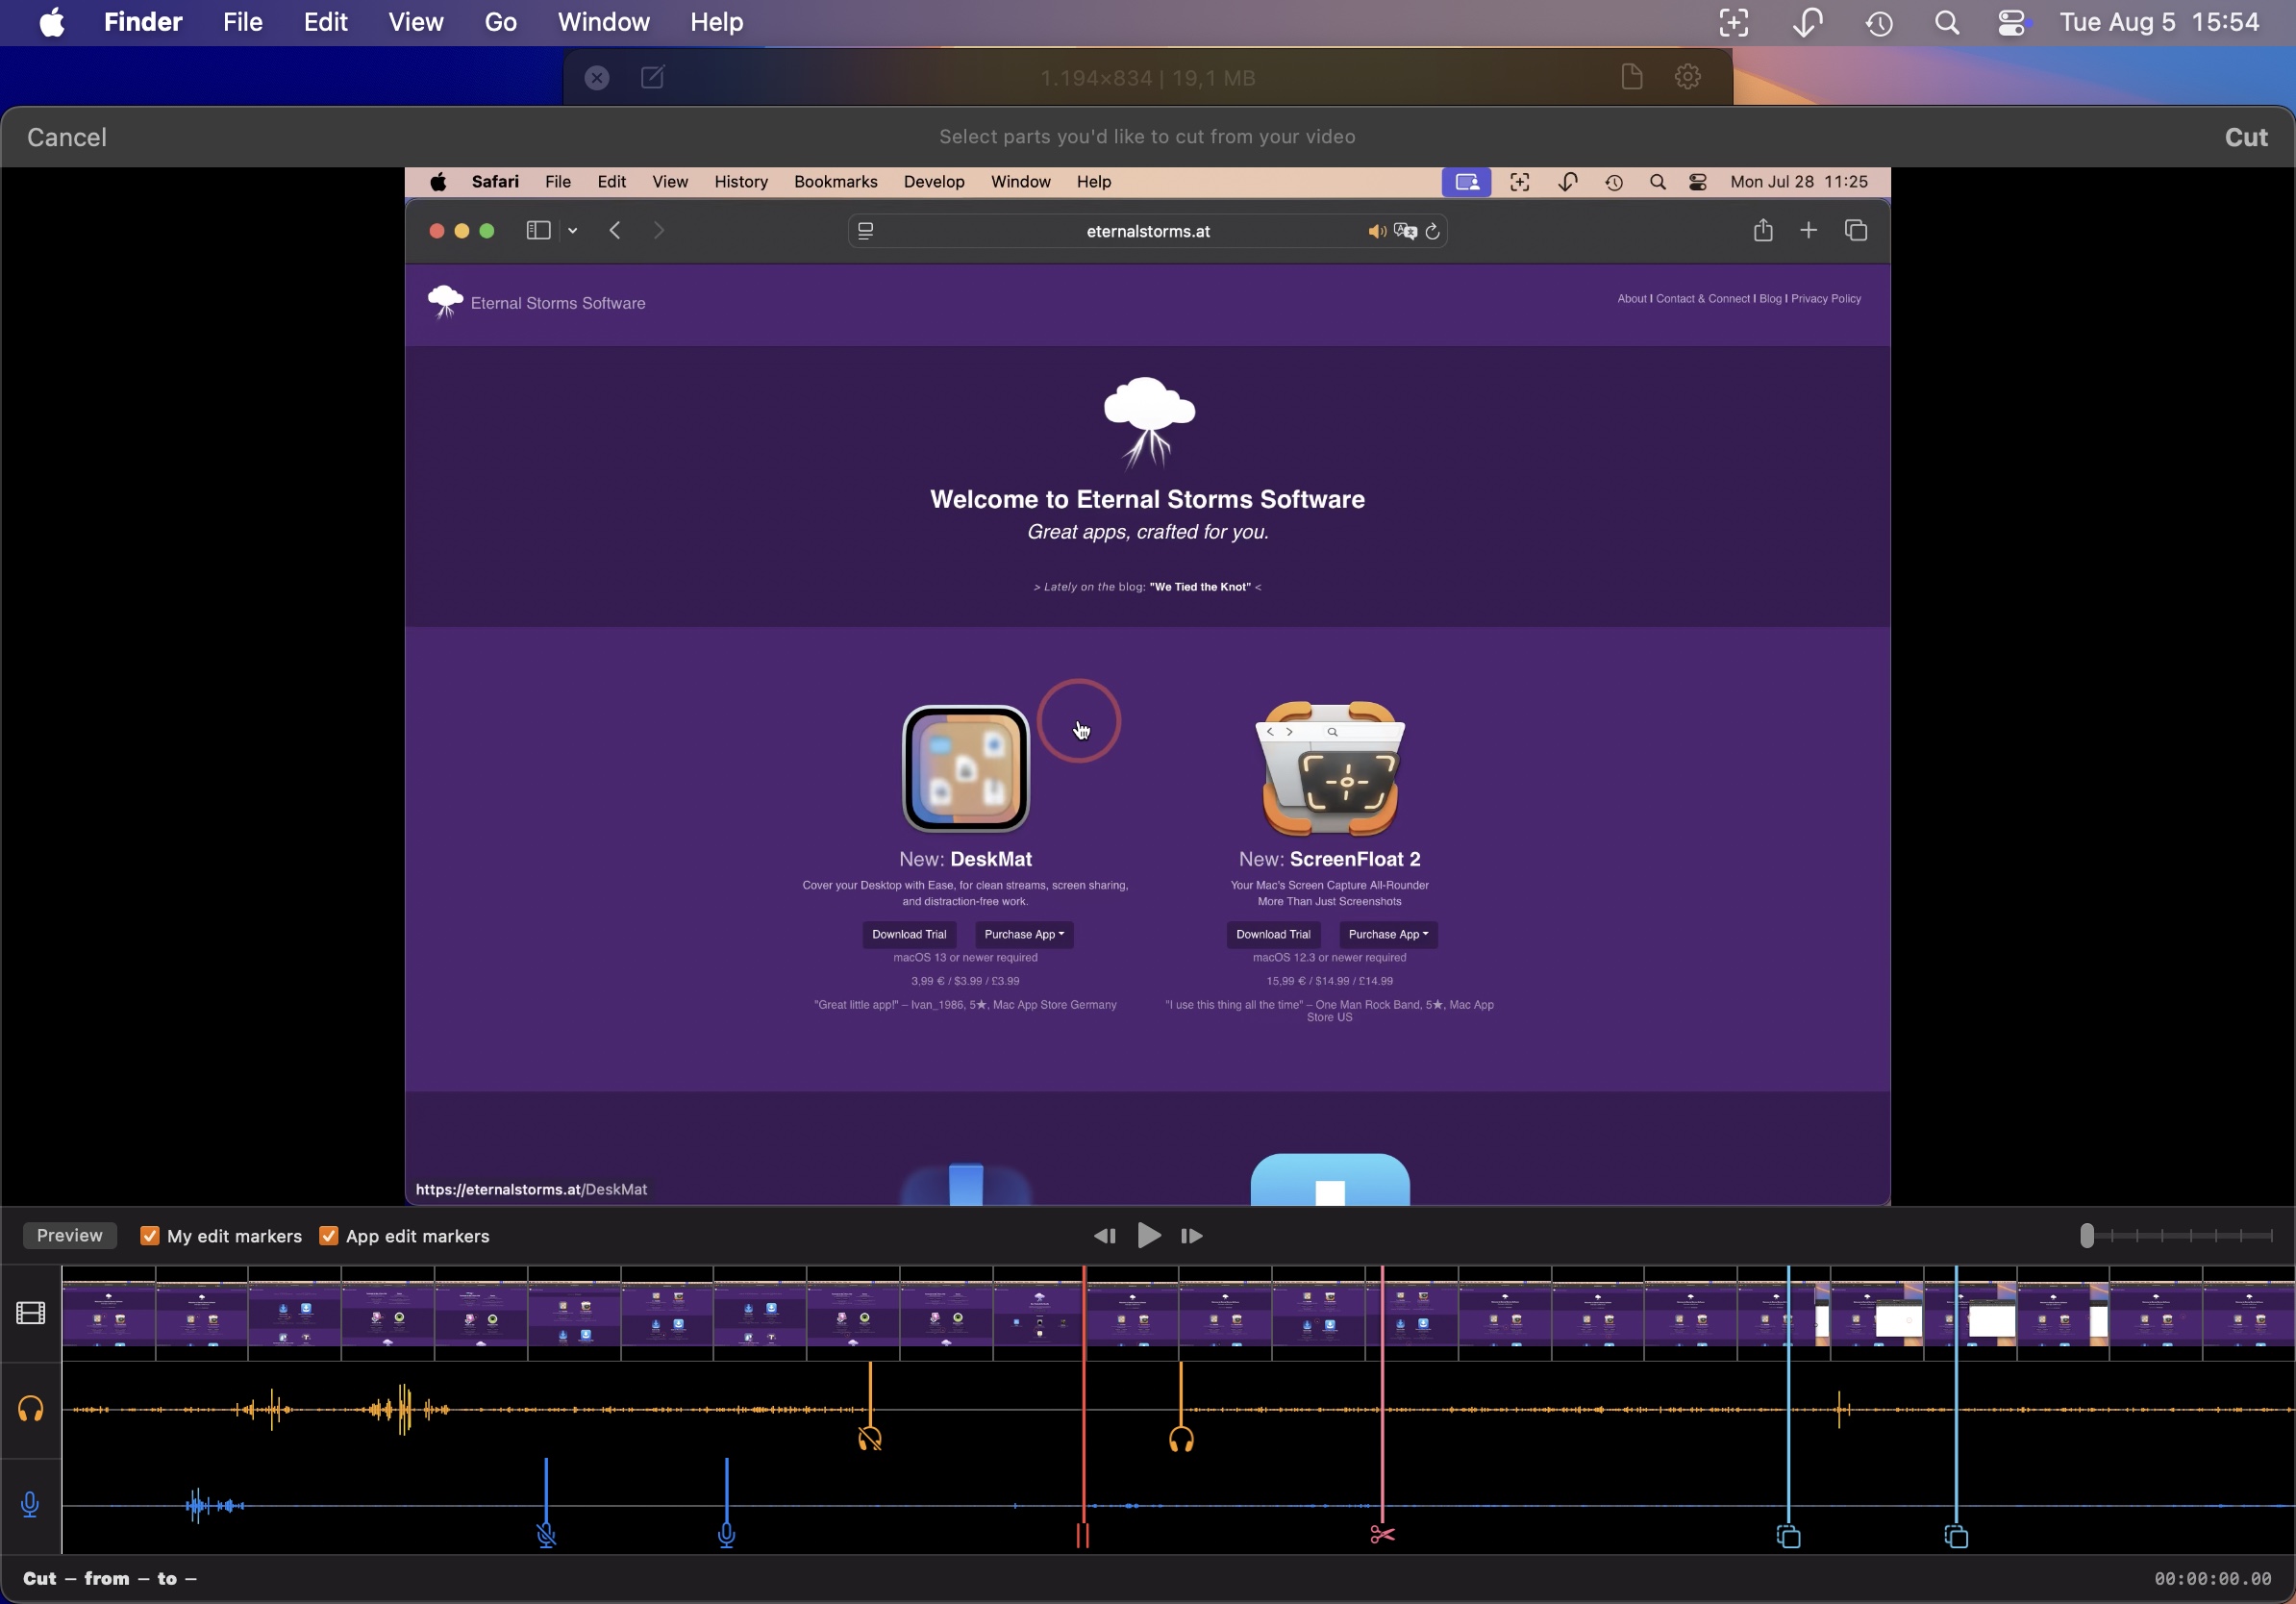
Cut Video
Cut out parts of a screen recording you don’t want to keep: an entire section of video along with all its audio, or maybe just an unintended cough in the microphone audio track; or a notification sound in the system audio track, for example:
Removing an entire section of video, part of the microphone audio track (keeping video and system audio), and part of the system audio track (keeping video and mic audio): Tracks that are crossed out with a dotted line will be removed from the recording. Tracks that are not crossed out will remain in the recording.
You can do this all with your mouse cursor, or frame-by-frame with your keyboard:
Creating and manipulating a cut selection solely with the keyboard
Press the space bar␣ to play/pause the video
Press the left← / right→arrow keys to advance / step through your recording one frame at a time
Press X to insert a new cut
Press command – X⌘ X to move the right end of the selected cut to the playhead
Press option – X⌥ X to move the left end of the selected cut to the playhead
Press shift – command – right arrow⇧ ⌘ → to move the right end of the selected cut to the right (increasing the cut)
Press shift – command – left arrow⇧ ⌘ ← to move the right end of the selected cut to the left (decreasing the cut)
Press option – shift – left arrow⌥ ⇧ ← to move the left end of the selected cut to the left (increasing the cut)
Press option – shift – right arrow⌥ ⇧ → to move the left end of the selected cut to the right (decreasing the cut)
Press shift – left arrow / right arrow⇧ ← / ⇧ → to move the entire cut along the timeline
Press V to toggle the video track of the selected cut (a dotted line across the track means it will be cut from the recording)
Press S to toggle the system audio track of the selected cut
Press M to toggle the microphone audio track of the selected cut
Press tabulator⇥ or shift – tabulator⇧ ⇥ to switch between all cuts
Press backspace⌫ to delete the selected cut
Edit Markers
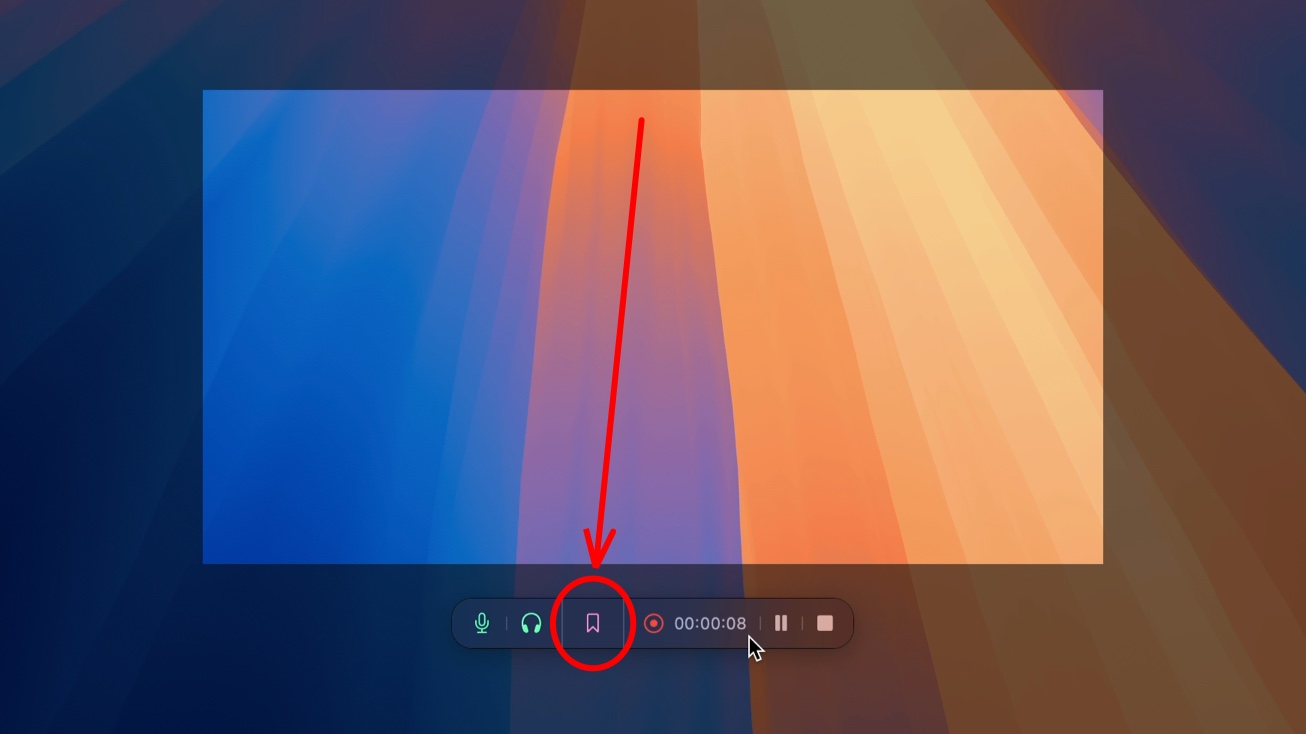
While recording, you can place edit markers on your recording’s timeline so that later on, you’ll know where to cut.
ScreenFloat places markers automatically for you when you change your audio settings, pause the recording, and switch apps or spaces.
In the Cut editor, it’ll look something like this:
At the bottom of the editor is the timeline. The first row is the video track (white icon), the second is system audio (orange icon) and the third is microphone audio (blue icon). From left to right, you see the edit markers. The first two are dark blue, with a mic off and on symbol, indicating that here the mic was turned off and then on again. Following that, there’s an orange marker with a headphones off icon – here, the system audio was turned off. Then there’s a red marker with a pause icon: the recording was paused here. After that, system audio was activated again, a custom (pink) marker was manually placed, and lastly, the active app or space was switched, and then again.
Toggle markers on and off in the timeline using the checkboxes “My edit markers” and “App edit markers”. Hover over a marker to learn what it means; for instance, a “switched app” marker will tell you what app was switched to.
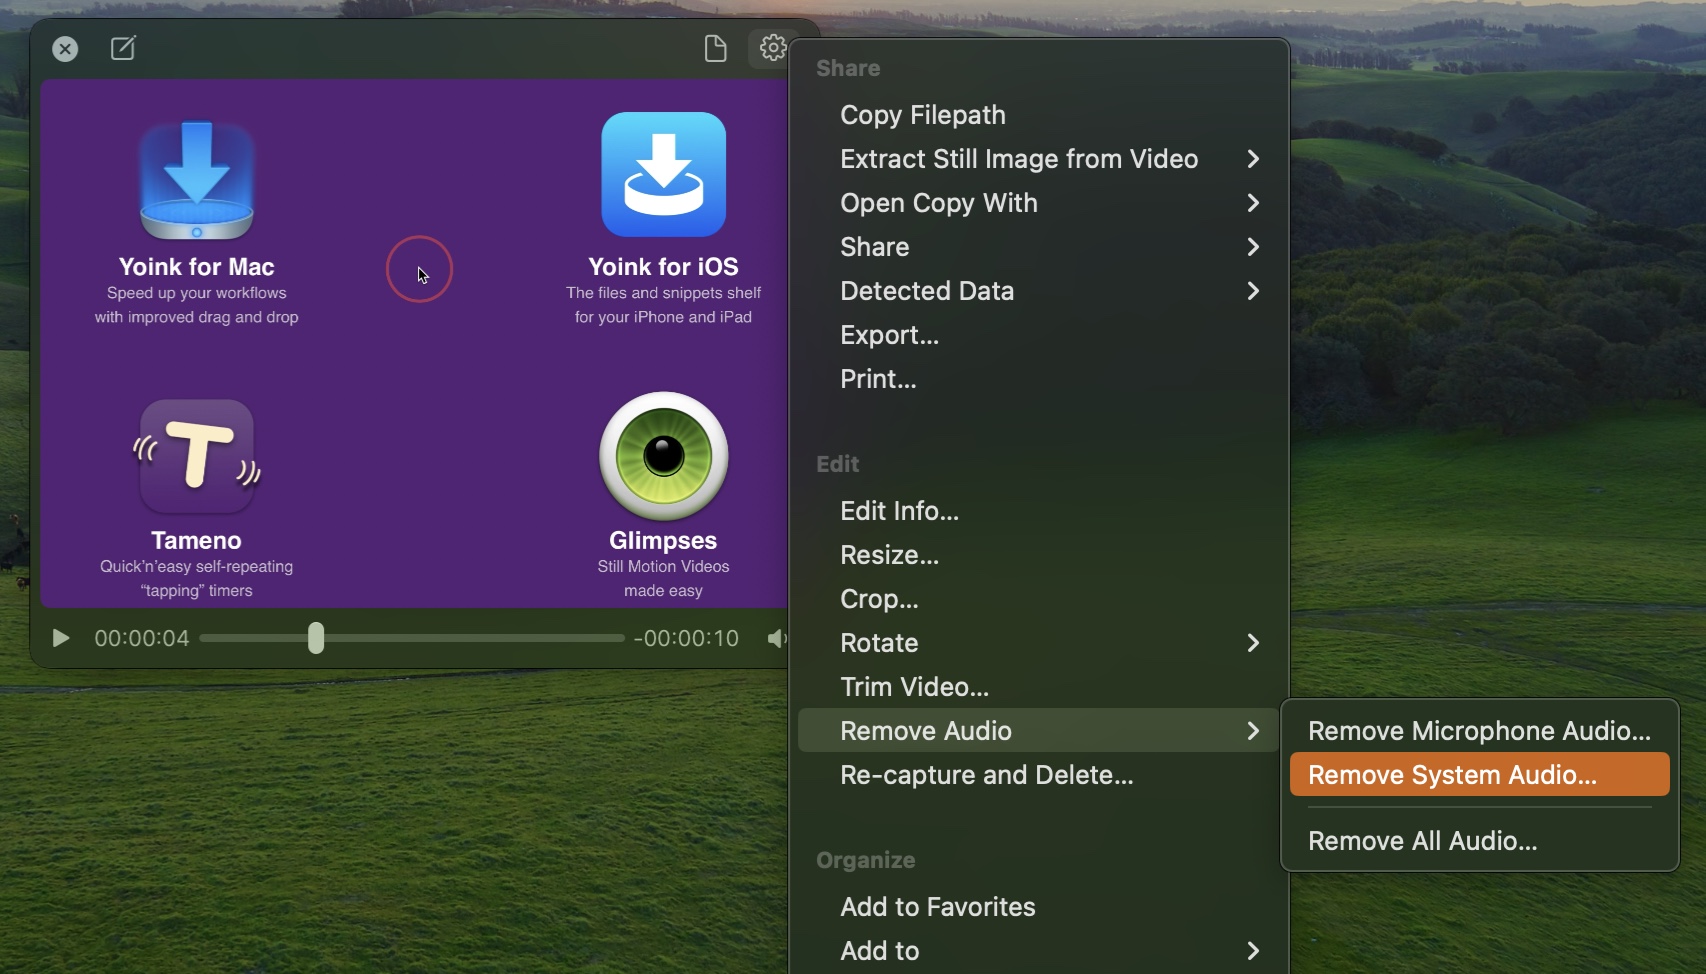
Remove Audio
You can remove a recording’s audio tracks. It is handy when you’ve recorded your microphone along with your recording for internal purposes only, but want to send the video to someone else. Remove its audio tracks, and send it. And if you duplicate the shot first, you’ll still have the original screen recording with the audio track for later. You can choose between removing all audio tracks, only the microphone track, or only the system audio track:
OCR, Annotations / Markup and Redactions
All redactions and annotations are entirely non-destructive. That means you can always go back in and make changes, or remove annotations entirely and restore the original shot.
QuickSmart Redaction Let’s begin with “QuickSmart” redaction. Right-click a text line or data (like a link, email, address or number), face or QR code and redact it without any further effort on your part. I couldn’t decide between “quick” and “smart”, so I just used both. Usually, names are hard, but I got definitely lucky that time.
QuickSmart-Redacting an address, a phone number, an email, and a face.
The type of redaction (blockout, pixellate, blur) used for QuickSmart-redaction is based on what you’ve set up the redaction tool to be when manually annotating. But we’ll get to that in a bit. **
Annotate, Markup, Redact To begin, right-click a shot (floating, or in the Shots Browser) and select Markup… .
At the top, you’ll find your tools. From left to right, they are: – Select: Select, move and manipulate one or multiple annotations space bar on your keyboard – Freedraw 1 on your keyboard – Rectangle 2 – Oval 3 – Line 4 – Arrow 5 – Star 6 – Checkmark 7 – X-Mark 8 – Text – Smart Numbered List – Highlight 9 on your keyboard – Redact 0
Double-click any of these tools (or press their number on the keyboard twice) to adjust their properties for future annotations. These are the tool’s defaults and used for every new annotation. Use the Select tool and double-click an annotation (or multiple) to change their properties. This will only affect them, and not become your new defaults.
Double-clicking a tool reveals its drawing properties.
In the screenshot above, I double-clicked the Redact tool to be able to switch between the Redaction Styles blockout, pixellate, and blur. If I choose Blockout, the Blockout Color will come into play, which will be used to completely block the part you overlay with this redaction. ** Like I said above, the Redaction Style you select here will be used for QuickSmart redaction, when you right-click a line of text, face or barcode in a floating shot and redact it.
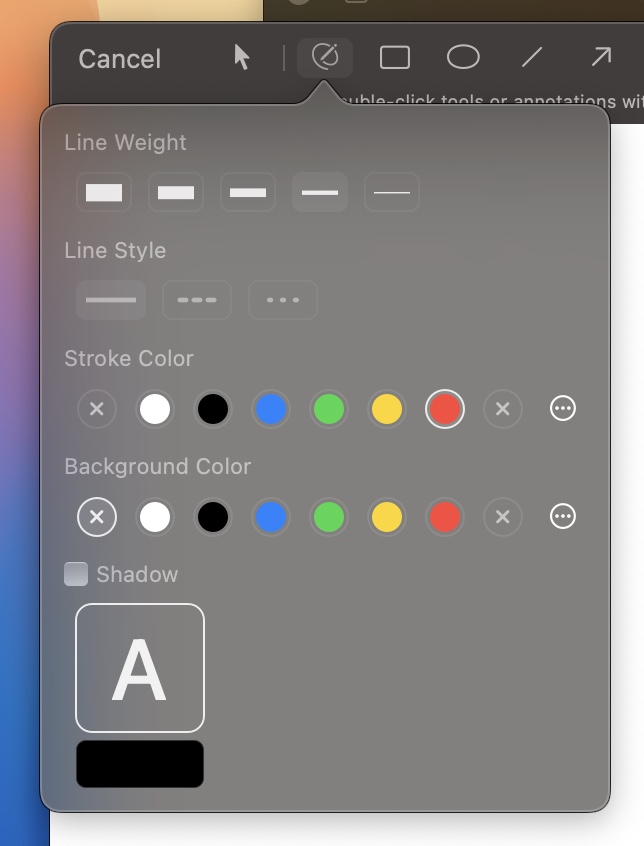
The line-based tools (from freedraw to x-mark) all offer the following properties:
The tool-settings for Freedraw.
– Line Width: How thick a line to draw (1px, 3px, 6px, 9px, 12px) – Line Style: Solid, dashed and dotted. – Stroke Color: The color of the line you’re drawing, the rectangle’s bounds or circle’s outline. – Background Color: A background for the entire annotation, based on its bounding box. – Fill Color: Rectangles, Ovals, Arrows, Stars, Check- and X-Marks also offer a fill color. – Rectangle Corners: For rectangles, you can choose between sharp and rounded corners. – Arrow Style: For arrows, you can choose between “line arrow”, “shape arrow” and “back-and-forth” arrow – Check- and X-Mark Corners: Choose between sharp, rounded rect, circle or none. – Shadow: Add a drop shadow to your annotation object The Shadow Well works like this: Click-and-drag to move the shadow around. Scroll up and down to adjust its blur. Right-click to reset its position to the center.
Fun times with Markup!
Text Annotation You can change the font, the size, and text- and background colors, and add a drop shadow.
Adding a text annotation, adjusting its text- and background color.
Smart Numbered Lists This allows you to add self-increasing numbers (or letters) to your image, for example, when writing a mail with instructions on how to perform an action on the computer, you could use this to add steps, like 1, 2, 3, and then reference them in the mail.
Using the smart numbered list tool to add “steps”. Removing one automatically updates the rest.
You can choose between numbers (1-x) or letters (A-Z, then A1, B1, … Z1, A2, B2, etc), and change their borders, colors, and add drop shadows.
Highlight You draw a highlight around an object you’d like to draw attention to, by “tuning out” the rest of the image.
The text above, highlighted with the Highlight tool.
You can change the corners of the highlight (sharp, rounded or oval), and the dimming color (all alpha values supported).
Redact Use the Redact tool to obscure something in a screenshot you don’t wish to share with blockout, pixellate or blur.
Using the Redact tool to blockout, pixellate and blur details in an image.
Note: Researchers have been able to reverse blur- and pixellate effects to some extent, so for sensitive information, consider using blockout – a solid color to block out what’s underneath.
Select Use the Select tool to select existing annotations and move them around, manipulate them, or edit their properties.
Editing an already annotated image and changing its redactions, drawing a freedraw line and changing its properties, too.
As you can see above, it’s easy to go back into an already annotated shot and change or remove its annotations, and edit those annotations’ properties with a simple double-click.
Tips – Annotating supports undo and redo. Press command (⌘) – Z to undo, command (⌘) – shift (⇧) – Z to redo, or right-click to reveal the contextual menu and select it there – With the Select tool, hold down the option (⌥) key on your keyboard and click-and-drag an annotation (or multiple) to duplicate it and its properties (alternatively, select them and press command (⌘) – D) – Select all annotations easily by click-dragging with the Select tool onto the background, or by pressing command (⌘) – A on your keyboard – Delete annotations by selecting them and pressing the backspace / delete key on your keyboard – If you have an iPad and use Sidecar, you can use your Apple Pencil to make annotations, and you can switch between your current tool and the Select tool by double-tapping the Pencil. Hold down the command (⌘) key and double-tap to select the next tool, or hold down the option (⌥) key and double-tap to select the previous tool (from left to right) – Move annotations around by click-and-dragging them, or with the arrow keys on your keyboard – Remember that you can always export and drag shots to other apps with and without annotations – Annotations/markup and redactions are non-destructive – you’ll always be able to restore the original image, or go in and make changes – Change an arrow’s direction by holding down the option (⌥) key on your keyboard when you start to draw it (video – first we draw an arrow without the option key pressed, then with)
Up Next
The next part of this series – Part V: Share – Drag and Drop, Link Sharing, Export – takes a detailed look at everything you can do with a simple double-click onto a floating shot. Definitely take a look, there’s a lot of neat stuff there!
Let’s take a tour through ScreenFloat and see how it can power up your screenshots, too.
ScreenFloat for Mac – Your Screen Capture Power Tool All-Rounder
ScreenFloat powers up your screenshots by allowing you to take screenshots and recordings that float above everything else, keeping certain information always in sight. Its Shots Browser stores your shots and helps you organize, name, tag, rate, favorite and find them. Everything syncs across your Macs. Extract, view and copy detected text, faces and barcodes. Edit, annotate, markup and redact your shots effortlessly and non-destructively. Pick colors any time. And more.
Part VI: Store – The Shots Browser, iCloud Sync, Tags Browser
Every shot you capture with or import to ScreenFloat is stored in the Shots Browser, and optionally synced across your Macs over iCloud. Read on to learn how the Shots Browser helps you organize and collect, name, tag, rate, favorite and find your shots, and keep your Desktop clutter-free in the process.
Open the Shots Browser with its keyboard shortcut (by default, ⇧ ⌘ 1), or from the app’s icon in the menu bar. It will open up in any app or space you’re in so it won’t take you away from what you’re doing at any given time.
Your Shots at a Glance
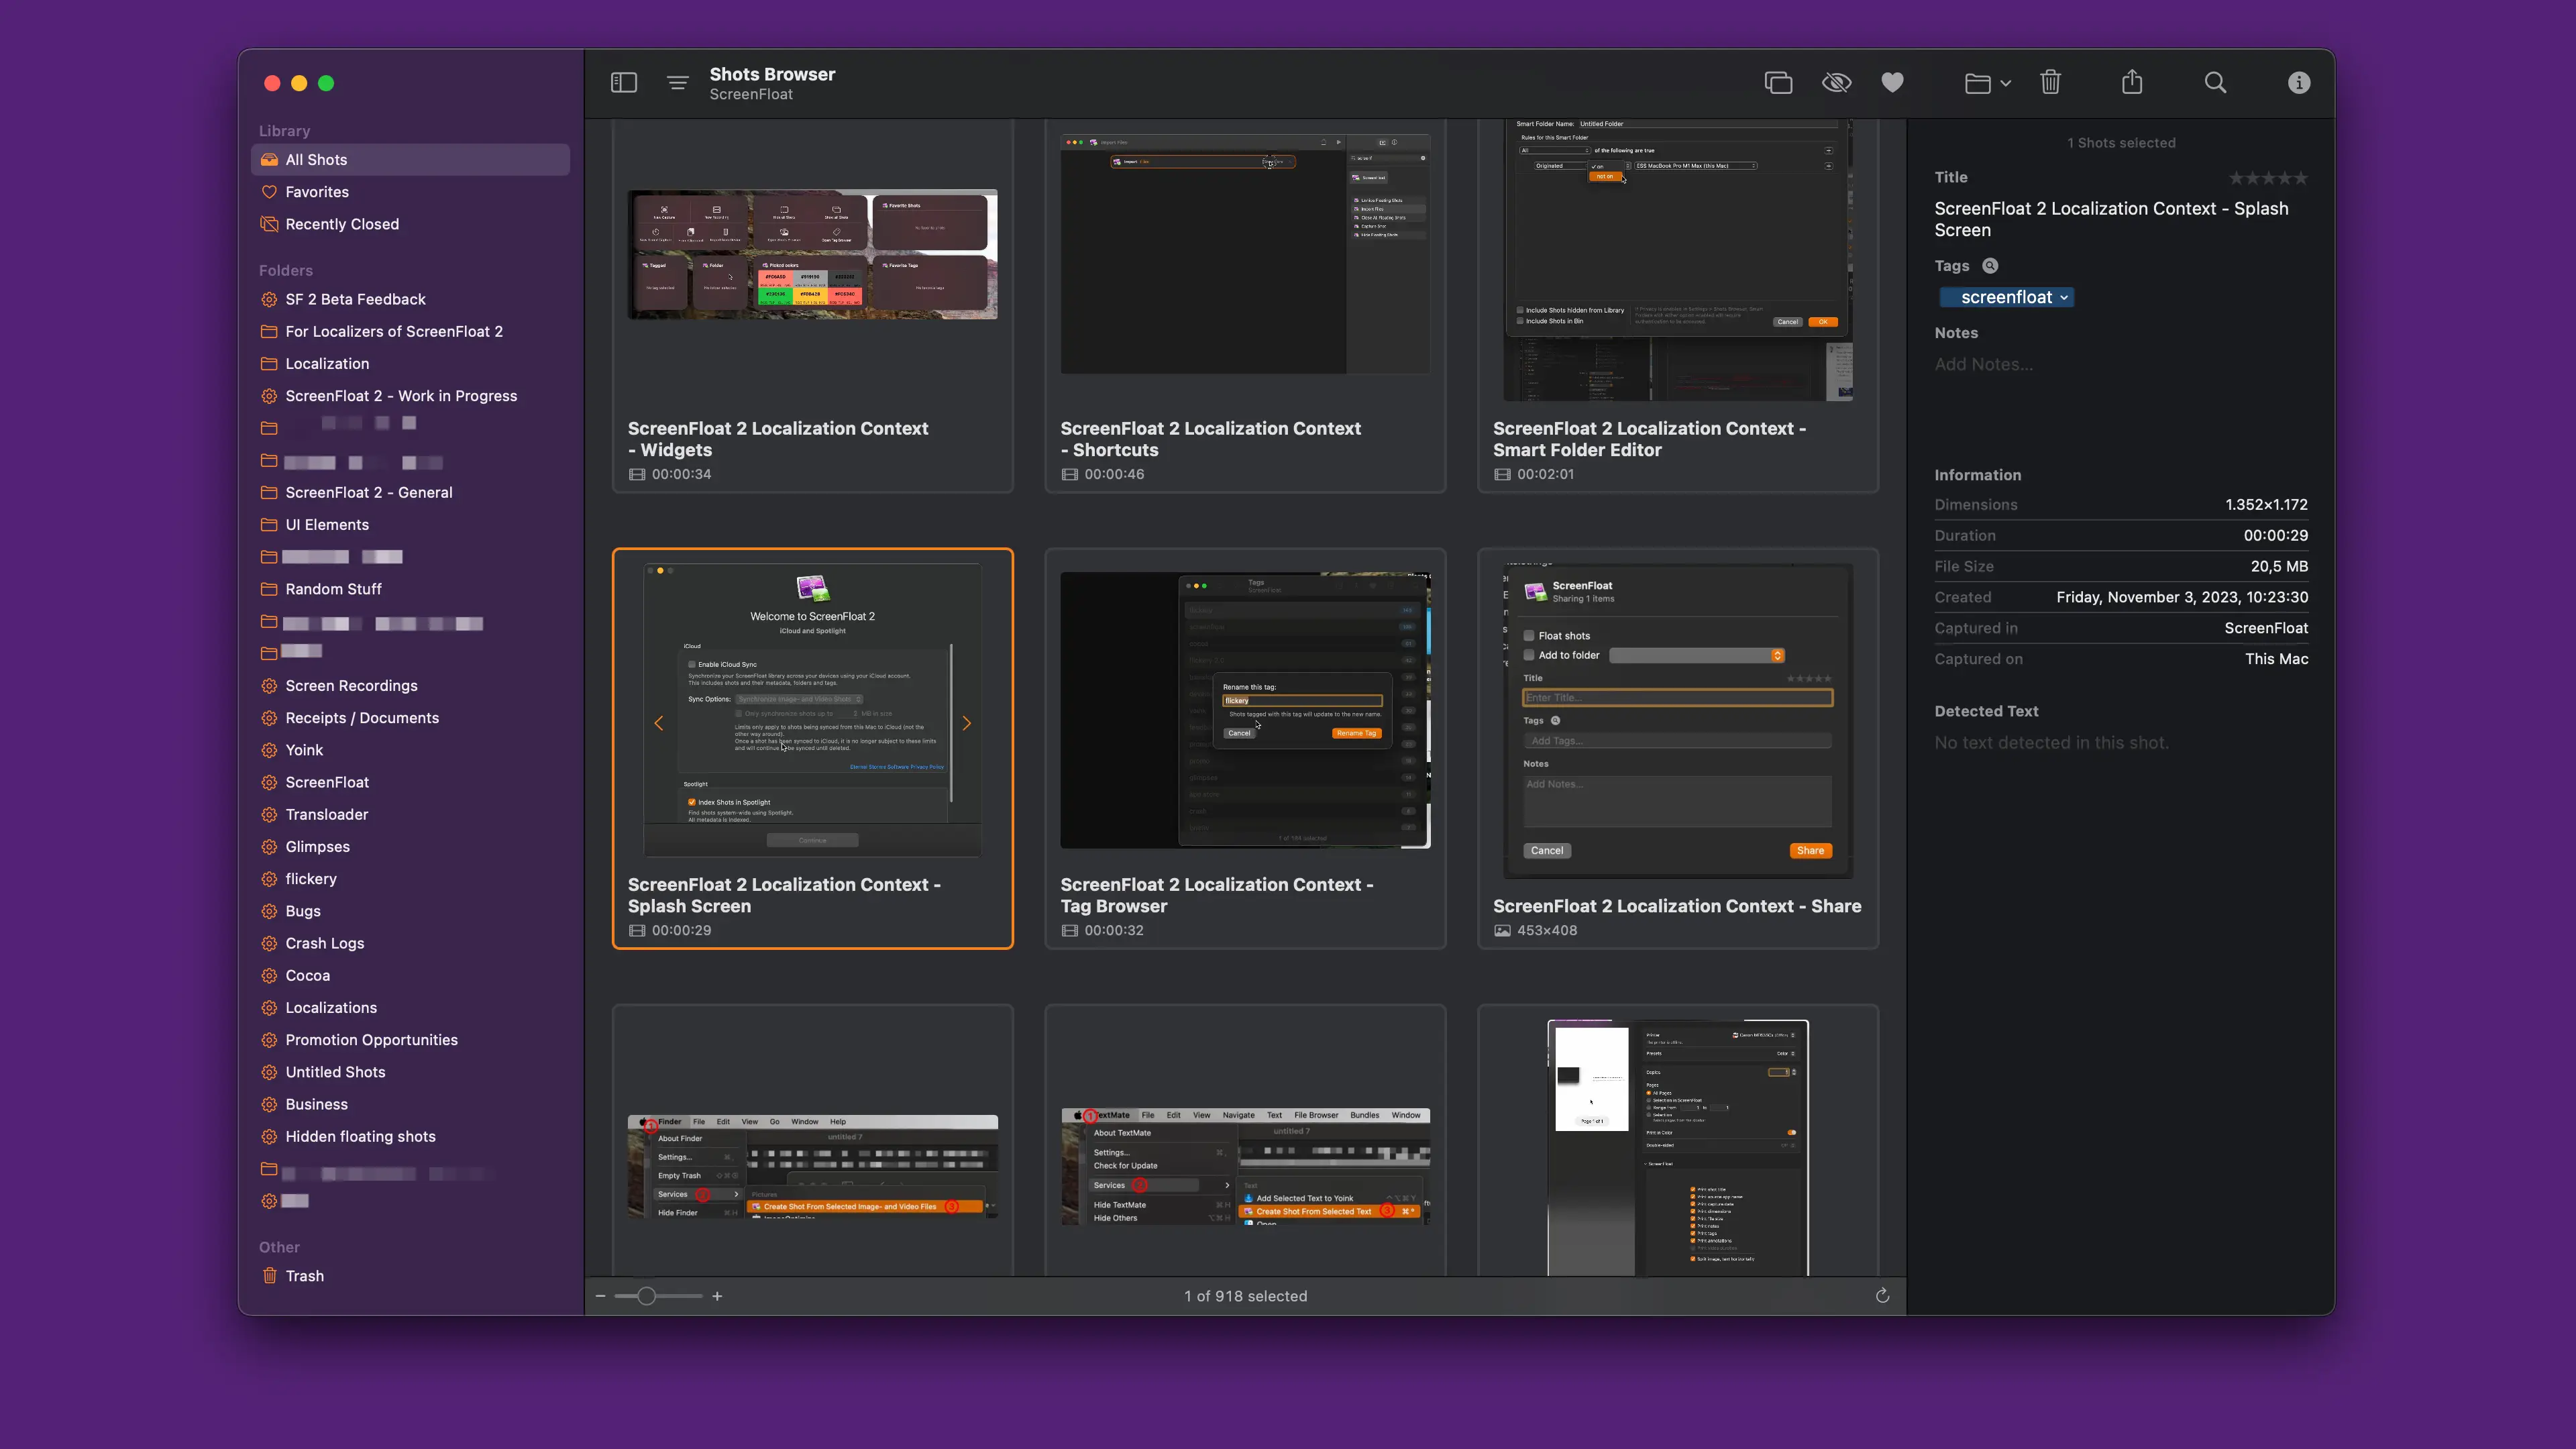
In the Shots Browser, you can access your Shots (center), folders (left panel), and detailed information about selected shots (right panel).
Your shots are sorted by their creation date (newest first) by default, with the option to change it to date last used, favorites first (by date favorited), rating, titles, file sizes, dimensions and kind (image or video).
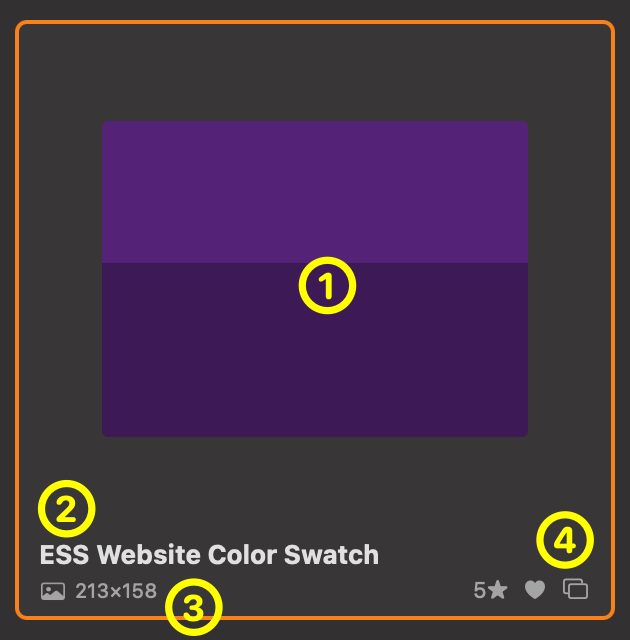
You can see a preview image (1), title (2), type and dimensions or duration (3), its rating, favorite status and whether it’s floating (4).
A selected shot in the Shots Browser
Pinch on your Magic Trackpad, or use the slider at the bottom left to adjust the size of the previews.
Double-click a shot (or press enter when shots are selected) to make them float, or press the space bar to use Quick Look. 0-5 will rate them. Press f to (un-)favorite them. Right-click selected shots to reveal more options, or to edit/annotate them. Shots you don’t want shown under All Shots can be hidden, so they only appear in the “Hidden Shots” folder, and folders you have set up to include hidden shots. You can click into a title to rename the shot quickly, or you can open…
The Info Panel
In the Info panel, you can edit the selected shots’ title, tags, notes and rating (1), see their metadata (2), as well as access and re-scan the shot’s detected text (3).
Tags will auto-complete as you type them, weighted by whether they’re favorites or not. Click the loupe button to reveal the Tag Browser (which we’ll talk about in a future installment of this series), or long-click/right-click it to get a list of all your tags to select from.
Notes are useful to add additional information, like the source of a screenshot – for example, a link.
Under Information (2) you can view the shot’s metadata: Its dimensions, duration (if it’s a screen recording), file size, the creation date, what application it was captured in, and what device it was captured on.
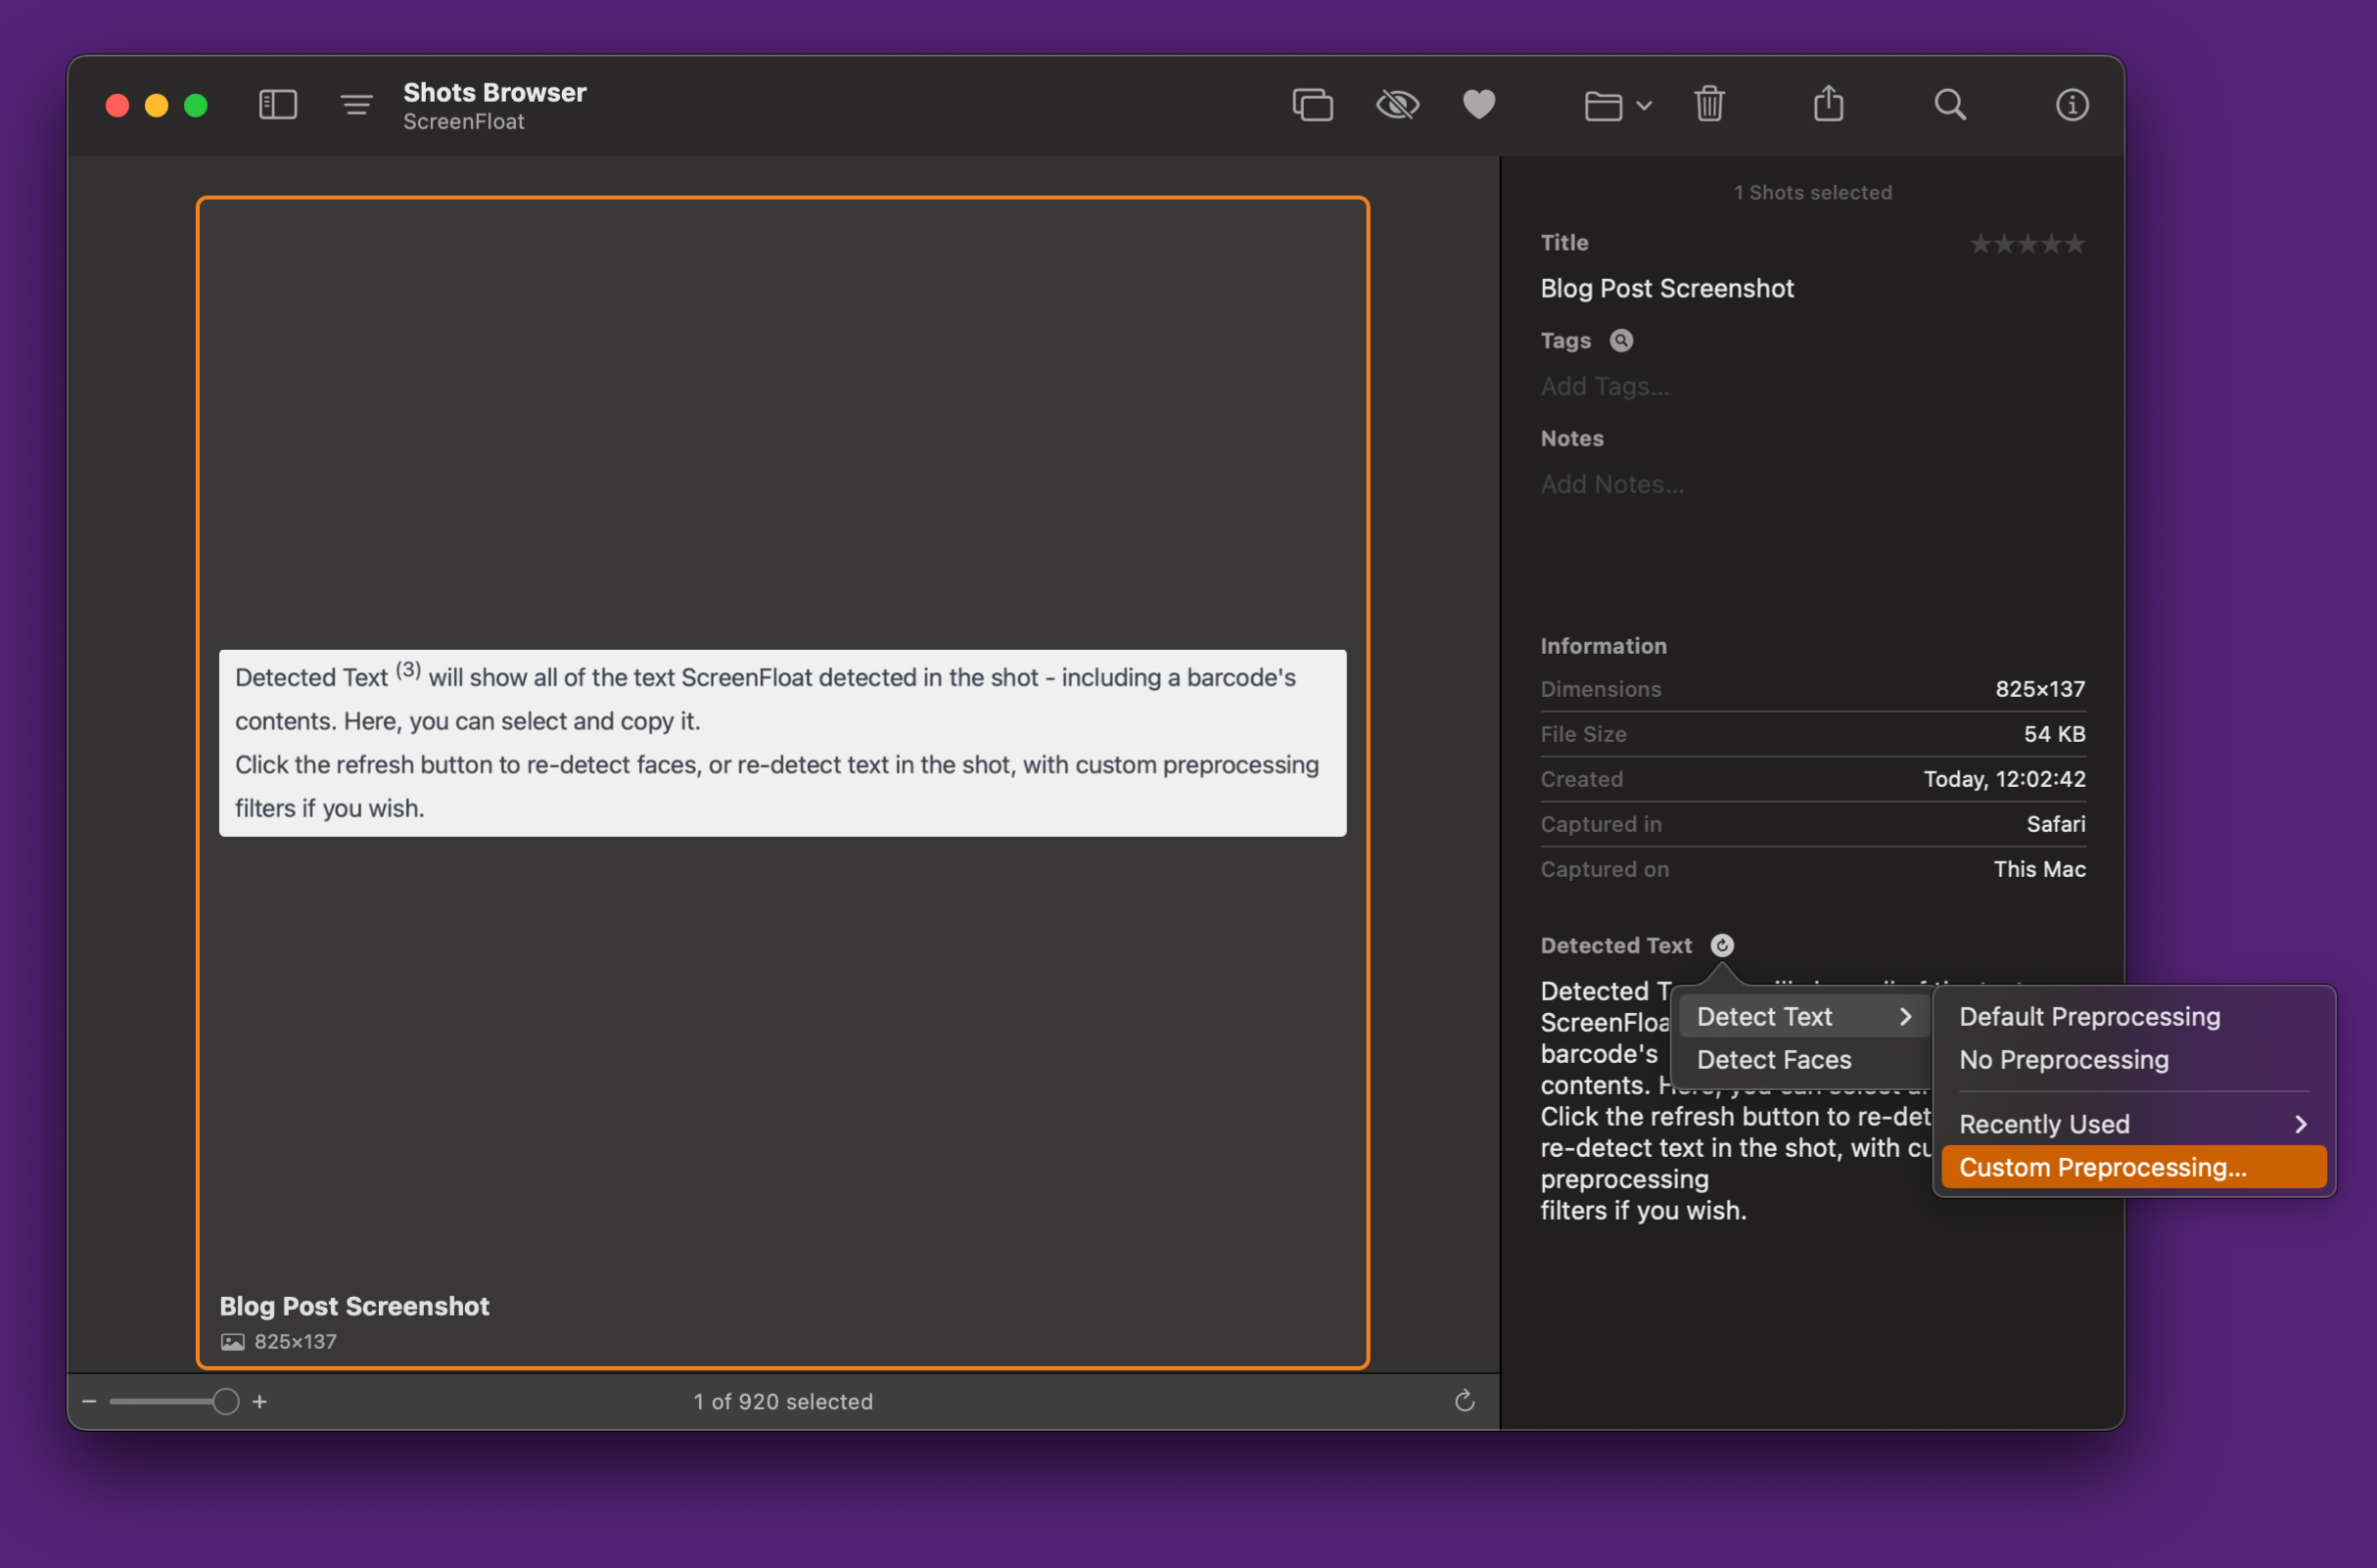
Detected Text (3) will show all of the text ScreenFloat detected in the shot – including a barcode’s contents. Here, you can select and copy it. Click the refresh button to re-detect faces, or re-detect text in the shot, with custom preprocessing filters if you wish.
Custom preprocessing is useful in cases where ScreenFloat’s default settings don’t yield the results you’re looking for:
Using custom preprocessing filters to help ScreenFloat in detecting text. In this case, we’re applying a grayscale and color invert filter, along with language correction and Threshold Otsu to get the results we want.
You can also edit detected lines, and omit lines you don’t want detected at all.
Categories, Folders and Smart Folders
Having tons of shots will eventually require some sort of organization. That’s where folders are helpful.
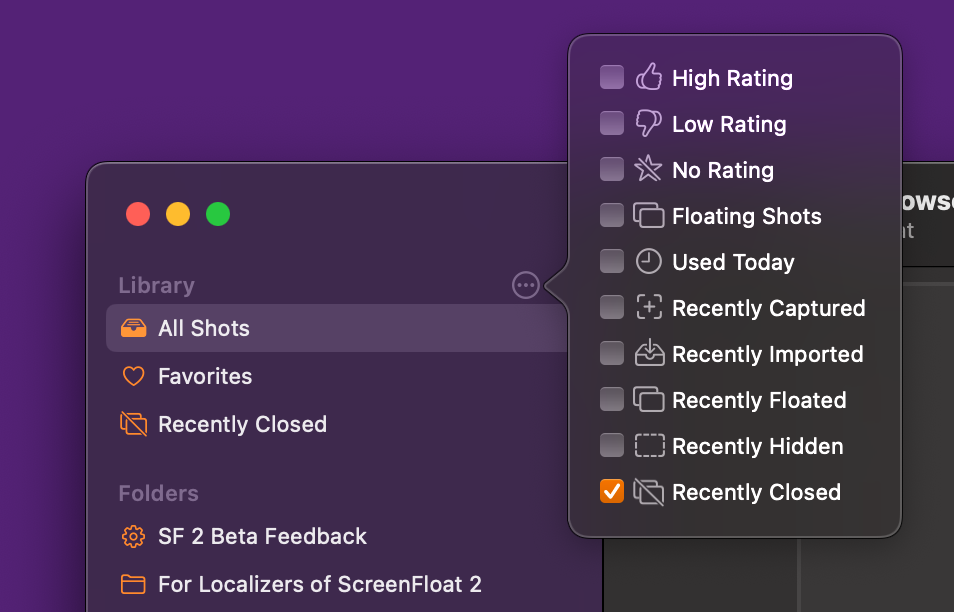
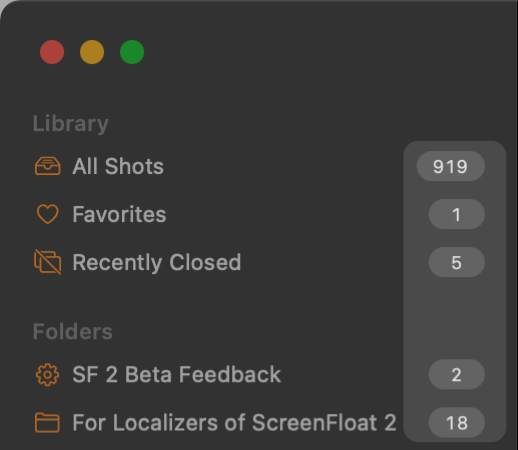
Categories First of all, ScreenFloat comes with a bunch of helpful pre-defined categories:
Most of them can be adjusted to your preferences. For instance, if you use the High Rating category, right-click it and you’ll be able to specify what a “high rating” is to you – only five stars? Or four and up?
The Hidden Shots category shows all shots you have hidden from your library. It is not shown by default, can be activated as seen in the screenshot above, and can be protected with a privacy setting (see Settings and Privacy).
The Trash is where all your trashed shots will be kept for a while, until they’re deleted automatically (by default, that’s 14 days, but again, you can adjust this to your liking from 1 day to never. It, too, can be protected with the Privacy setting.
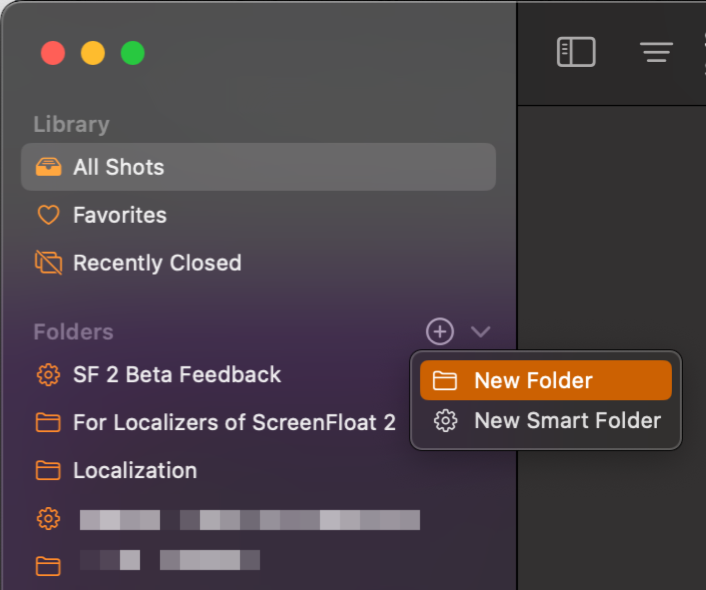
Folders Folders are your tool to manually collect shots. Create a new folder by clicking the + button next to “Folders” in the navigation panel, or by dragging selected shots over to the Folders section directly.
In a folder, you can sort shots manually, or by other criteria we discussed above. Right-click a folder to be able to rename it, duplicate it, export all shots it contains (which you can also do by dragging the folder to Finder, for example), set it up to show or not show shots hidden from your library, or delete the folder, with the option to deep-delete the shots it contains, too.
Smart Folders Smart Folders are populated with Shots automatically, based on rules you set up. Rules can be created with the following shot data:
Title
Tags
Notes
Rating
Favorite status
The app the shot was taken in
The source of the shot (screen capture, import, share extension, from shortcuts, from clipboard, from selected text, from text on clipboard, from a video shot’s still image, continuity camera)
Shot Kind (image or video)
File Size
Origin (which Mac the shot was captured on)
Whether it was annotated
Annotation Text content
Whether text was detected in the shot
Detected text content
Whether the shot contains faces
Whether the shot contains barcodes
The number of tags
Whether the shot is currently floating
Whether the shot is currently floating, but hidden
Creation date
Date favorited
Date last used
Date last closed
Date trashed
Whether it’s in one or more folders
Whether it was duplicated
Additionally, you can specify whether you want hidden or trashed shots included or not.
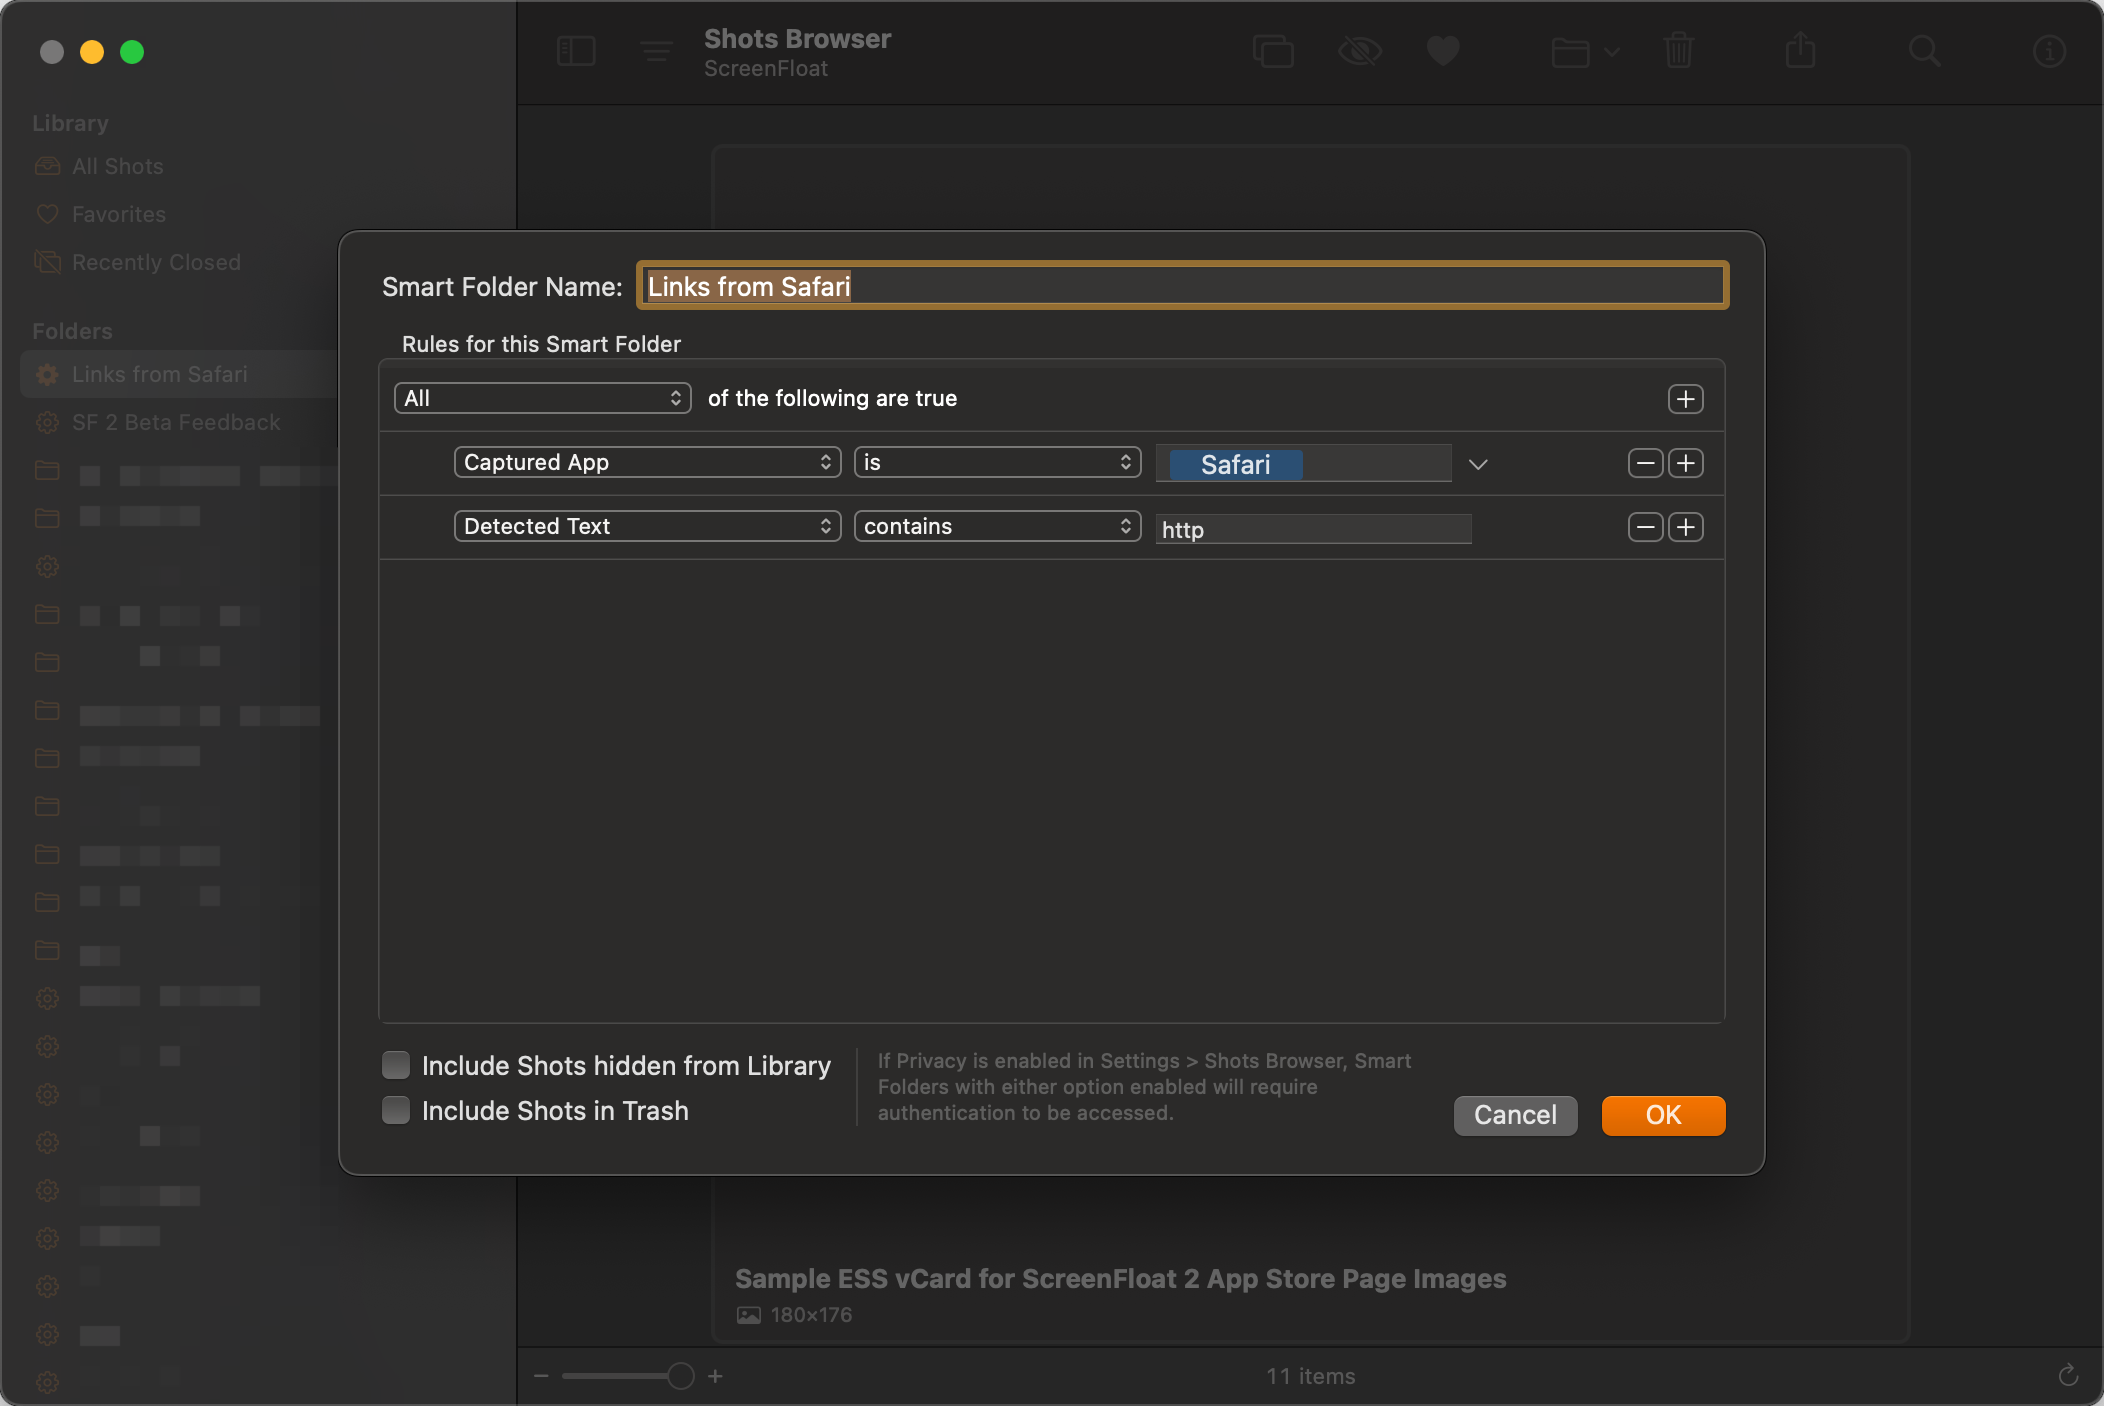
As an example, you could set up a Smart Folder that collects shots that you took in your browser, which have detected text that contains “http”, to have easy access to all links you have captured.
Double- or right-click a Smart Folder to edit its rules.
Drag folders and smart folders around to change the order they’re listed in.
Speaking of Smart Folders, let’s talk about:
Finding Shots
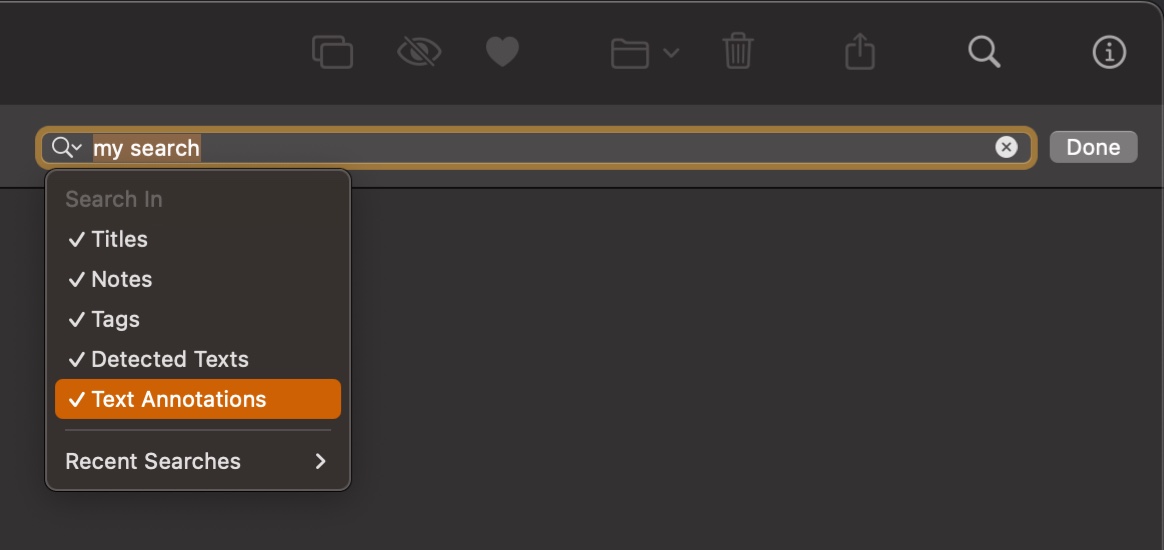
The same rules you already know from Smart Folders can be used to find shots in the Shots Browser. Click on the loupe button in the Shots Browser to show the search panel, then Advanced… to edit your rules. If you just need to do a quick search without elaborate rules, enter some text and results appear straight away, with the option to filter the text search further down to titles, notes, tags, detected texts, or text annotations.
Hold down the option (⌥) key, and the Done button will change to Save, so you can save your search as a Smart Folder.
You can also find your Shots system-wide using Spotlight, which we’ll talk about more in a future installment of this series.
Importing
There are several ways to import image and video files into ScreenFloat.
You can drag files onto ScreenFloat’s app icon, or in Finder, right-click the files and select Open With > ScreenFloat, or Share… > ScreenFloat.
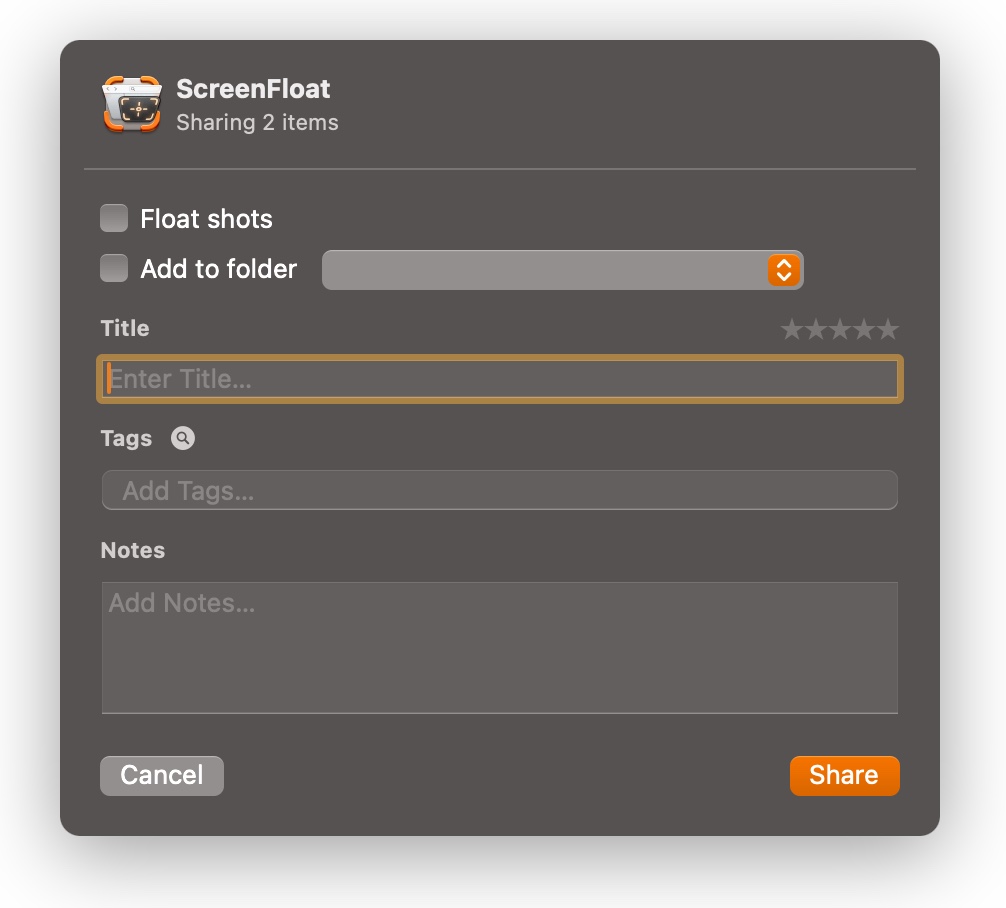
While “Open With” is faster, Sharing gives you more control over the shots to be imported:
You can also drag to the Shots Browser, allowing you to instantly create folders, or add to existing folders:
Dragging a file from Finder to the Shots Browser’s Sidebar to create a new folder for the importDragging to an already existing folder
Another option is to drag files directly to ScreenFloat’s icon in your menu bar:
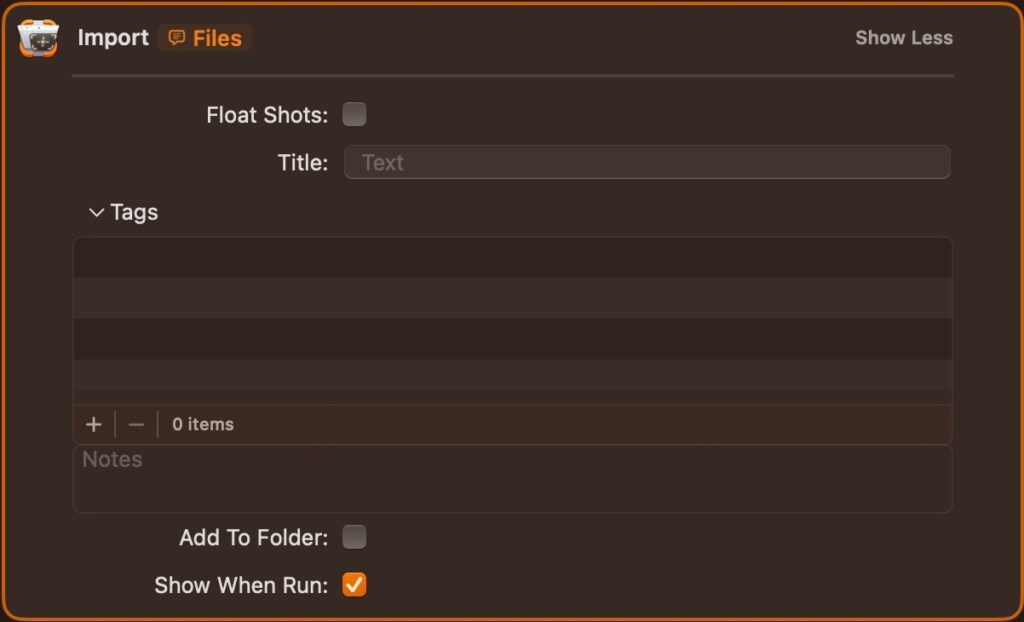
Finally, you can also create a Siri Shortcut to import files into ScreenFloat:
Settings and Privacy
There are a couple of settings for the Shots Browser we should take a look at.
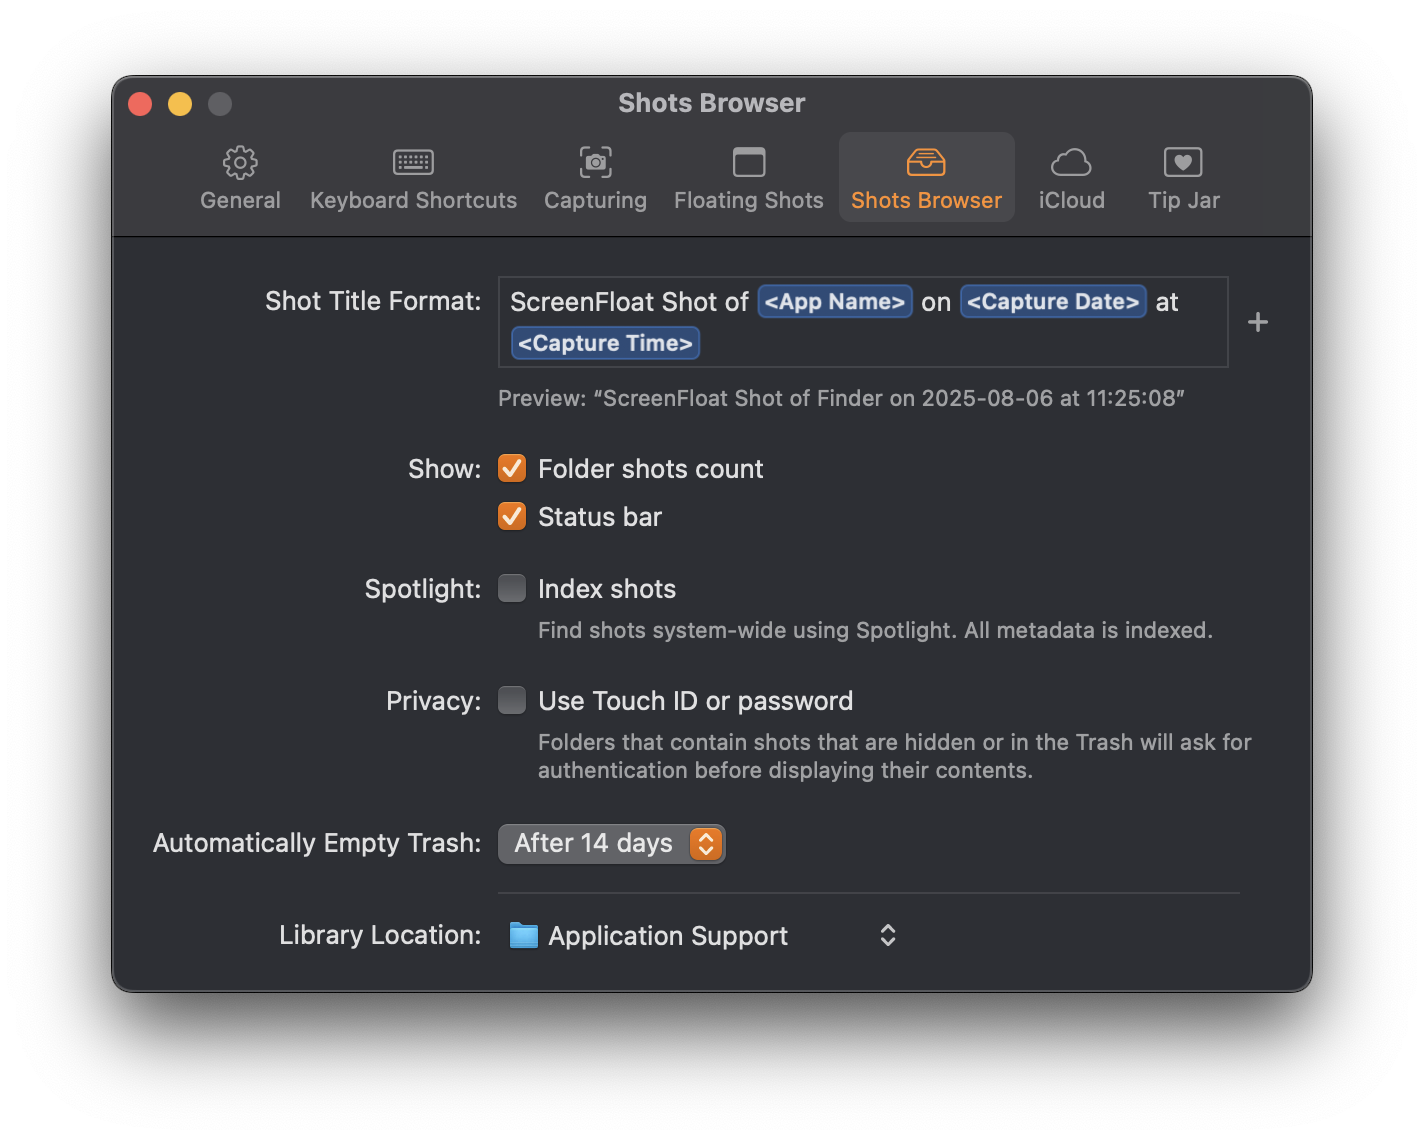
Shot Title Format Here you can give your file names a custom format, with variables the app fills out for you. The following options are available to you here:
<App Name>: The name of the captured app
<Shot Kind>: Like “Image Shot” or “Video Shot”
<Capture Date>: The date the shot was captured
<Capture Time>: The time the shot was captured
<Year>, <Month>, <Day>, <Minute>, <Second>: The components of the capture date/time
<Unix Timestamp>: A unix timestamp representation of the capture date and time
<File Size>: The file size of the shot (before the export), like “320KB”
<Dimensions>: The dimensions of the shot, like “640×480”
<Width>, <Height>: The components of the dimensions of the shot, like “640”, or “480”
<Duration>: For recordings, the duration of the video, like “1m22s”
<Random>: A random, 12-character string
Folder shots count With this enabled, you’ll see the number of shots in your folders.
Status bar Enables the status bar at the bottom of the Shots Browser. It shows you the number of shots, how many are selected, or, when searching, how many results there are. Also allows you to manually sync.
Spotlight: Index shots Enables system-wide Spotlight search of your shots. More on that in a future installment of this series.
Privacy: Use Touch ID or password With this enabled, (smart) folders that contain trashed or hidden shots will require authentication before displaying their contents.
Automatically Empty Trash The interval in which the trash should be emptied automatically. Can be set from 1 day to Never. This can also be changed by right-clicking the Trash in the Shots Browser.
Library Location By default, ScreenFloat stores its library in your User folder under ~/Library/Group Containers/G78RJ6NLJU.group.at.EternalStorms.ScreenFloat/Library/Application Support/ . With this, you can move it to a different location. Requires a relaunch.
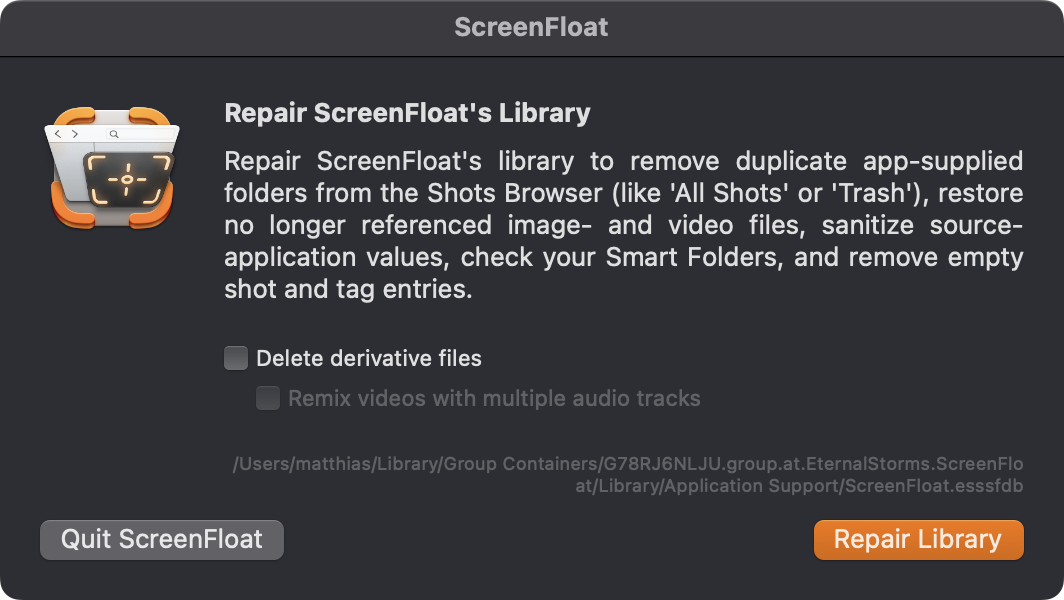
Repair Tool
ScreenFloat can attempt to repair itself in certain cases: It checks for duplicate app-supplied Smart folders, like “All Shots”, or “Trash”, or “Favorites”) and removes them, looks for no-longer referenced image- and video files and restores them for you to decide what to do with them, sanitizes tags and source-application values, and checks your Smart folder rules for integrity and validity (where, if ScreenFloat discovers issues, you’ll be able to forward that info to me so I can figure out what’s going on).
Select “Delete derivative files” if you’d like ScreenFloat to re-render all images with annotations from their original sources. This also cleans out superfluous files that are no longer associated with a shot in your library. Select “Remix videos with multiple audio tracks” to re-render videos with multiple audio tracks into additional files with a single audio track, which ScreenFloat does behind-the-scenes for broader compatibility when sharing.
iCloud Sync
Have your ScreenFloat library with you everywhere, by syncing everything using your iCloud account.
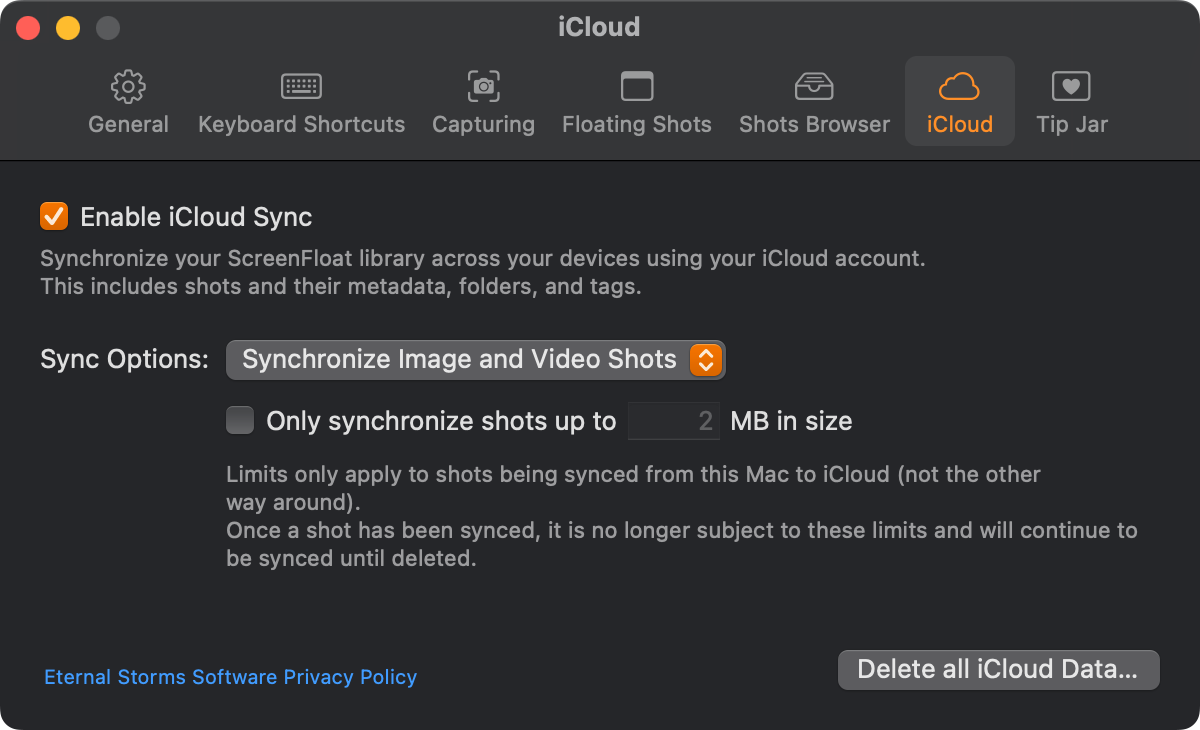
ScreenFloat’s iCloud Sync settings
If you choose to use iCloud sync, ScreenFloat synchronizes all your shots by default. But you can fine-tune it to your liking. You can specify whether to synchronize all shots, image shots only, or video shots only. Additionally, you can set a file size limit to make ScreenFloat only synchronize shots that have a file size smaller than the limit you set.
Limits only apply to shots going up to iCloud, not coming down from iCloud: If you have a file size limit set to 2 MB, images and videos larger than that will not sync up, but shots in iCloud larger than that will sync down to your Mac. Or, if you choose on one Mac to only synchronize image shots, it means video shots will not be synced up from that Mac to iCloud, but they will sync down from iCloud. Once a shot has been synced, it is no longer subject to these limits. Basically, if you start synchronizing with no restrictions, and later change your mind to only sync image shots and no video shots, video shots already synced up to iCloud will continue to sync changes and will not be deleted from iCloud unless you manually delete the shot.
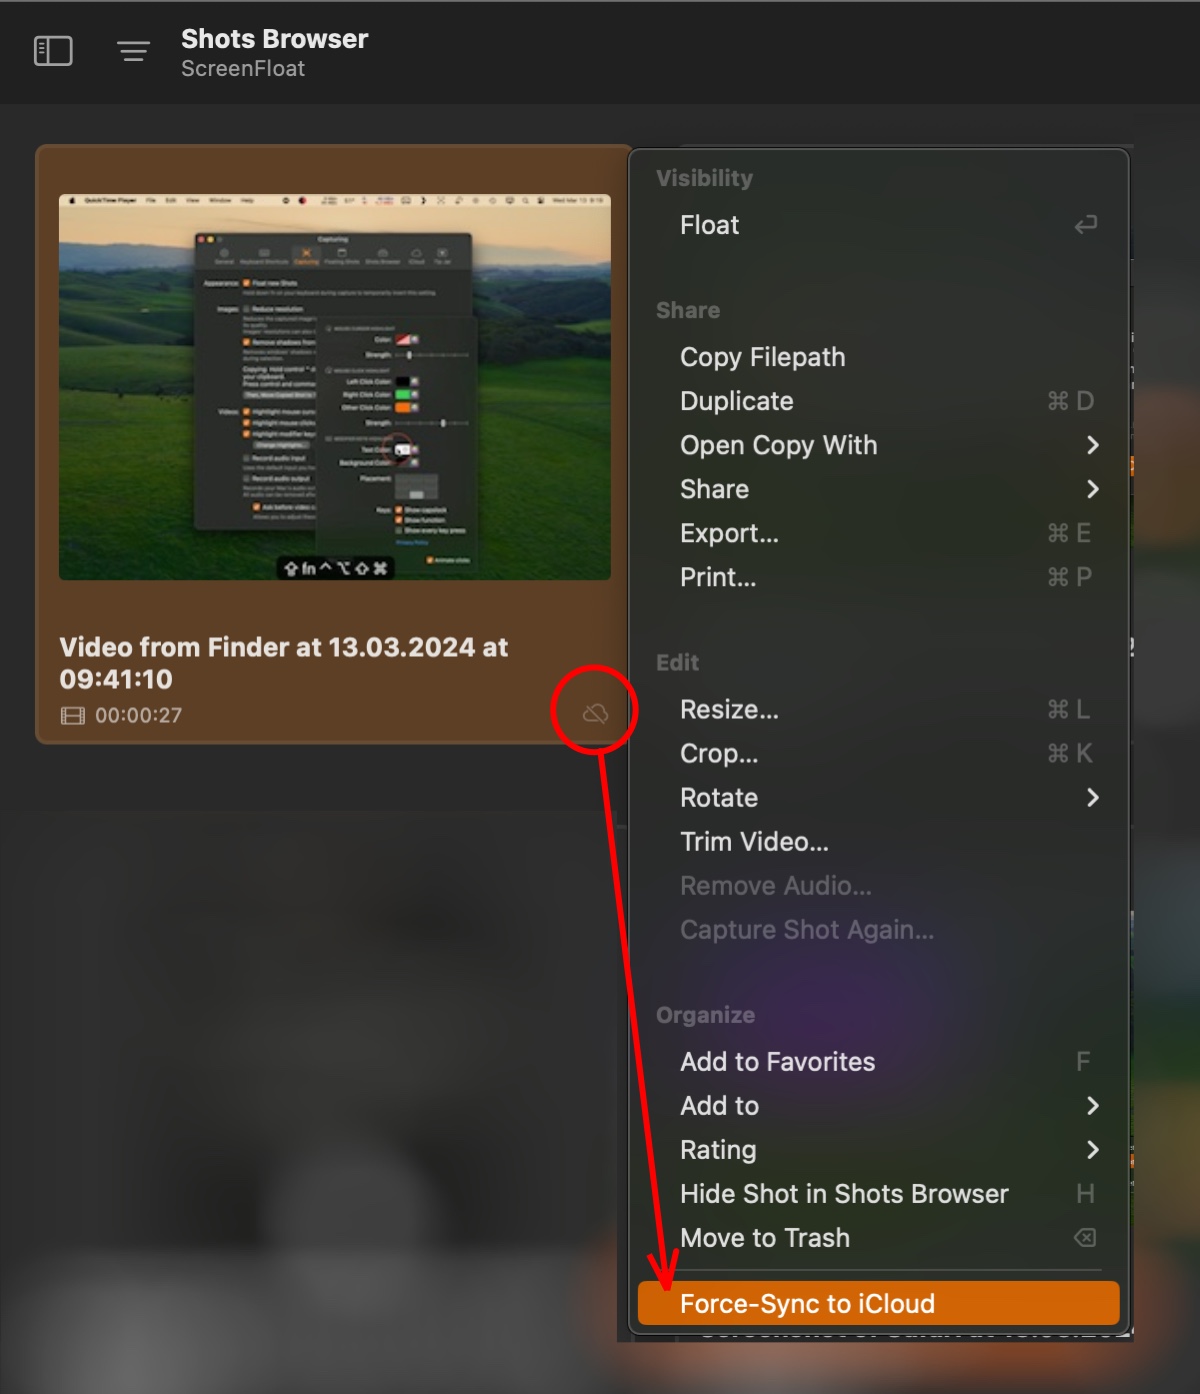
Shots that are excluded from sync because of a limit you have set up can be force-synced in the Shots Browser by right-clicking them:
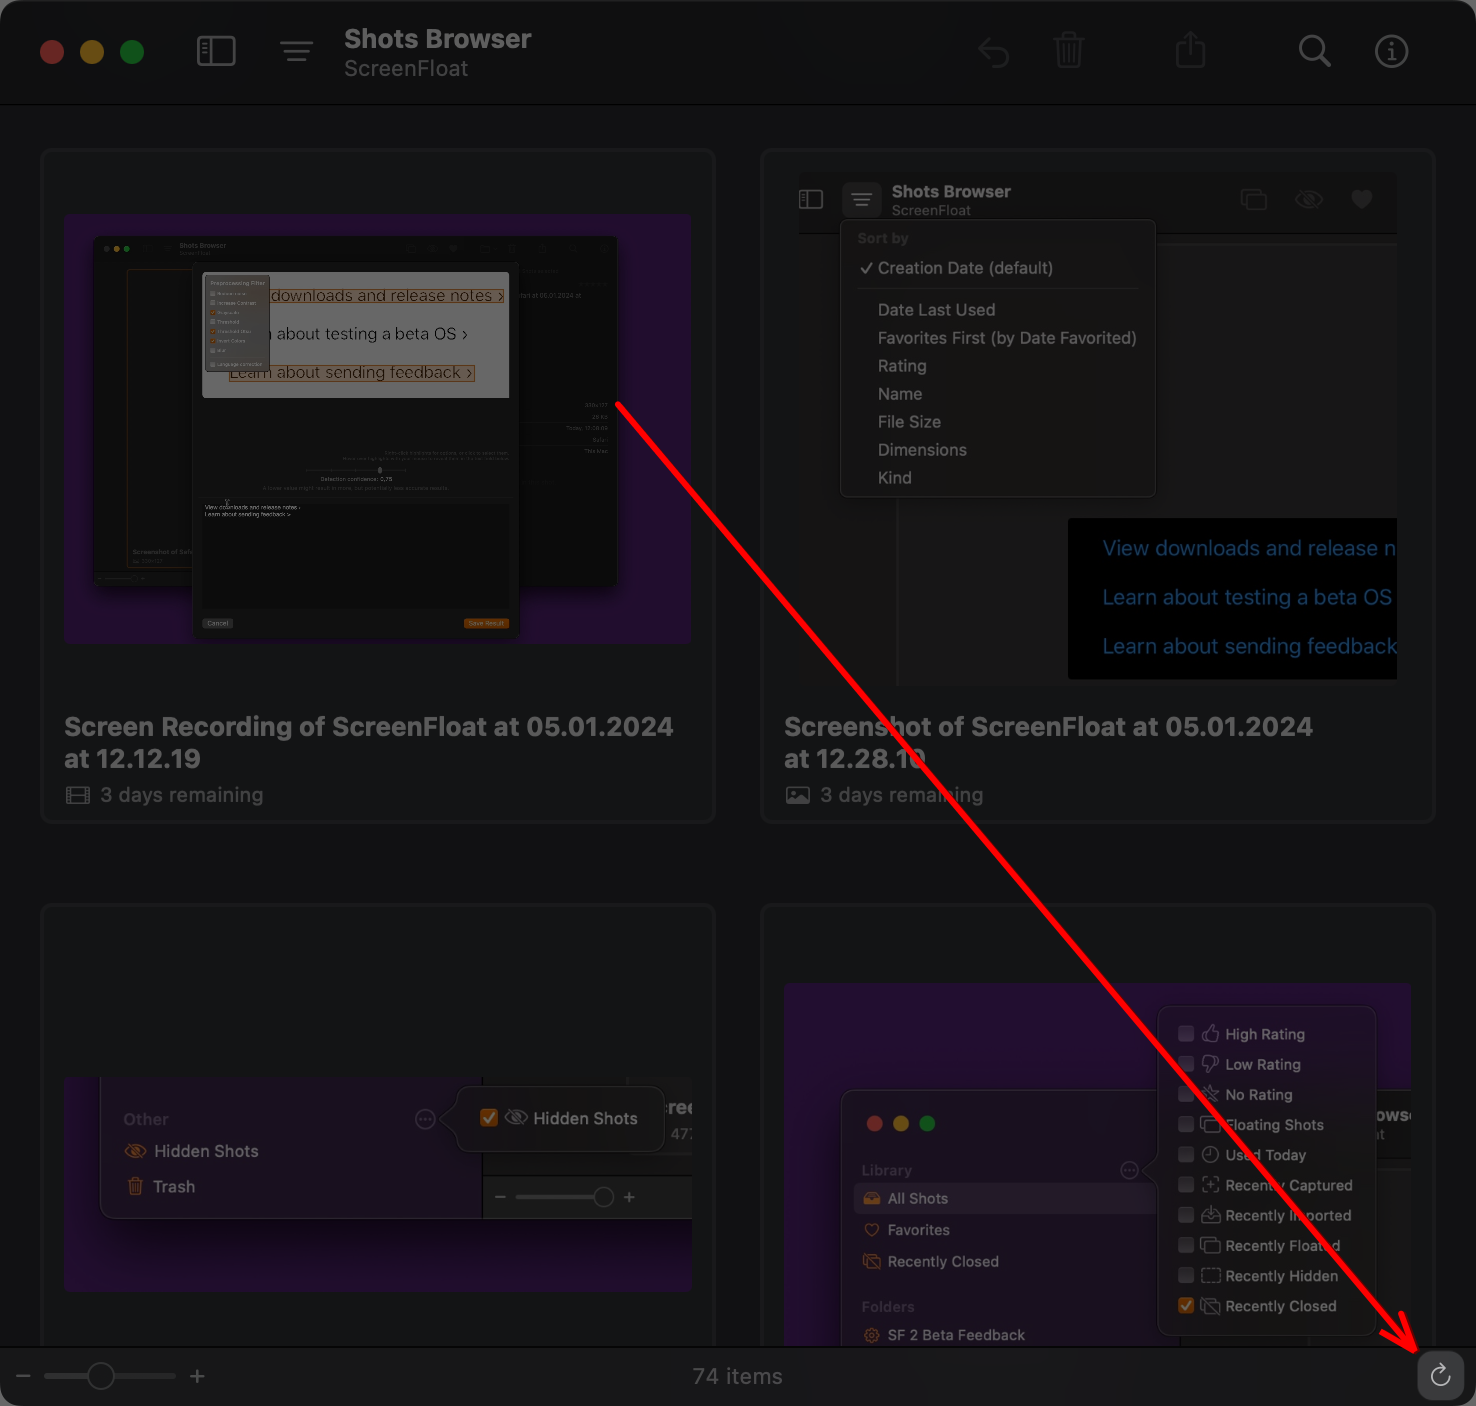
You can manually start a sync in the Shots Browser, by clicking the little refresh button at the far right of the status bar:
Refresh iCloud Sync manually in the Shots Browser
This is also where you’ll be informed about any errors that might occur, in addition to the Settings’ iCloud panel.
What gets synchronized in detail:
Your shots, their annotations, and metadata (title, notes, detected text/faces/barcodes, etc)
Your tags and their metadata (favorite status)
Your folders and smart folders
Minimal information about the devices you synchronize, to enable filtering by device in smart folders and search.
You can read my Privacy Policy here. The gist: I see nothing, and I want to see nothing. Whenever any of my apps use your internet connection, it’s to realize a feature in the app, not to send me any usage data, tracking data or anything else like that.
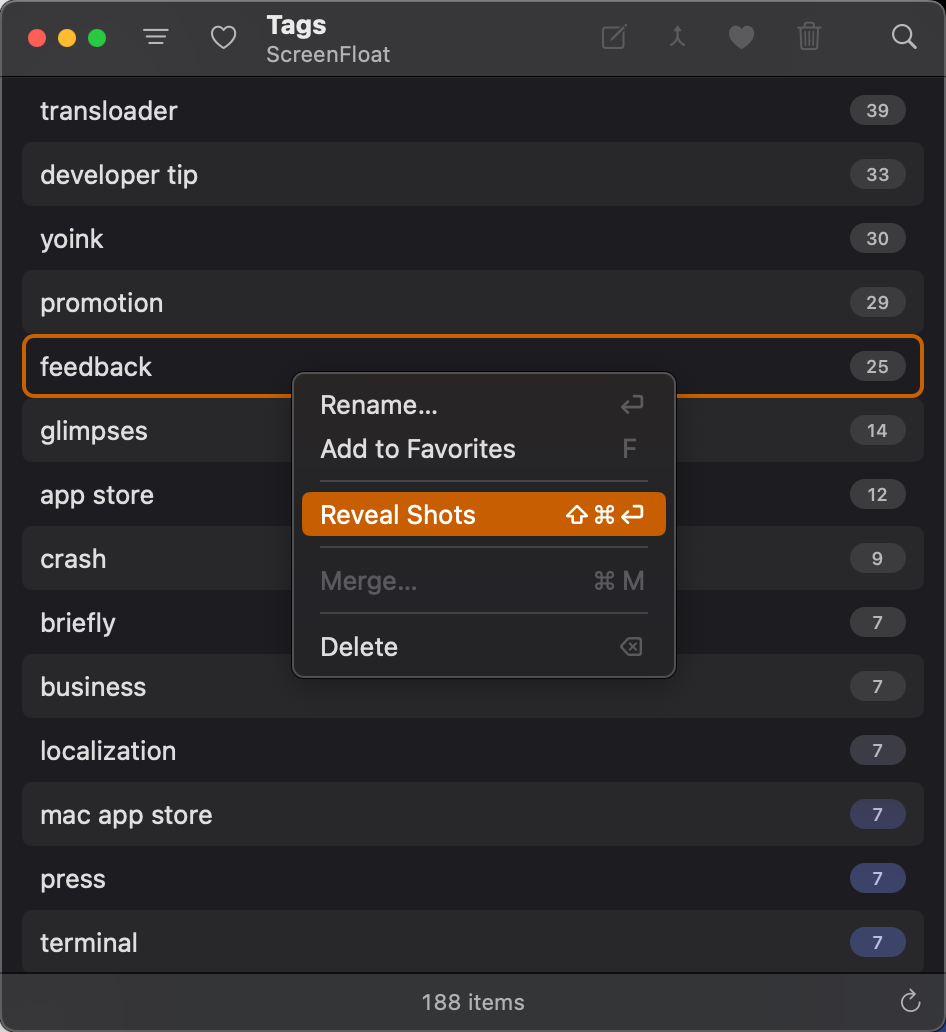
The Tags Browser
Using ScreenFloat 1, I always longed for a way to see all my tags and to organize them more precisely. That’s why in ScreenFloat 2, there’s the Tags Browser, which lets you (and me) do exactly that.
You can rename tags, in case you discover a typo. You can merge tags, if you’ve accidentally created similar ones. Shots will automatically update to the merged-into tag. You can delete tags, if you no longer need them. They will be removed from all shots they were assigned to. You can favorite tags which will help in discovering in the tag menus, or when auto-completing tags in the Shots Browser’s Info panel.
It’s also neat to be able to Reveal Shots tagged with one or more selected tags right from the Tags Browser in the Shots Browser.
It shows you the number of shots tagged with each tag, which helps weed out shots and tags you might no longer need.