ScreenFloat lets you keep visual references to anything you see on your screen floating above other windows using screenshots. It’s also a screenshot organizer.
I’m now working on ScreenFloat 2, and I thought it would be fun to chronicle my progress, struggles, successes, failures and break-throughs, as well as random stuff while developing it.
Disclaimer: Estimated Time of Arrival, Pricing
I don’t have an ETA. I’m a solo developer, with multiple apps that need maintenance and updates, there are just too many moving parts for me to be able to estimate, well, basically anything. And while that may be a serious lack of managerial skill: I accept that flaw and ignore it 🤷♂️.
Regarding pricing, I don’t know what ScreenFloat 2 will cost yet. But I am resolved on its upgrade path: existing customers of ScreenFloat 1 will receive ScreenFloat 2 for free.
Entry 4 – Roadblock: Deadlock
It’s been quiet in this journal recently. The reason’s twofold.
1) I’ve been busy making good progress on the app and didn’t want to interrupt my flow.
2) I encountered a deadlock issue in my Core Data stack that I’ve been trying to debug for the last one-and-a-half weeks (and never solved directly, but found a way around it).
So much has happened and changed, though, so it’s high time I give an update.
Floating Shots
I reworked the floating shots a bit. If you recall, I had a few kinks to work out regarding the floating shot’s framing.
I reconsidered my approach and instead of using a window below the actual shot content’s window to act as the framing that holds the buttons, the entire thing is just one single window now, and with that change, I was able to get rid of all the issues I had.
Getting the resizing of a floating shot was a bit of a hassle: the image itself has a different aspect ratio than the “outer” framing window. However, the user resizes that outer window, not the shot itself, so the resizing has to take that into account. Nothing a bit of trial-and-error couldn’t fix; I ended up with an aspect ratio NSLayoutConstraint on the image that does the heavy lifting for me. The only downside is that if the image’s width is larger than the image’s height, resizing the window from its lower or upper edge won’t work. Conversely, if the image’s height is larger than its width, it can’t be resized from the sides. Thankfully, resizing from the corners always work, so it’s not a deal-breaker, but it’s something I’ll investigate further later down the road.
The tall image on the left can be resized from its corners and the top and bottom, but not from its sides.
Shots Browser
I defined my first milestone in ScreenFloat 2’s development to be “feature parity” with ScreenFloat 1.
That’s the thing about complete re-writes (which ScreenFloat 2 is – see journal entry #1 for my reasoning): you’re spending a *lot* of time re-implementing stuff that’s already there and works.
That can be frustrating at times, because you’re not making any progress on those cool new features you want to implement with the new version. But it can be equally rewarding, because you get to improve upon what’s already there, and use all the experience you’ve gained since implementing the original.
Now, as part of the “feature parity” milestone, the next step for me was to get started on the Shots Browser.
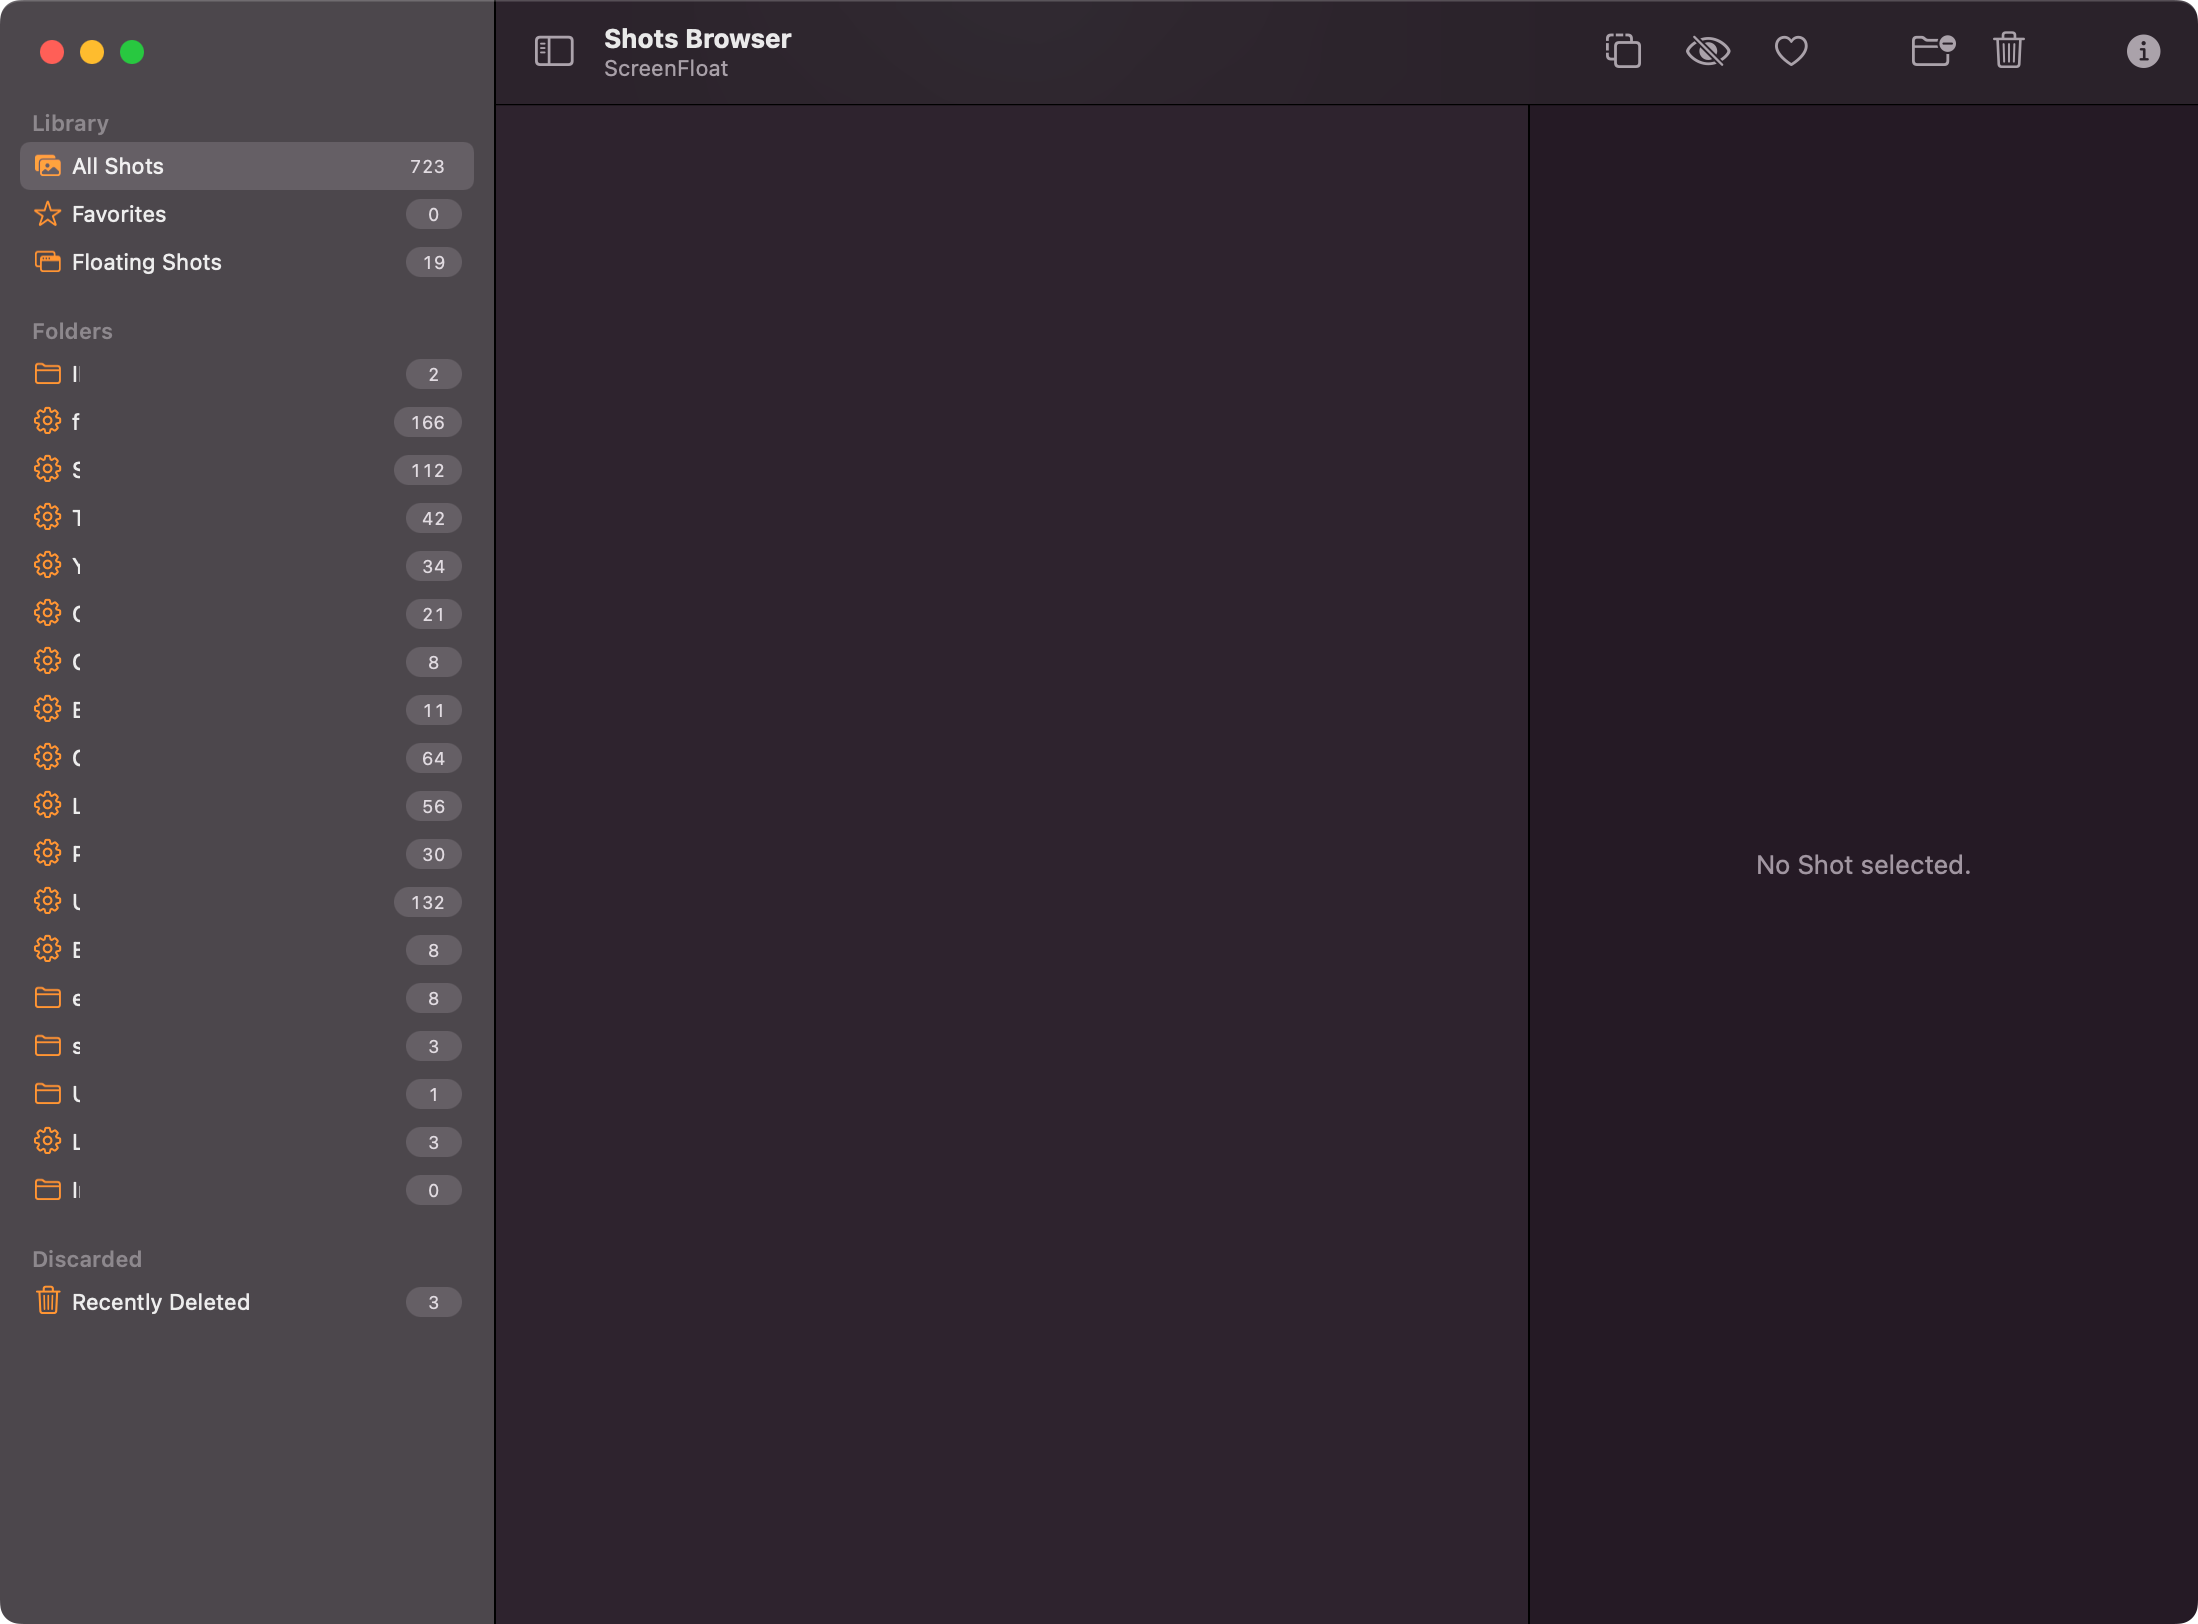
It’s your basic three-pane-setup.
The left pane is your source list. It consists of app-defined folders (like “All Shots”, “Favorites” and “Recently Deleted”) and (smart) folders you can create.
The middle pane shows shots contained in the folder you selected in the source pane.
The right pane shows information about the currently selected shot (if any).
The source list is an ordinary NSOutlineView, and has been improved quite a bit already in this early stage over its v1 counterpart.
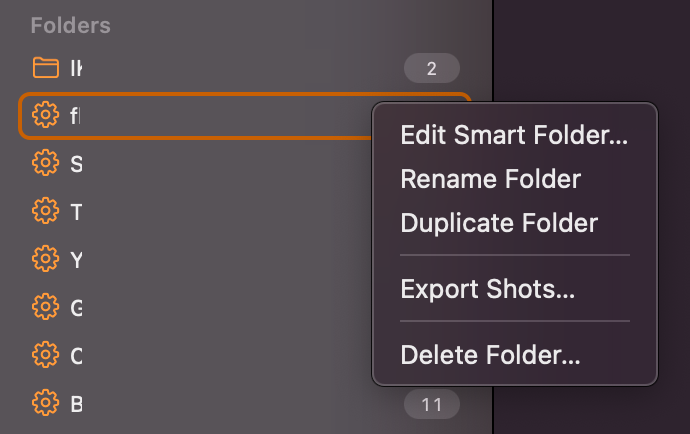
Folders can now be duplicated, and its contained shots exported via the contextual menu.
You can also drag out folders – for example, to Finder – which will trigger an export of the contained shots to the dragged-to destination.
Aside from deleting the folder, you can also hold the option (⌥) key to show the alternate option, which deletes the folder, and all its contained shots.
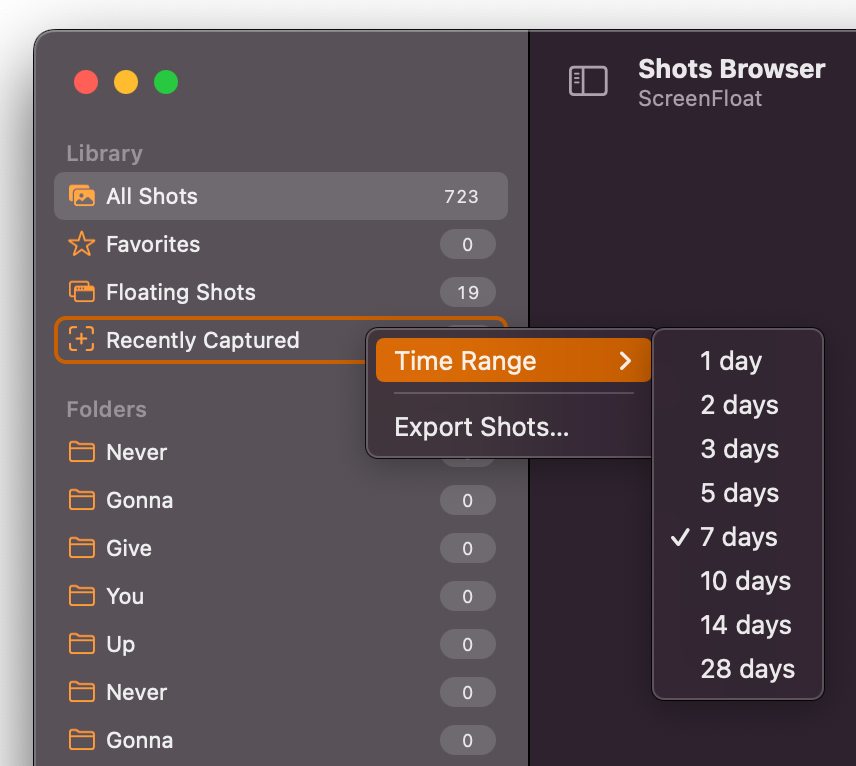
ScreenFloat 2 defines a couple of smart folders for you, like “Favorites” or “Floating Shots”.
Hover over the Library header, and you’ll be able to add and remove any you want or don’t want:
For each of those, you can change just what “Recently” means to you:
Apart from the app-defined folders, you can create your own (smart) folders.
“Normal” folders just hold the shots you add to them, whereas smart folders automatically populate themselves according to rules you set up for them:
I’m very happy with the tag suggestions feature. It serves up tags in the following way:
First, it displays tags that *begin* with the exact string you typed.
Second, it displays tags that *contain* the exact string you typed, *anywhere* within the tag.
And lastly, as you can see in the video, where I type “ysmt” and it serves up “yosemite”, it does a bit of regex matching.
With all that searching going on, I figured it would make sense to split that up into multiple threads (each search on one thread). However, as it turns out, that’s actually slower than doing it one after another – instead of 0.0002+ seconds, it takes 0.0003+ seconds per search. Maybe with a gazillion of tags, multi-threading would be the way to go, but I decided against it for now.
Instead, I’m doing some smart caching, where any subsequent search only operates on the result of the previous search, so if you type “y”, all tags are filtered for “y”. Then you go on to type “o” (entire string now would be “yo”), and it will only operate the new search on the already existing result from the “y” search. All results are cached for the duration of the creation of the smart folder, after which, it’s discarded, because tags are more likely to change then.
Smart Folder rules can become quite complex, and it’s something I’m looking into improving going forward, as those are directly matched against the Core Data shots library. In my testing, adding lots of tags to lots of shots, it can bring the Mac down to its knees (partly Core Data querying, but mostly my own current implementation of displaying the number of shots in a Smart Folder).
To improve that, I’m moving all boolean rules (like isFavorite, or isInCategories) to the front of the search, as those are much faster than string comparisons. This way, subsequent string searches would only be executed on a subset of the shots (i.e., only on shots that are a favorite), not the entire set, which would be the case if the string search was the first thing in the matching process.
I’ve also started work on importing shots into the Shots Browser. Obviously, taking a floating screenshot using ScreenFloat is the main way to get new shots into the app, but I also want to facilitate other ways and sources.
So the Shots Browser supports drag and drop for ordinary file drags, and promise file drags. It can also create a folder for you right away, depending on where you drag the files:
Enough about the source list. Let’s move on to the middle pane: the shots list.
Not much UI work has gone into this yet, but behind the scenes, a lot has changed.
ScreenFloat 1 uses IKImageBrowserView, which served me well, but it’s about to be deprecated by Apple, and it’s recommended to switch to NSCollectionView instead, so that’s what I did.
I have a rudimentary system for displaying shot previews set up, but it’s not finished yet and can take up quite a bit of memory right now, but that’s obviously just for now, while I get things going.
For shots to be displayed, I look at my app’s thumbnail cache and see if I have an image cached. If not, I look at the app’s Caches directory to see if I’ve already created a thumbnail in the size I require and load it from disk. If not, I create a thumbnail from the original image (because it’s usually smaller than the original shot), save that to disk (so I don’t have to do the thumbnail creation again later) and load it into the app’s cache (so I don’t have to read it from disk every time I display the shot).
I don’t know if resizing the previews is necessary (although it is available in ScreenFloat 1), but I probably will implement it in ScreenFloat 2, too. It’s just a bit of additional work because IKImageBrowserView allowed for it more readily than NSCollectionView.
Moving on to the info pane.
It went through a couple of iterations:
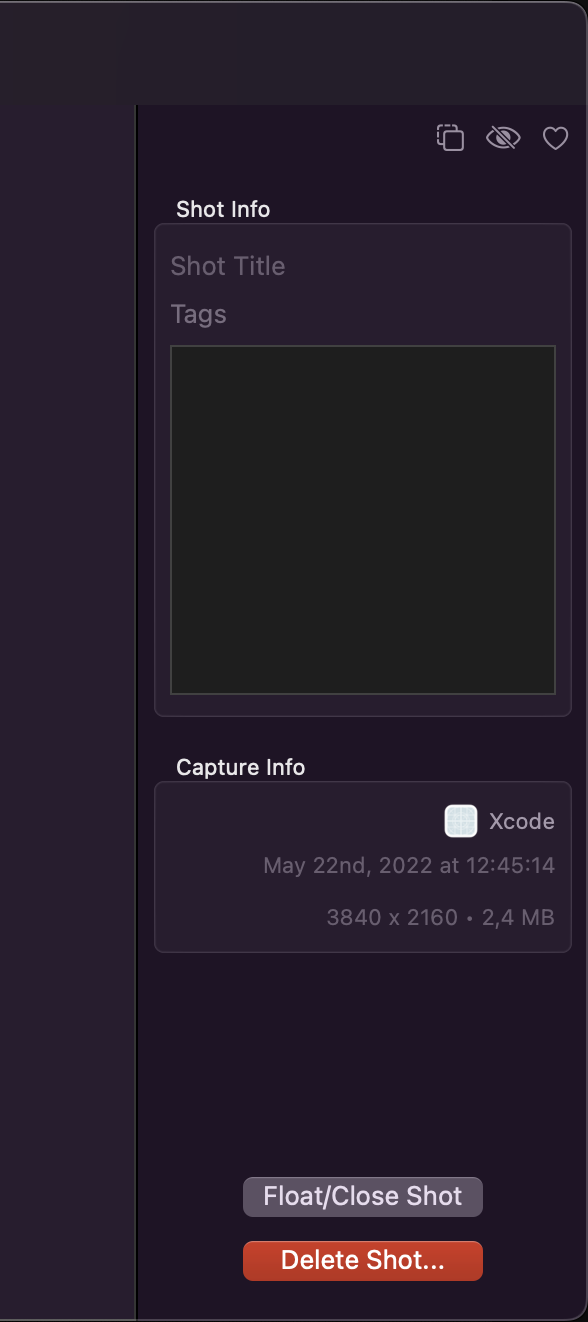
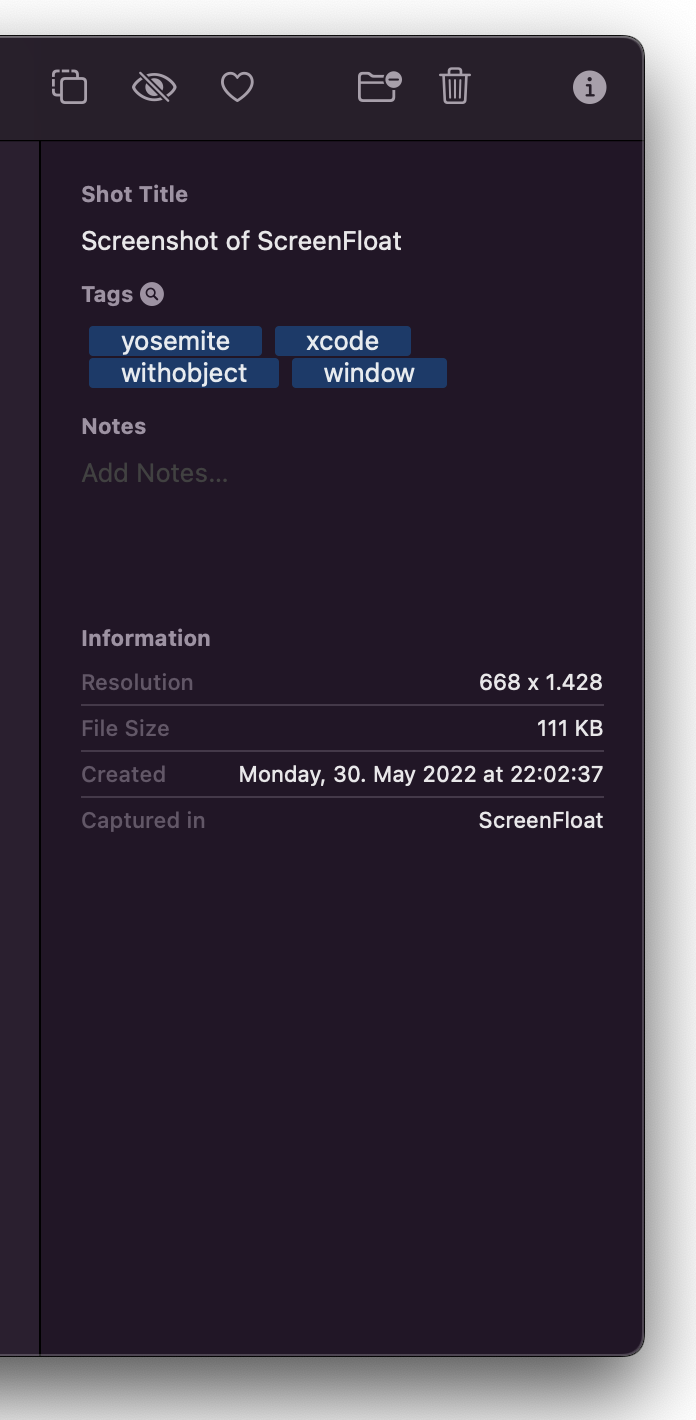
What I like most about it, if I may say so myself, is my custom implementation of a “compressible” date field. The smaller the pane gets, the less info the date shows, in order not to be cut off / truncated:
Please ignore the red stuff at the left – it’s a UI debug flag I left on for the NSCollectionView shots list.
Tags Browser
A new feature in ScreenFloat 2 is the Tags Browser.
While working on the migration from the SF 1 database to the new Core Data backed one, it occurred to me I had many duplicate tags, just spelled differently – uppercase, lowercase, with or without space, etc.
I wanted a way to edit (rename), delete, favorite and – most importantly – merge tags. That’s how the idea for the Tags Browser was born.
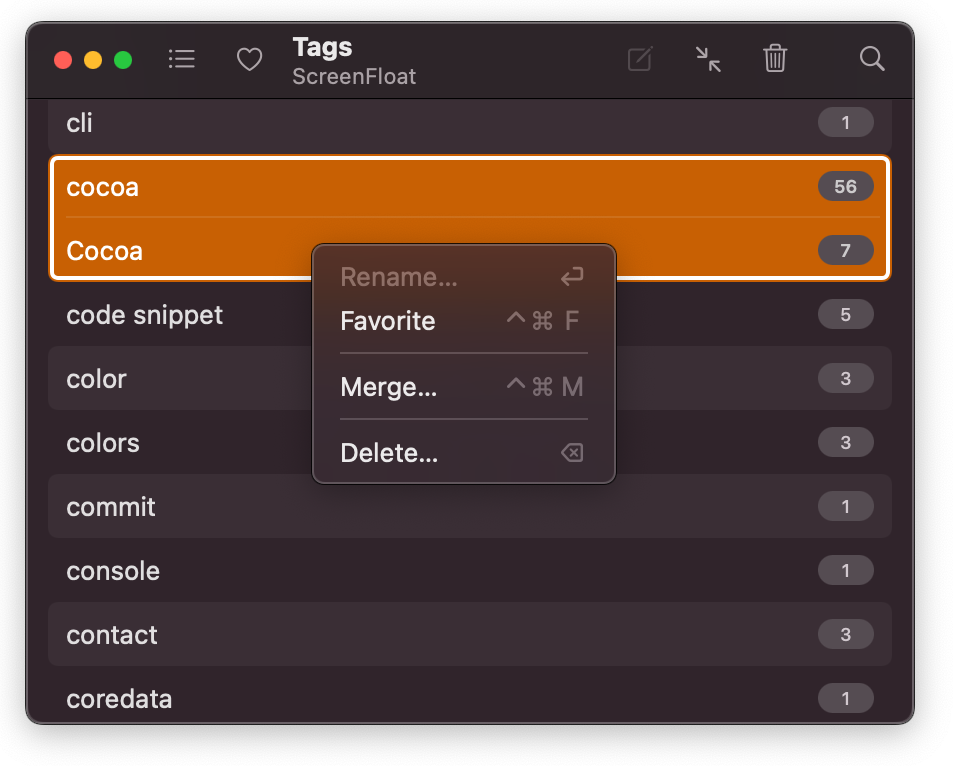
As you can see, I have both “cocoa” and “Cocoa”. Now I can merge them into just one (or an entirely new one), and the Shots tagged with those tags will update automatically, thanks to Core Data.
Bad Luck, Dead lock
You know how they say you’re insane when you do the exact same thing over and over, and expect different results?
Speaking of tags, I discovered an issue that drove me friggin’ crazy the past two weeks.
First, a quick note on what a deadlock is.
An app can have multiple layers of execution (threads).
Every app has at least the main thread, which is where UI work happens (for example, updating the Shots Browser’s Source List happens on the main thread).
For longer running tasks, it might be better to run them on a background thread, so that the main thread – and thus, the app’s UI -, is not blocked.
However, if the background thread requires the main thread to complete something, and the main thread requires the background thread to complete something at the same time, it’s game over. You’re done. Finished. Kaputt.
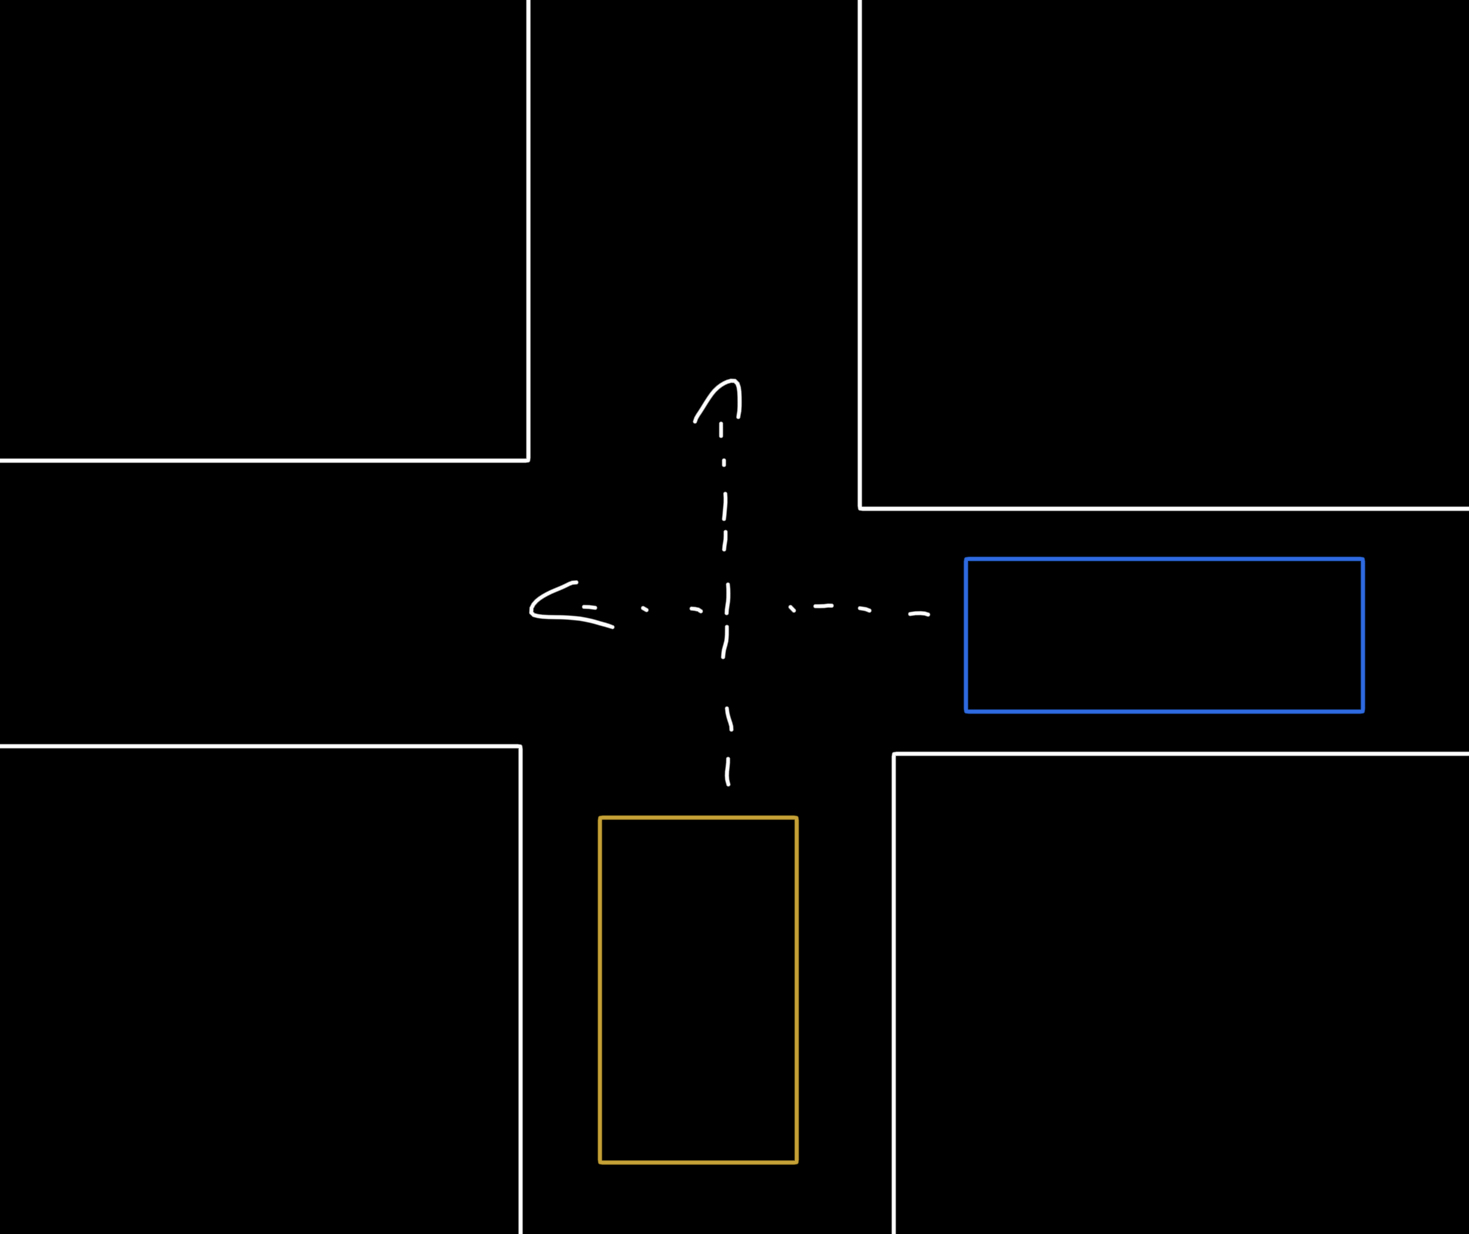
The blue care will only drive if the yellow car drives first.
Deadlock.
And that’s exactly what I experienced. But that’s not the driving-me-insane part.
It’s that this only occurred sporadically.
A bug is fairly easy to figure out and fix if you can reproduce it reliably. You execute function A, and the app crashes. Good. Fix function A.
But if you execute function A a thousand times, and out of that, it crashes twice, what to do then?
I had my Core Data stack set up like this:
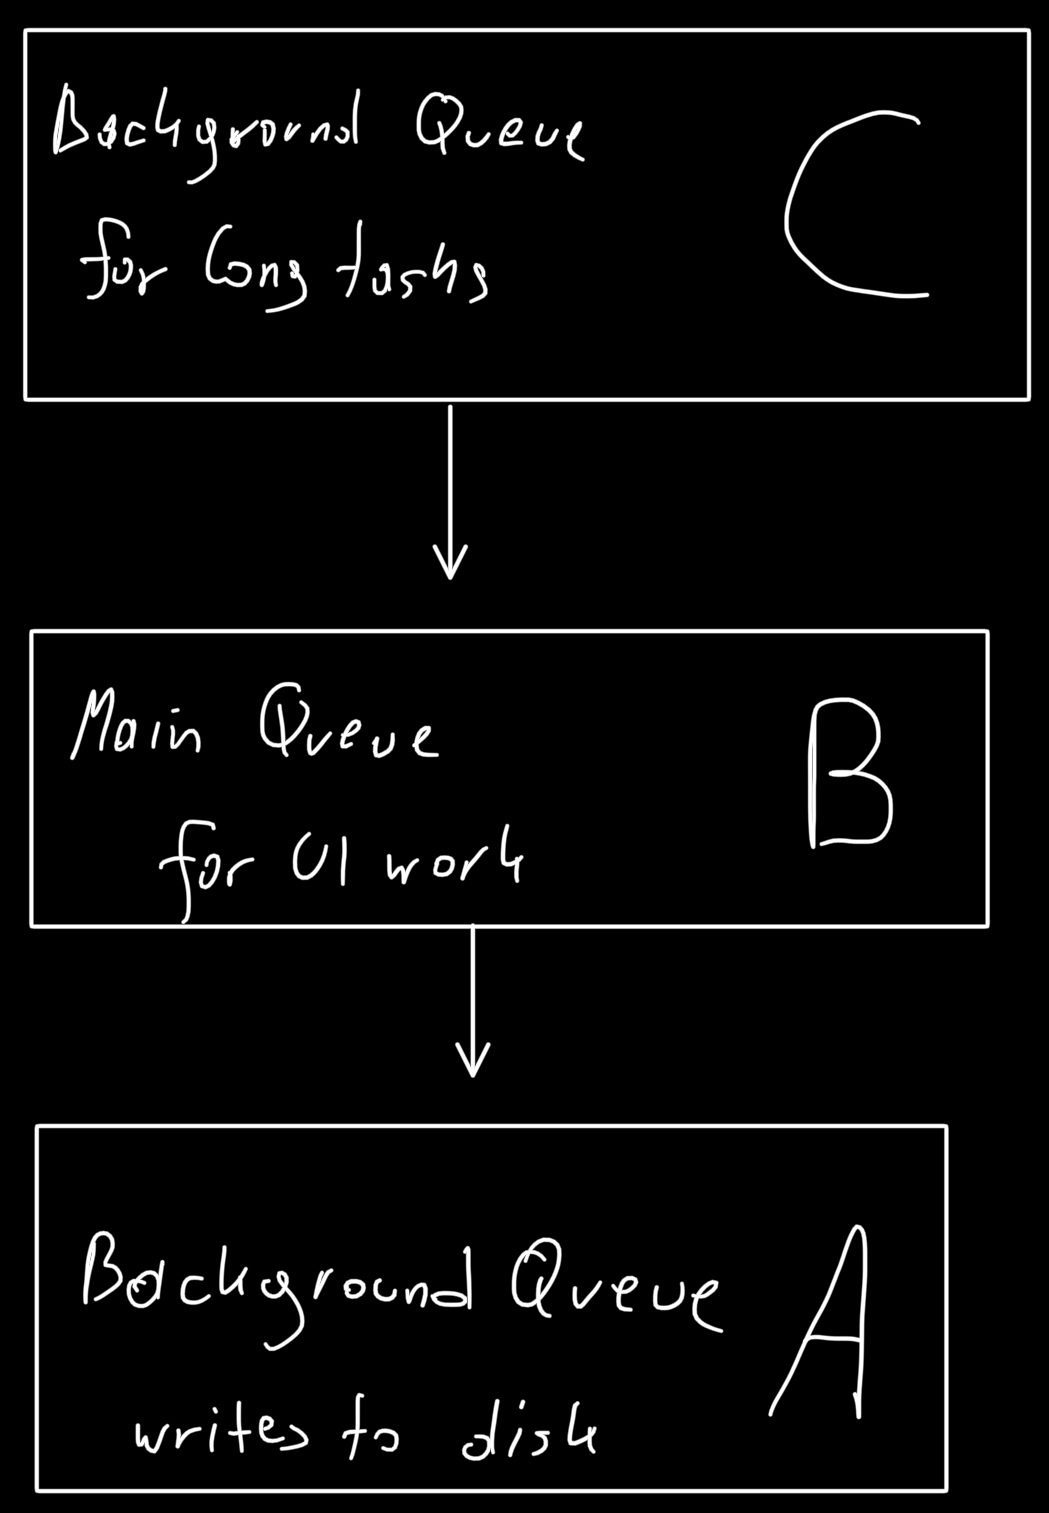
Three contexts. Context A is on a background queue, which writes to disk. It’s good to have this on a background queue, in order to not block the UI/app if it’s a longer operation.
Context B is on the main queue, so I can populate the interface with objects’ contents.
Context C is on another background queue, if I have to fetch a lot of shots, for example.
When I save context C, it saves to context B (not yet to disk).
When I save context B, it saves to context A (not yet to disk).
When I save context A, it saves to disk.
So in order to save a change I have made on queue C, I have to save C, B and A subsequently.
And it works fine. Except when it doesn’t. I found that when I drag > 700 shots to one tag, context C and B save fine, but context A deadlocks. But sometimes, it works without a hitch.
Or when I create a new Folder with > 700 shots, and save from C to A and to disk, it deadlocks. But sometimes, it works without a hitch.
You know how they say you’re insane when you do the exact same thing over and over, and expect different results?
Well, what say you to this, Einstein!?
I thought it might be an NSFetchedResultsController (which is a way to automatically be notified about changes to objects in Core Data, simply put) that gets in the way, as it is updated behind the scenes by Core Data when saving occurs.
So I disabled them. Same result.
I then created a sample project, trying to isolate the issue, and sure enough, it happened there as well.
This sort of thing gnaws at me. It’s always in the back of my mind, because I can’t figure it out. I tend to fixate and get frustrated, and eventually end up thinking the project is doomed.
To vent, I took to twitter asking for help. And thankfully, I got a pointer, directing me to NSPersistentContainer (thank you, Frank Reiff and Steve Harris).
I did know about it, but for some reason I thought it was only available on macOS Big Sur (11.0) and newer. I was wrong – it’s available on macOS Sierra 10.12 and up.
It does things differently, and it solved my deadlocking.
Instead of having one context writing to disk and child contexts on top (see drawing above), it has one main context (for UI work) which writes to disk, and offers backgroundContexts, which also write to disk directly. The way it’s set up, though, is that when you change something in a background context, the main context is notified about it and also has those changes more or less right away.
Now I must admit, I don’t know Core Data well enough to understand why I deadlocked before. And after almost two weeks of trying to understand, I really don’t care anymore.
I’m just happy it’s working now. I tried getting it to deadlock multiple times – with more than 700 shots dragged to a tag and saving – and it all works like a charm.
Fingers crossed.
That’s it for now.
It’s been tough – but any project eventually (and sometimes, repeatedly – yay) hits a point where I think it’s all over. At least, for me, that’s always been the case.
I guess, the lesson here is: no matter what happens, keep going. Don’t let it get you down too much. Ask for help if you need it, there’s always someone out there who’s been through it already, or knows something you don’t. And the Mac developer community is one of the friendliest and most willing to help there is.
Thank you for joining me. Feedback, input and questions are welcome: mail me, tweet me.
Take care!
[…] You can find the blog post here. […]