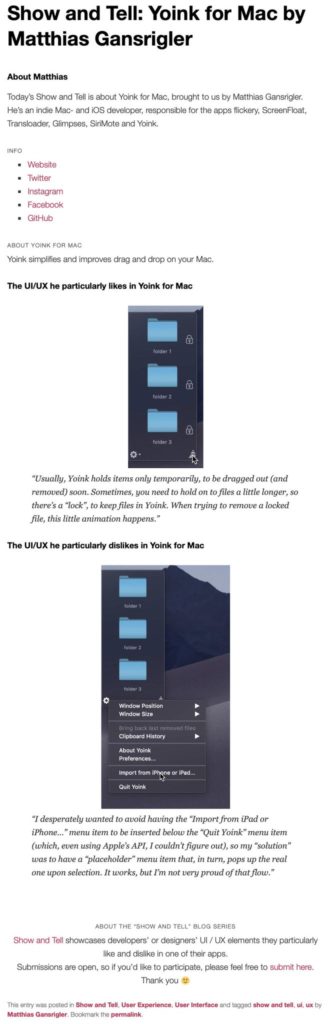
One of Yoink v3.3‘s new features is the detection of favicons for webloc files dragged into the app, making it easier to quickly identify individual weblocs at a glance. (A webloc file is something Finder creates when you drag a URL/link to it).
Think of it as QuickLook icon previews, just for websites:
.jpg")
weblocs without favicons
.jpg")
weblocs with favicons
The advantage is obvious right away, that’s why I jumped on it the second the feature was suggested to me.
Optional Setting
Even though I really like favicon detection and have it enabled on my Mac, I decided right at the start that favicon detection would be opt-in (disabled by default), for a couple of reasons:
- It requires an internet connection
- It uses data (very little, but still)
- I thought I’d use a Google Service for this (which I discarded after the prototype) and wasn’t comfortable having users use it without their “consent”
1) Internet Connection
Yoink is not an app that should require an internet connection at all.
It’s a “local” Mac app, it helps you with drag and drop, why need an internet connection?
As a side note, the connection itself actually doesn’t happen in the main Yoink app, it’s an XPC service that has the sandbox privilege, so the main app isn’t affected.
2) Data Volume
A Mac usually connects to the internet over WiFi or an Ethernet connection, and the data transferred for favicons *is* very small.
But there’s still a chance you’re using weblocs like crazy on a Mac connected to the internet via your iPhone’s Personal Hotspot on a data plan, which also makes it obvious why the user needs to be able to turn this option on and off.
It just made me more comfortable to have users opt-in to this option, instead of opt-out.
3a) Google?
Google has a nice favicon detection service, which is just a URL you pass another URL into to receive the image data:
http://www.google.com/s2/favicons?domain_url=PERCENT-ESCAPED-URL
There’ no need to parse the HTML yourself for the URL to the favicon, Google does it all for you.
3b) So Why Not Google?
What if the service goes away?
With Google having a bad rep for some users, would they use this feature?
What about privacy? (I don’t know, but they might collect your IP and then know what URL a favicon was loaded for, etc.)
So even though it worked very nicely, I decided to implement it myself.
Getting the Favicon
With Google out of the picture, I had to roll my own detection and parsing.
What I do is actually very, very simple.
I load the webloc’s URL’s HTML content, and then look through the header part.
In particular, I look for one of the following lines:
rel=“apple-touch-icon”
rel=“shortcut icon”
rel=“icon”
rel=“apple-touch-icon-precomposed”
in that order. (I’m sure there are more I could go through, but those were the ones that I came across while testing.)
Should none of those exist, I just try something like:
•) http:// … /favicon.ico
•) …/favicon.png
•) rinse and repeat for every image format you can think of
If I have no luck there, either, I bail and return macOS’ default webloc icon.
If I am lucky and I find a “rel” I’m interested in, I figure out what the href contains (an absolute link to the image, a relative path to the image, or just the name of the image file itself). Once I know that, I can load the image file and composite it into the final icon.
The final icon is cached so Yoink won’t have to connect to the internet and re-download favicons for weblocs that point to the same base URL.
Drawing the “personalized” webloc icon
I went through three iterations, each at its own, unique laziness level.
Iteration 1, laziness level 3 (extremely lazy)
Just show the favicon:
.jpg")
No wonder I didn’t use it. It’s so lazy.
Second, it doesn’t even remotely resemble a webloc file anymore. It actually looks more like an image file’s QuickLook preview icon, and that’s a bad thing, as it could very possibly confuse users.
So I went on to
Iteration 2, laziness level 2 (pretty lazy)
Show the favicon super-imposed on the webloc icon:

That’s better. But not good, either. Favicons can be transparent, like the one here, but they can also be opaque, blocking the WEBLOC text in the icon and making the overall icon look more blocky and less nice.
Onwards and upwards!
Iteration 3, laziness level 1 (not that lazy)
Crop out the “Safari” part of the webloc icon and paint the favicon below it:
.jpg")
If the favicon is transparent, I draw it on top of a white background (so it would fit with the rest of the original webloc icon), if it’s not transparent, the favicon’s background is used, solving everybody’s problems. And you can still see that it’s a webloc file, at first glance!

– – – Do you enjoy my blog and/or my software? – – –
Stay up-to-date on all things Eternal Storms Software and join my low-frequency newsletter (one mail a month at most).
Thank you 🙂
 Submissions will be published on no particular schedule in no particular order on this blog.
.jpg")
.jpg")

.jpg")
.jpg")
.jpg")
.jpg")
.jpg")