Software

Glimpses App Icon

Glimpses 2.0 for Mac

After a lot of hard work, I’m very happy to finally be able to announce the immediate availability of Glimpses 2.0 (formerly known as Briefly) on the Mac App Store.
The app has undergone some major changes, and I wanted that to be reflected in the app- name and icon (wonderful work by the very talented Alexander Käßner).

What Does Glimpses Do?

Still Motion videos typically show photos for not much longer than the fraction of a second.
Glimpses is designed to let you create these videos with just a few clicks, with stunning results.

The app produces high-quality video with a resolution of up to 4K and lets you add a soundtrack to make your video really sing.

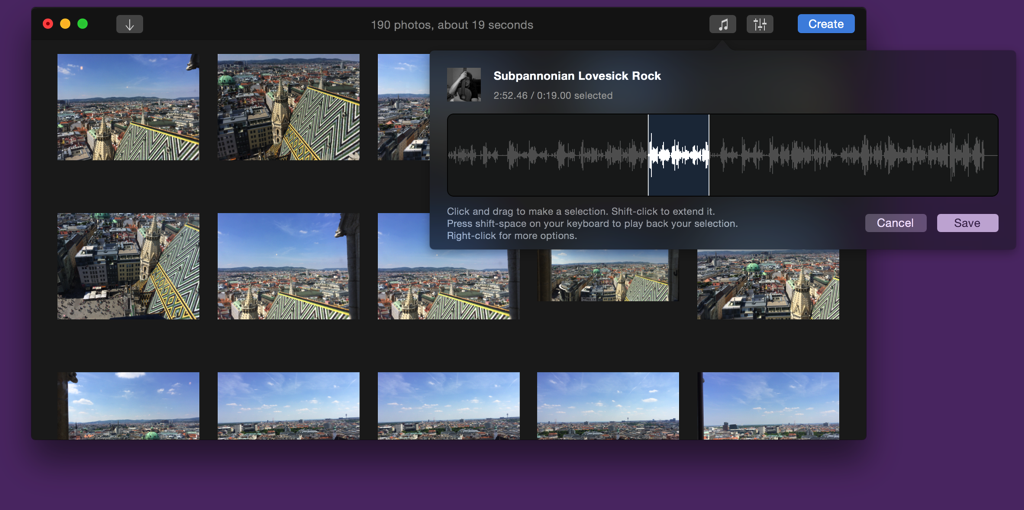
Glimpses with soundtrack selection

What’s New?

– Soundtracks: Glimpses 2.0 makes it much easier to add multiple soundtracks. It also lets you select the parts of the soundtracks you really like to make your Still Motion video really shine.
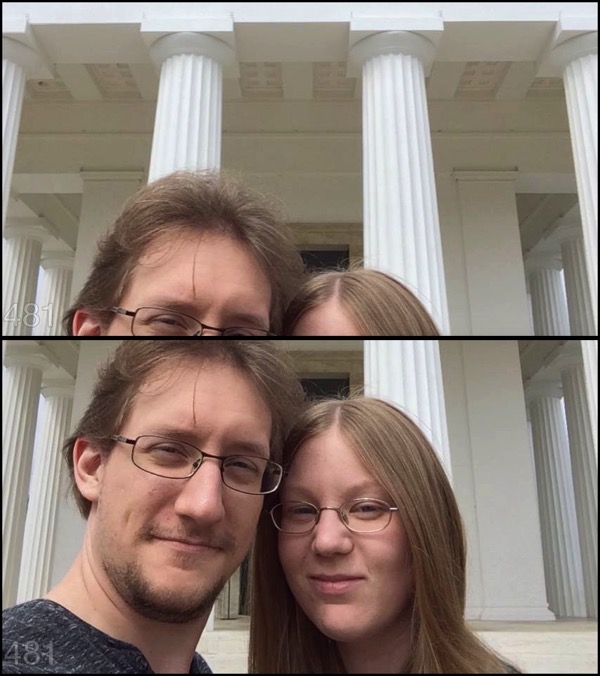
– Face Detection: Glimpses analyses your photos for faces and places the photos in your video accordingly for much nicer and more personal results.
– 4K Resolution: Going beyond 1080p, Glimpses now renders your videos with a resolution of up to 4K.
– Projects: You can now save your projects. Up until now, the app only remembered the last used photos and soundtrack.

… as well as many more, minor improvements (like improved support for panorama photos) and fixes.

Details

Soundtracks

Soundtracks are a vital part of a Still Motion video. Glimpses makes it so much easier to add and edit one or several soundtracks.
With its new selection feature, you can select just the part of a song you like best that should be used for your video.

If a soundtrack is too short, you can either loop it or add another one. The order of appearance can be changed at any time.
Should a soundtrack be longer than your video, Glimpses will automatically fade it out at the end without you having to do anything.

Face Detection

In earlier versions, Glimpses used to center your photos within the video’s frame.
Glimpses 2.0 is much smarter and analyses your photos for faces and if detected, moves them into the video’s frame, resulting in much nicer and more personal videos.

Briefly without and with face detectionA still from a video created with Briefly 1.5.2 (top) compared to the same video created with Glimpses 2.0 (below)
Resolutions and Video Settings

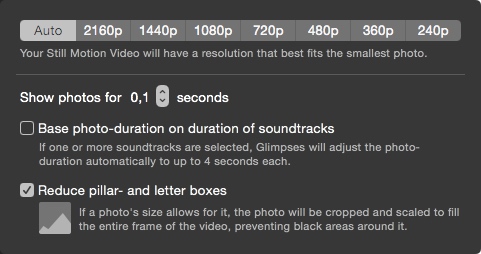
With cameras getting better and better, it was only logical to include new resolutions in Glimpses 2.0 – the app now goes beyond 1080p and adds support for 2K and 4K resolutions. You can set the resolution manually or let Glimpses decide, based on the smallest photo.

Glimpses Video SettingsGlimpses Video Settings

A photo’s duration can be set from 0.1 seconds up to 4 seconds in 0.1-second-increments, an improvement that allows for more fine-grained control over the resulting video. Glimpses can also automatically do it for you, based on the duration of the soundtracks you selected.

Pricing and Availability

Glimpses is available exclusively on the Mac App Store (click) for the introductory price of $9.99 for a limited time (about 60% off), after which the price will revert to $24.99.
A free, 15-day trial can be downloaded from the website (click) (direct download). If you’re from the media and would like to get more info about the app, please download the press kit (click), thank you.

Glimpses Website: http://eternalstorms.at/glimpses
Glimpses on the Mac App Store: https://itunes.apple.com/app/glimpses/id637565340?mt=12
Glimpses Demo Download: http://eternalstorms.at/glimpses/Glimpses.zip
Glimpses on Twitter:https://twitter.com/GlimpsesApp
Glimpses Press Kit: http://eternalstorms.at/press/Glimpses-2-Press-Kit.zip
Glimpses on Product Hunt: https://www.producthunt.com/posts/glimpses

Thank you for your time, I hope you enjoy this great new version of Glimpses 🙂

If you have any feedback or questions, please be sure to let me know via twitter (click) or eMail (click). I’m looking forward to hearing from you.

Read more

ESSSquareProgressIndicator animating

What Is ESSSquareProgressIndicator?

It’s an indeterminate progress indicator originally developed for the iOS game ZEN.

It uses Core Animation (specifically, CAShapeLayers) to do its job and it’s pretty straight forward.

CGPathRefs, CAShapeLayer

CAShapeLayer has two animatable properties – -strokeStart and -strokeEnd (with a minimum value of 0.0 – start of path – and 1.0 – end of path). Going beyond 1.0 or below 0.0 doesn’t work.

So when trying to animate those values along a rectangular path – which was the first thing I tried when creating this – you do get a nice animation, but it ends at the 0.0/1.0 (which is, basically, the same) mark. So you end up with something like this:

glitchy progress indicator animation

The goal, then, was to animate beyond 1.0. The solution I came to – I’m sure there are other ways – was to use a second CAShapeLayer that animated alongside the first for the last/first part of the animation.

For a square, the values of the CAShapeLayer’s -strokeStart and -strokeEnd are as follows (starting at the top left corner):

CAShapeLayer strokeStart strokeEnd values

The CGPath begins and ends in the top left corner because I drew the path that way (you could make it start in the lower left corner or in the middle of a side, it all depends on where you start the CGPath with CGPathMoveToPoint).

The progress indicator starts at the middle of the left line and reaches to the middle of the top line. These are the two CAShapeLayers at work. The left part is one shape layer, the top line is another. I’ll do this in pictures I drew in code so it’s simpler to understand (the lines represent where the layer animated to, the dots are the invisible rest of the square).

Animating

Animation Part 1We start at this position. The line to the left is layer2(strokeStart:0.875, strokeEnd:1.0), the line at the top is layer1(strokeStart:0.0, strokeEnd:0.125).

Animation Part 2The transition to this is the reason we need two layers as we can not animate one layer beyond the 1.0 value.
So we animate layer2 to (1.0, 1.0) and at the same time animate layer1 to (0.0, 0.25) which makes it look like one line moving.

Animation Part 3This next part is easy. We animate layer1 to (0.75, 1.0).

Animation Part 4Lastly, we animate with two layers again to get to the initial position so we can repeat the whole thing from there on.
We animate layer2 from (0.75, 1.0) to (0.875, 1.0) and layer1 from (0.0, 0.0) to (0.0, 0.125) at the same time, again making it look like one line moving.

The Source Code

The repository (a sample iOS app, but the class works the same on OS X) is available on Github.

It was developed for iOS 7.1 but should work on earlier systems, and has been tested on OS X Yosemite, but should work on earlier systems as well.

You just drop in an ordinary UIView or NSView and set its class to ESSSquareProgressIndicator. Done. You can then set the color and stroke width right within Interface Builder thanks to the fairly new Xcode macros IB_Designable and IBInspectable.

Open Source

I have some more source code available here (or directly on my github profile page) if you’re interested. If you have any questions or feedback regarding this progress indicator, please be sure to mail or tweet me 😉

Enjoy!

—-
My name is Matt, I’m the developer of Eternal Storms Software. If you’d like to comment, you can catch me on twitter here: [twitter-follow screen_name=’eternalstorms’ show_count=’yes’] or by eMail.

Read more

Transloader 2.1 Icon

I’m happy to announce today the immediate availability of Transloader 2.1, a significant and important update to the app that lets you start downloads on your Mac remotely from your iPhone or iPad.

Transloader Explanation

I’ve also prepared an App Preview Video for the occasion:

[youtube https://www.youtube.com/watch?v=3VAKEpWVArc]

Easier and more straight forward to use

Transloader 2.1 features an Action Extension so you can add links directly from a website you’re browsing – here a short video of the Action Extension in, well, action 😉

[youtube https://www.youtube.com/watch?v=DPuCp9HO5So]

The update also comes with a Today Widget, which offers you a quick look at the state of your downloads right from within Notification Center.

Transloader's Notification Center Today Widget

Improved Feedback

Transloader 2.1 on the Mac will send your iOS devices push notifications when downloads finish or fail so you are always in the know about the state of your downloads.
The Mac app also got a UI overhaul and now fits in perfectly with OS X Yosemite.

On Sale – 65% off!

As part of Two Dollar Tuesday, Transloader is on sale today (March 10zh, 2015) for just $1.99 instead of $5.99 – over 65% off. Head on over and check out the other cool apps as well 😉

System Requirements

For full functionality, iOS 8 or newer and OS X Yosemite or newer are required. An iCloud account is necessary for Transloader to work.

Links

Transloader on the Mac App Store ($1.99; 65% off)
Transloader on the iOS App Store (free)

Transloader Website
Transloader Press Kit (direct download)

I hope you enjoy the update – if you have any feedback or questions, please be sure to get in touch via mail or twitter! I’m looking forward to hearing from you.

—-
My name is Matt, I’m the developer of Eternal Storms Software. If you’d like to comment, you can catch me on twitter here: [twitter-follow screen_name=’eternalstorms’ show_count=’yes’] or by eMail.

Read more

First Concept of ZENFirst concept of ZEN

After last week’s guest blog post by my cousin Sebastian about how he came up with the idea of the iOS game ZEN, the design and conception process behind it and the soundtrack, today it’s my turn to talk about putting it in code and making it all come to life.

The Premise

Like a lot of developers I know, I became intrigued with programming because of games. As a kid, I always wanted to develop games for a living, make the next Diablo. So of course I jumped at the idea of creating a game when my cousin asked me if I was interested.

I had never actually programmed a game before, so when Sebastian approached me about developing a game with him, I was already seeing myself having to learn OpenGL and everything that comes with it.

Luckily, it soon became clear that it would be a 2D game, almost 8-bit-ish, like an old Super Mario Bros game. So my fears of having to learn something new* were put to rest and the more he told me about the game, the more I realized that Core Animation would be the perfect fit for this project.

The game is about a cube with random numbers on it. Your goal is to reach ten with these numbers by turning the cube and selecting the appropriate sides within ten seconds.

ZEN Cube Animation

*just kidding, I love learning new stuff, but for a side-project having to learn OpenGL would have been a little much, especially with all my other apps that need constant attention

Core Animation actually was pretty much made for this kind of stuff. Even if the game had had some 3D effects (for example, some sort of perspective distortion when turning the cube, etc), it would have been fairly easy to implement.

First Blood

The first thing I did in the process of developing ZEN was to prototype the cube itself. I began by mapping out the cube because a) I didn’t have one handy and b) to get a visual on each side:

Mapping out the cube

Because I was using Core Animation and it was all in 2D space, I had to figure out what side would go where when the cube was turned from left to right, right to left, from the top or the bottom, so that the numbers would stay on the same side and not end up any place they shouldn’t be. I went so far to write down which side would go where once the cube was turned in any direction

Mapping out which cube side would go whereWhich side goes where when turning the cube?

To make the animation possible, I would have to use at least two CALayers that changed in shape and color, and would have to be kept up to date in terms of data (which side holds which number).

One layer would always be hidden, the layer to turn to, so to speak, the other layer would always be visible. They would alternate in doing that.
For example:

Layer 1 is visible with the front number of the cube.
You turn the cube right and layer 2 (still hidden) gets the number of the left side of the cube.
Layer 1 is animated to fold to the right
Layer 2 shows and animates to the full size of the front cube side.
Layer 1 is hidden

Turning Cube Down on PaperTurning the cube from the top on paper

With that done, I had the cube – of course, there were some kinks to be worked out (for example, sometimes the hidden layer would suddenly be visible with a completely wrong size), but basically, the cube was working.
In code, turning the cube upwards looks like this:

- (void)turnUp
{
ESSCubeSide *oldUp = self.topSide;
ESSCubeSide *oldFront = self.frontSide;
ESSCubeSide *oldDown = self.bottomSide;
ESSCubeSide *oldBack = self.backSide;
self._cubeDict[ESSCUBE_FRONT] = oldDown;
self._cubeDict[ESSCUBE_TOP] = oldFront;
self._cubeDict[ESSCUBE_BACK] = oldUp;
self._cubeDict[ESSCUBE_BOTTOM] = oldBack;
}

This is only the data model, of course. The view code just the two layers – resizing them in unison, hiding one layer and showing the other, etc.

Random Numbers

The next thing that had to be done was to fill the cube with random numbers, some of which would add up to ten.

I chose to do the following:

  1. Decide how many sides it takes to solve the current cube (a number between 2 and 6); let’s say it’s 3 – 3 sides to solve the cube.
  2. Loop while we create 3 random numbers between 1 and 9 that add up to ten.
  3. Fill the rest of the cube (3 more sides) with random numbers between 1 and 9.
  4. Shuffle the resulting array of six numbers so the solving sides aren’t always on the same sides
The same principle works for the minus mode, where there are positive and negative integers that you need to select to add up to ten.

Interface

The first interface concept, as you can see in the first screenshot of this blog post, was pretty simple. The title and three buttons. There was no mention of animations!

As it always happens, things change during the development process, you iterate on everything, and the interface gets overhauled as well. This new one was, in my opinion, much nicer as it demonstrates the “cube-y” nature of the game very nicely.

ZEN Line animation

But it took me some time to get there. I was hoping that Sebastian could define the animations in svg or gif or something like that and I could just load them in and display them.
However, I could not do that – apparently iOS doesn’t support svgs or gifs out of the box (and I didn’t want to rely on 3rd party libraries to do the job). After googling around for a couple of days (because, you know, you want to be thorough), I tried doing it in a web view, because these animations would work in the browser. However, I wouldn’t have that amount of control over them as I did with the final approach I took – code it in Core Animation as well.

So I have one view class that, depending on the width and height of the bounds of the view either expands horizontally or vertically. That was the easy part.

The hard part was creating all the views in Xcode’s Interface Builder with the proper dimensions and positioning them so they would define the buttons and letters. I’m just glad the Help – view is not animated 😉 :

Help ViewThe Help View – thankfully for me, not animated

Creating ZEN was a very exciting experience and I learned a lot during the process. As I usually work alone, working within a team on this project (even if it’s just two people) was a breath of fresh air and is a lot of fun, bouncing ideas off of each other, inspiring each other – there’s a whole lot of energy there.
While I do have a few dear friends with whom I can exchange ideas over the internet for my own projects, it’s quite different when you’re one on one, face to face.

It’s been  a lot of fun.

—-
My name is Matt, I’m the developer of Eternal Storms Software. If you’d like to comment, you can catch me on twitter here: [twitter-follow screen_name=’eternalstorms’ show_count=’yes’] or by eMail.

Read more