workflow

Yoink for Mac Usage Tip #14

The following explains how to make Yoink automatically pick up any new file added to a specified folder.
For more Usage Tips like this, click here.


Yoink 256

If you’d like Yoink for Mac to automatically pick up any new files you download or save into a specific folder, here’s how it’s done.

Automator Folder Action

Automator, an app that comes with every Mac, allows you to create Folder Actions, which are small programs that run every time files and folders are added to a folder you specify.

I’ve prepared such a Folder Action for you: Download (direct download, ~42 KB)

Installation
  • Download the action above, then unzip and double-click it. It will prompt you with this:
Screenshot of Automator Installer  13 10 2020 14 39 16

Choose the folder you’d like to attach this action to and click on Install. The action will then be moved to /Users/yourname/Library/Workflows/Applications/Folder Actions/Yoink Save Folder.workflow
If you ever wish to uninstall it, just delete that file.

  • With the Folder Action installed, whenever you download or save a file into that folder, it will be added to Yoink, like you can see in this video:
  • To create multiple of these, all you need to do is unzip again, change the filename of the Automator action, double-click it and follow the instructions above
Details

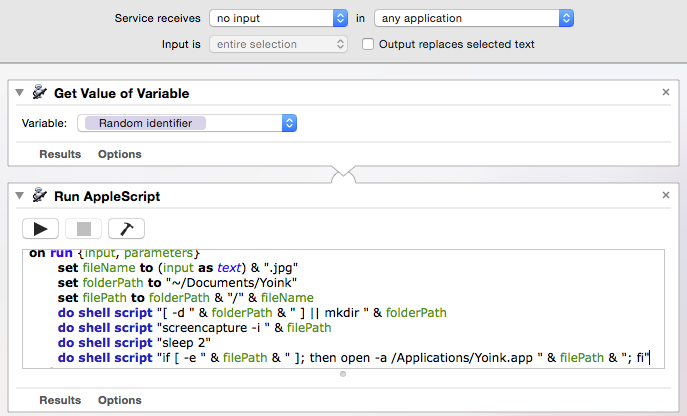
If you’re curious about what the Folder Action actually does, it’s this:

Screenshot of Automator  13 10 2020 14 35 23

The action runs this shell script

open -a Yoink “$@" 

any time new files or folders are added to the specified folder, which instructs macOS to open the specified file with Yoink (which ultimately results in the file being added to Yoink’s list).

Advanced

You can edit the shell script anytime (by right-clicking onto the Automator file and selecting Automator):

Screenshot of Finder  13 10 2020 14 54 50

which would enable you, for example, to tell the action only to add files of a certain file type, or with a certain file extension.
The following script sample shows how to make the Folder Action only add PDF files:

for str in "$@"
{
filename=${str##*/}
pathExt=${filename##*.}

if [ $pathExt == 'pdf' ]
then
open -a Yoink "$str"
fi
}

Enjoy 🙂

Read more

Yoink users have been automating adding various files to Yoink via Automator Workflows for a while now – from adding mail attachments or screenshots, to adding files from the Terminal.
Douglas (@douglasjsellers on twitter) today adds to this list of wonderful workflows an Automator Workflow that lets you quickly add files that you created/saved recently.

Here’s what he says about it:

I cooked up my Automator Service that lets you send the last file that you saved (from any application) to Yoink.
When bound to a key combination this allows you to do things like “Export to Web” from Adobe Photoshop, hit the key combo and then the newly created png is on Yoink.
Or say you’re editing a file in Emacs and you want to add it as an email attachment. You save the file, hit the key combo and the file will then be in Yoink for easy dragging into your email.
I also use it heavily to get recently downloaded files from chrome to Yoink.

The Automator Workflow

Screenshot of Automator Workflow for Yoink

The main part of this workflow consists of a complex shell script that finds files that were recently saved, excluding files that are less likely to be needed in Yoink – obviously, this is something everybody needs to configure for themselves, but since this is an Automator Workflow, it is easily done.

Download

The Automator Workflow is available for download here (~130 KB).
My thanks to Douglas for his awesome work.

Installation & Keyboard Shortcut Setup

To install this workflow, download it from above, unzip it, double-click it and click on Install when this dialog comes up:

Instaling the Automator WorkflowClick on Install if you’d like to install the service, click on Open with Automator if you’d like to make changes

To create a keyboard shortcut for this service:

  1. Launch System Preferences
  2. Click on Keyboard -> Shortcuts -> Services
  3. Find ’Send Last File to Yoink’ in the list, under ‘General’
  4. Click on ‘add shortcut’ and enter the shortcut you’d like to use to activate the service

If you have any feedback regarding this workflow or if you’d like to share a workflow of your own, please be sure to get in touch either via twitter or eMail. Thank you and enjoy 🙂

Read more

Yoink for Mac Usage Tip #8

The following explains how to add attachments directly from Mail.app into Yoink.
For more Usage Tips like this, click here.

Today, I received an eMail from Sandro G. asking me if there was a way to quickly add mail attachments from selected mails in Mail.app to Yoink.

The Problem

Sandro frequently adds attachments from mail messages in Mail.app to Yoink but says it can be cumbersome with lots of mails with a couple of attachments each.
I agree, having to select each mail message with an attachment, scrolling down and dragging each attachment to Yoink can take a lot of time.
Instead, he says, he’d like a way to just select the mail messages that contain the attachments, ideally press a keyboard shortcut and let Yoink do the rest, saving nerves and, most importantly of all, time.

The Solution

As with the “capture screenshots to Yoink”-problem, where Bogdan V. wanted to be able to take screenshots that automatically end up in Yoink, Automator seemed like a good solution for this.

I launched Automator and created a System Service – easily accomplished by creating a new project and selecting Service in the resulting dialog.
A system service is something you can either access through a contextual menu or by the applications Application menu -> Services, containing context-aware services, for example “Look up in Dictionary” or “New Email with Selection”.

Automator - New Project DialogAutomator’s New Project Dialog. Select Service and click on Choose.

The Automator Workflow

Automator - Finished workflowThe finished workflow.

Let’s go through it from the top. Specify the service to receive no input (as the other possible values don’t apply) and select Mail as the target application the Service should be available in.
Now we need three actions:

  1. Get Selected Mail Messages – creates a reference to the currently selected mails in Mail.app
  2. Get Attachments from Mail Messages – uses the references created before and saves their attachments to a folder, in this case the Default Mail downloads folder
  3. Open Finder Items – Action 2 passes the attachment files to this action, where we ask Yoink to open those files, resulting in them being added to Yoink’s files

Installation and Keyboard Shortcut

Once you save it, it should be automatically saved into your Services folder. If not, double-click the saved file and it should prompt you with this dialog – click Install and it should be installed correctly:
Automator - Service Installation
If you’d like a keyboard shortcut, it’s quickly done. Launch System Preferences, select Keyboard -> Shortcuts -> Services, scroll to find the service and set up your shortcut:
Service - Keyboard Shortcut
Now you can access the service either through this keyboard shortcut or the Services menu in Mail.app’s Mail menu:
Service Installed in Mail

Automator Workflow Download

For your convenience, here’s the workflow ready for download.
Unzip, double-click to install. Set up the optional keyboard shortcut – done 🙂
If you have any feedback, questions or improvements, please be sure to get in touch – by mail or twitter – I’m looking forward to hearing from you!
Read more

Yoink for Mac Usage Tip #9

The following explains how send screenshots directly to Yoink.
For more Usage Tips like this, click here.

I recently had a very interesting conversation with a customer of Yoink, Bogdan V. He wanted to make Yoink detect screenshots he created so they would show up in Yoink’s window.

Automator to the Rescue

I had the idea of using Automatorto create the screenshot and send it to Yoink. After experimenting around a little bit, I sent Bogdan a very rudimentary workflow (that could, if saved as an OS X Service, also be launched with a keyboard shortcut) and he immediately turned it into something awesome.

The Automator Workflow

This is the script of the workflow Bogdan came up with:

Automator Workflow Screenshot

You can download the Automator Workflow here (~59KB) (tested on OS X Yosemite 10.10.1).

Setting up the Service

  1. Download the Automator Workflow
  2. Unzip it and double-click on the resulting screencapture.workflow file
  3. In the dialog, select Install (except if you’d like to edit the script, then click on Open with Automator)
  4. It will be installed in your ~/Library/Services/ folder: Automator Service Path
  5. To confirm installation, in Finder, click on Finder in your menu bar, select Services and find Capture Screenshot to Yoink in the list: Service in Menu
  6. In your ~/Documents/ folder, create a folder titled Yoink (where captured screenshots will reside)

You have now successfully installed the Service to capture screenshots to Yoink. What you can do now is create a keyboard shortcut for it so you can more easily access this

Create a Keyboard Shortcut

  1. Launch System Preferences
  2. Click on Keyboard -> Shortcuts -> Services
  3. Find Capture Screenshot to Yoink in the list, under General:Screenshot System Preferences Keyboard Shortcuts
  4. Click on add shortcut and enter the shortcut you’d like to use to activate the service.

That’s It

That’s all there is to it. Now you can create screenshots that are then immediately available in Yoink for you to drag around.
If you find it useful, be sure to let me know on twitter (@eternalstorms) or by eMail – I’d appreciate the feedback!
Take care!

Update (October 14, 2015)

I got a bit of feedback on this – especially feedback from Pietro S. and Jeremy M. pushed me to update this post with a bit more information.
  • To make the Automator Script capture the entire display instead of just a selected portion, replace the line ‘ do shell script “screencapture -i ” & filePath ‘ with ‘do shell script “screencapture “ & filePath ‘ (removing the -i option to cause the selection)
  • Jeremy was so kind to provide an updated Automator Workflow that appended a date and timestamp to the screenshot’s filename; add two actions before the actual script (“Get Value of Variable”) with the variables Date and Timestamp and import them into the script – as in this screenshot:
    Screenshot of Automator, appending date and time to the filename
  • To use this Automator Workflow with the standard keyboard shortcut command-shift-4, you first have to deactivate the standard action in System Preferences -> Keyboard -> Shortcuts -> Screen Shots, or assign it a different keyboard shortcut: Screenshot of System Preferences

A ‘thank you’ goes to Jeremy and Pietro for the updated workflows.

Read more