ux

We recently cancelled our cable/general TV subscription, which left us with a bit of an entertainment void. Not that TV was entertaining – we hardly watched anymore, hence the cancelling – but we do like to just “put something on” every now and then. So we decided to get Apple One (Premium, because we’re sharing with my mom).
I was, at first, a bit hesitant to enable iCloud Photos – we have nearly 40.000 photos/videos, and obviously we don’t want to lose any of them. So I asked my cousin how he felt about it (he’s been using it for quite some time). He seemed happy with it, so I was confident in turning it on. A couple of backups on multiple drives later, I clicked the checkbox in Photos’ preferences on my Mac – and the waiting began.

Upload Observations

All in all, it took well over 36 hours to finish the upload. I began in the morning, let it run overnight in the hopes it would finish, but the next morning, it still kept going for more than half a day. I noticed that Photos didn’t continuously upload all photos. It uploads for a bit, then does some encoding for a bit, and then uploads again a bit. Now thankfully, my connection is pretty good with a consistent upload rate of ~7MB/s so I thought it would be done fairly quickly, but I didn’t consider that any encoding could be going on. Judging from Activity Monitor, at least videos are encoded before they go up into the cloud.

My Mac (which has all the photos) was the first where I turned it on, and after it had finished, I also enabled it on my iPhone and iPad. Those were done syncing in about two days. “Thanks” to what Apple probably considers a “feature”: the constant pausing of the syncing process on iOS devices, in order to conserve battery: “Paused syncing to save battery”, it said anytime I looked. No! Why!? Sync!, that’s what the battery’s there for. Just do it, I don’t care. And don’t let me enable it for “a day”, let me enable it forever. Seriously. Get it done.

Comparing to Photo Stream

Previously, I mostly collected photos on my Mac via Photo Stream. And I have to say, while I do enjoy the new syncing features iCloud Photos offers (syncing albums, photo-edits, etc), newly taken photos now take noticeably longer to appear on other devices than before. Not a deal breaker, but noticeable.

“Unable to Upload”

65 photos were unable to upload, according to Photos on my Mac. Why? I couldn’t honestly tell you. Photos didn’t tell me. It should have, if you ask me. I’d have liked to know. And there’s no way to retry to sync those photos with iCloud. They’re just in the “Unable to Upload” smart-album forever.
Albeit, a bit of online research reveals an Apple support document with one of the weirdest and Apple-unlike solutions to a problem I’ve ever come across:
Step 1: Export the photos in question “unmodified” to a folder on your disk.
Step 2: Delete them from Photos (scary)
Step 3: Import those photos you just exported into Photos again to retry their syncing.
It worked (mostly), but still, why can’t I just do this in Photos itself?

Varying Photos count

An interesting tidbit: All my synced devices show a different photo count.

DevicePhoto countVideo count
Mac37.831461
iPad37.835461
iPhone37.834461
The video-count is the same on all devices, but photo-counts vary.

Of course, with that amount of photos, there’s no way – ever – for me to find out which photos are missing on which device. Because interestingly, when I connect the iPhone or iPad to my Mac, it tells me that the connected device only contains items that are already on my Mac. Go figure.

General Impressions

I’m happy with iCloud Photos. Finally, all my videos sync, and so do all “fancy” photos (with blurry backgrounds or any sort of effects) and edits, and the syncing seems to so far be very reliable.
No longer do I need to connect them once a month to make sure I have all photos collected on my main machine. Nice.

Face- and duplicates analyses appear to happen on each device individually, probably in the name of privacy (and iOS devices need to be – again, why? – connected to power for that to happen). I wouldn’t mind if that synced over (the found faces appear to, anyway).
It’s kind of weird that they constantly turn off those features to conserve battery, and then have all my devices do the same work. Wouldn’t it save even more battery if just one device did it? Oh well…

Read more

About Oskar

Oskar is an independent Mac developer who is committed to enhancing the Mac experience.
Since founding Cindori, he has designed, developed and released several popular apps such as Trim Enabler, Disk Sensei and VR Desktop.

About Disk Sensei

Disk Sensei helps you monitor and analyze your Mac’s drives, enhance your Mac’s performance and clean your system safely and efficiently.

Info

What Oskar particularly likes in Disk Sensei:

Liked by Oskar

“Disk Sensei is all about optimizing your Mac performance, so I knew I wanted a way to let users find and delete large old files.
After settling on the idea to build a sunburst chart to visualize the file system hierarchy, I struggled for a long time to build something that was responsive, performant and beautiful.
Eventually, I turned to an unconventional solution: I built a component using D3, a JavaScript visualization library, and integrated it in Disk Sensei using a web view.
The end result was a beautiful sunburst chart with slick animations, at the cost of only a few hundred lines of Obj-C.”

and particularly dislikes:

Disliked by Oskar 1

Disliked by Oskar 2

“Disk Sensei offers features that are related to both hardware and software. In some cases, this means that the user must select the storage drive for which he wants to display data or perform actions on.
For example, the Health feature, which displays diagnostic data and predicts the remaining lifetime of your hard drive or SSD.

To avoid having to select a storage drive over and over when switching between features in the app, I opted for a global option and put a drive selection button right in the menu bar of the application window.
This made it very easy to toggle between drives from any view in the app. But it also created several problems:
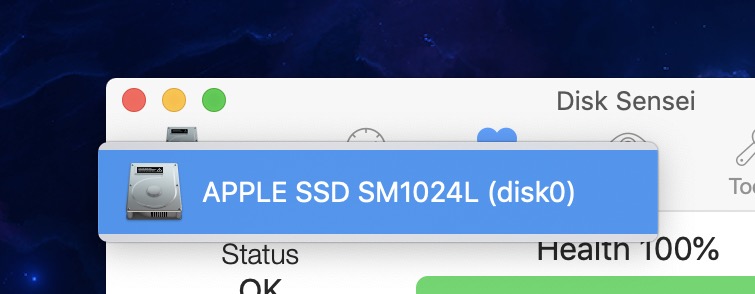
It broke the conventions of the menu by having the button look like it’s supposed to behave like a menu option.
It created even further confusion by being accessible while using features that wasn’t related to the currently selected drive. As if that wasn’t enough, the button was just too small to fit the full drive name, creating cryptic titles such as “APPLE”.
All in all, this was a poor solution.”

Thank you, Oskar, for sharing 🙂

About the “Show and Tell” Blog Series

Show and Tell presents developers’ and designers’ most and least favorite elements of UI/UX in an app they helped create or design.
If you’d like to share, submissions are open! Submit your app here!
Thank you 🙂

Read more

About Michael

Michael is a student at Aalborg University, Denmark, studying Engineering Psychology — it’s about how to shape (technology mostly) products to fit humans. Although they don’t do a lot of visual design, he’s taken a personal interest in that on his own, hoping to land a job as a designer / user experience researcher at a medium sized company after he graduates this summer.

Info

About Amusic

Michael made the app with some of his fellow students, designing most of it on his own. Sadly, the app was actually never submitted to the App Store due to lack of time to finish it.

What he particularly likes about it…

“The two screens are actually the same — the player view. But unlike in the Apple Music app where the queue is an afterthought that is hidden beneath the cover art, in this design, you can choose whether to be utilitarian and use the queue view or have it look pretty. Easily change between the two. The player is beautiful either way. When you change, the song animates to its new position and stays there until you decide to change it again. Choose your style and forget about it if you like.

Better yet, the waveform slider is both pretty and SUPER useful as it lets you easily fast forward to your favourite part of the song.”

…and dislikes

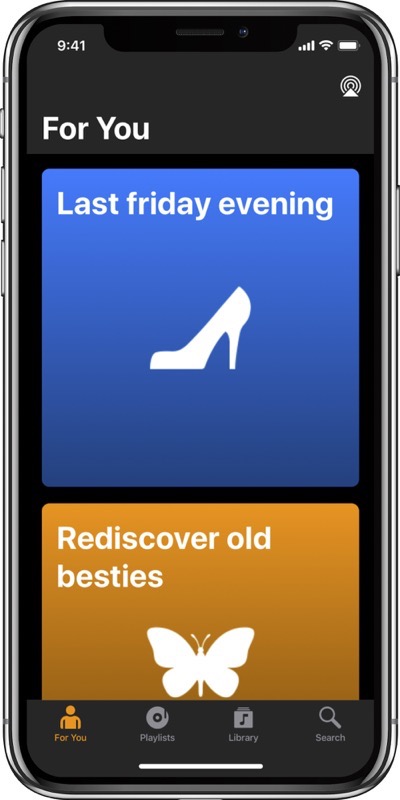
For You

“I’m not very happy with the artwork on the “for you” screen. Also it should pack more content pr. screen estate.”

Thank you, Michael, for sharing 🙂

About the “Show and Tell” Blog Series

Show and Tell presents developers’ and designers’ most and least favorite elements of UI/UX in an app they helped create or design. If you’d like to share, submissions are open! Submit your app here! Thank you 🙂

Read more

In this new series on this blog, I’d like to give developers and designers a place to show off  one UI / UX element they’re particularly proud of, and one they particularly dislike, in an app they worked on.

Submit now 🙂

If you’re a developer or designer and would love to share a UI/UX element in your app you particularly like, and one you particularly dislike, please mail me!

What I need from you

  • Your name, or, if you like, state that your submission should be anonymous. Your email and other contact info will not be published
  • Your website, twitter/facebook/instagram/github handle, or any other way you’d like to be credited (if it’s not an anonymous submission)
  • A short description of who you are and what you do
  • Your involvement with the app
  • The name of the app with a link (if you’re willing to share, but it’s not a must)
  • A screenshot, short video or gif of a UI/UX element in your app you particularly like, with 1-2 sentences of why you like it
  • A screenshot, short video or gif of a UI/UX element in your app you particularly dislike, with 1-2 sentences of why you don’t like it
  • Please only send apps you worked on yourself
  • Multiple submissions are fine

A post will look something like this:
Submissions will be published on no particular schedule in no particular order on this blog.
You’ll be notified beforehand with a preview.
Submissions will (or will not) be published at my own discretion.

I’m looking forward to your submissions!

For updates, please follow this blog, or @showandtell_ui on twitter.

Read more