App Store

Last year, I started using the iTunes Affiliate Program.
The program allows you to make a little money by linking to your apps with your affiliate token and lets you track where clicks and purchases come from, as well.
I thought it’d be interesting to do a little retrospective, now that a year has gone by.

Using Affiliate Links

Turning an (Mac) App Store link (or almost any other iTunes – based link) into an affiliate link couldn’t be simpler.
All you need to do is append your affiliate token (like &at=your_token).
Additionally, you can provide context with your links so you can track them more easily later on.
For instance, I “tag” my links with “twitter”, “facebook”, “blog”, “website”, “newsletter”, “yoinkdemo” and so on.
That makes it very easy to track where your customers come from.

I use affiliate links for every iTunes link I share – be it an app of my own or that of another developer.

Tools and Info

There are tools available to you to make affiliate linking even easier, like John Voorhees’ Blink (for iOS).
I personally don’t use any extra software – I have a note in Notes.app with all my affiliate links and then just change the aforementioned context string.

If you’re interested in an in-depth look at the iTunes Affiliate Program, I recommend you read John Voorhees’ excellent comprehensive guide about it on MacStories.
It’ll get you up to speed on how to set it all up.

Where do Clicks Come From?

A very interesting aspect of the iTunes Affiliate Program is its tracking capabilities.
When someone clicks your link, you know:

  • the country the user is in
  • when the link was clicked
  • the context string you provided for the link (like “website”, “blog”, etc)
Live-View of Clicks on Links

A click presented in the live-view of iTunes Affiliate Program’s dashboard. I can see the click came from the US, and from within Yoink‘s “Demo Expired” window.

Furthermore, it tracks what the user purchased – a Mac app, an iOS app, a song, a book, etc.

Top 5 Countries

Based on the number of clicks, the top 5 countries from where people click on my links are:

  1. United States
    22,498 clicks
    $254.15
  2. Brazil
    924 clicks
    $4.96
  3. Germany
    570 clicks
    $76.70
  4. United Kingdom
    91 clicks
    $46.10
  5. Spain
    50 clicks
    $19.17

Apparently, more clicks don’t automatically equal a higher payout.

Conversion Rates

The program allows you to see the conversion rates for your links.
Who really purchased after clicking my link? Here’s what I found out:

  1. 38.62% purchased an app after clicking a link on my website
  2. 25.70% purchased an app after clicking on the link from the “demo expired” window inside the app
    (I haven’t had the affiliate link in the “demo expired” window in Yoink for the entirety of the year, more like only half a year)
  3. 00.72% purchased something when they clicked on a link on my blog

I can’t be sure what the user purchased – once a user clicks a link with an affiliate token, that token is used for the next 24 hours for that user.
Which means that they might click on a link for Yoink, but don’t purchase it. Then, some hours later, they purchase a book on the iBook Store – that will count towards that link’s conversion rate.

A Year of iTunes Affiliate Program Links

Here’s the gist of my first year in the iTunes Affiliate Program:

  • Clicks: 24,647
  • Items Bought: 4,465
  • Revenue Generated: $ 9791.12
  • Payout: $ 685.38
  • Average Conversion Rate: 18.12%

Granted, $685.38 isn’t a lot, but it’s money I wouldn’t have seen otherwise, and as an indie developer, every bit counts 😉

Eternal Storms Software Logo

– – – Do you enjoy my blog and/or my software? – – –
Stay up-to-date on all things Eternal Storms Software and join my low-frequency newsletter (one mail a month at most).
Thank you 🙂

Read more

OS X 10.11 El Capitan

I’m happy to say that all my applications, Yoink, Glimpses, ScreenFloat, Transloader and flickery are compatible with OS X 10.11 “El Capitan” and work perfectly on Apple’s new operating system, which will be released tomorrow, September 30th.

I’ve tested all my apps on the Golden Master of the upcoming Mac system upgrade and haven’t found any showstoppers or issues.

Should you, however, discover anything you feel is a bug, an annoyance or an issue, please be sure to get in touch with me either by mail, twitter or Facebook – I highly appreciate your help.

I hope you’ll enjoy tomorrows upgrade of OS X, I know I am very much looking forward to it!

Read more

Transloader 2.1 Icon

I’m happy to announce today the immediate availability of Transloader 2.1, a significant and important update to the app that lets you start downloads on your Mac remotely from your iPhone or iPad.

Transloader Explanation

I’ve also prepared an App Preview Video for the occasion:

[youtube https://www.youtube.com/watch?v=3VAKEpWVArc]

Easier and more straight forward to use

Transloader 2.1 features an Action Extension so you can add links directly from a website you’re browsing – here a short video of the Action Extension in, well, action 😉

[youtube https://www.youtube.com/watch?v=DPuCp9HO5So]

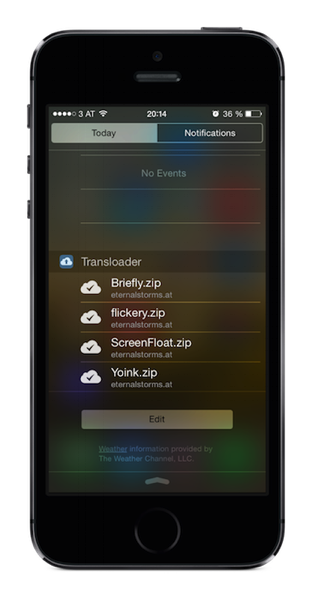
The update also comes with a Today Widget, which offers you a quick look at the state of your downloads right from within Notification Center.

Transloader's Notification Center Today Widget

Improved Feedback

Transloader 2.1 on the Mac will send your iOS devices push notifications when downloads finish or fail so you are always in the know about the state of your downloads.
The Mac app also got a UI overhaul and now fits in perfectly with OS X Yosemite.

On Sale – 65% off!

As part of Two Dollar Tuesday, Transloader is on sale today (March 10zh, 2015) for just $1.99 instead of $5.99 – over 65% off. Head on over and check out the other cool apps as well 😉

System Requirements

For full functionality, iOS 8 or newer and OS X Yosemite or newer are required. An iCloud account is necessary for Transloader to work.

Links

Transloader on the Mac App Store ($1.99; 65% off)
Transloader on the iOS App Store (free)

Transloader Website
Transloader Press Kit (direct download)

I hope you enjoy the update – if you have any feedback or questions, please be sure to get in touch via mail or twitter! I’m looking forward to hearing from you.

—-
My name is Matt, I’m the developer of Eternal Storms Software. If you’d like to comment, you can catch me on twitter here: [twitter-follow screen_name=’eternalstorms’ show_count=’yes’] or by eMail.

Read more

First Concept of ZENFirst concept of ZEN

After last week’s guest blog post by my cousin Sebastian about how he came up with the idea of the iOS game ZEN, the design and conception process behind it and the soundtrack, today it’s my turn to talk about putting it in code and making it all come to life.

The Premise

Like a lot of developers I know, I became intrigued with programming because of games. As a kid, I always wanted to develop games for a living, make the next Diablo. So of course I jumped at the idea of creating a game when my cousin asked me if I was interested.

I had never actually programmed a game before, so when Sebastian approached me about developing a game with him, I was already seeing myself having to learn OpenGL and everything that comes with it.

Luckily, it soon became clear that it would be a 2D game, almost 8-bit-ish, like an old Super Mario Bros game. So my fears of having to learn something new* were put to rest and the more he told me about the game, the more I realized that Core Animation would be the perfect fit for this project.

The game is about a cube with random numbers on it. Your goal is to reach ten with these numbers by turning the cube and selecting the appropriate sides within ten seconds.

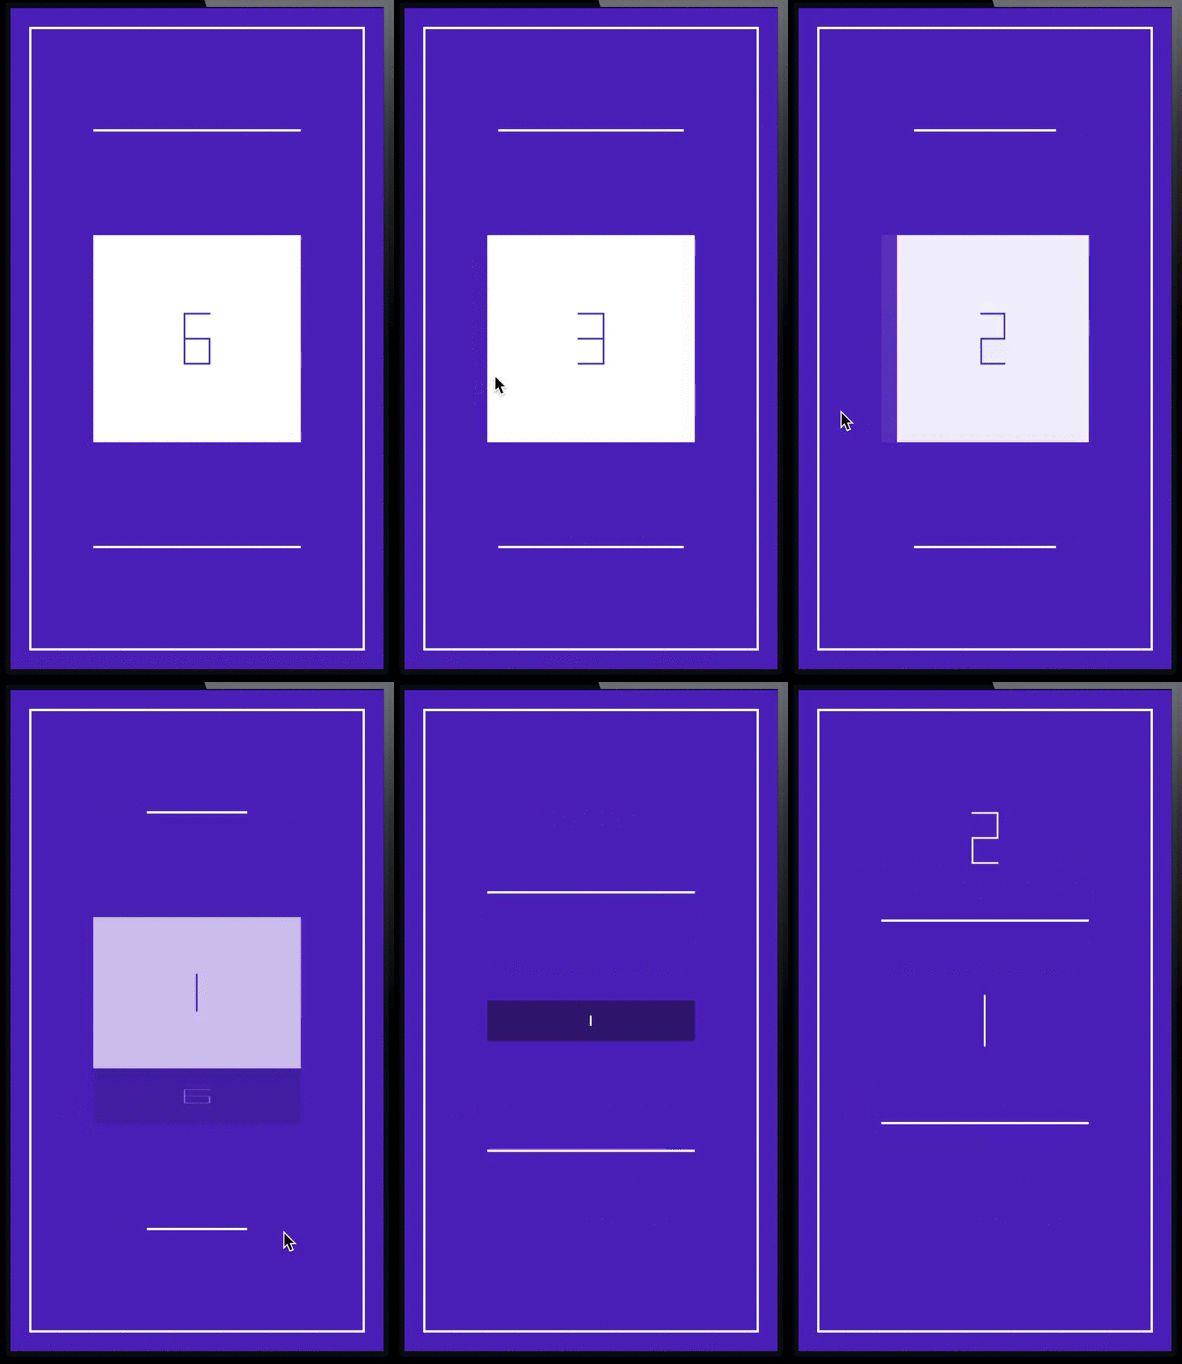
ZEN Cube Animation

*just kidding, I love learning new stuff, but for a side-project having to learn OpenGL would have been a little much, especially with all my other apps that need constant attention

Core Animation actually was pretty much made for this kind of stuff. Even if the game had had some 3D effects (for example, some sort of perspective distortion when turning the cube, etc), it would have been fairly easy to implement.

First Blood

The first thing I did in the process of developing ZEN was to prototype the cube itself. I began by mapping out the cube because a) I didn’t have one handy and b) to get a visual on each side:

Mapping out the cube

Because I was using Core Animation and it was all in 2D space, I had to figure out what side would go where when the cube was turned from left to right, right to left, from the top or the bottom, so that the numbers would stay on the same side and not end up any place they shouldn’t be. I went so far to write down which side would go where once the cube was turned in any direction

Mapping out which cube side would go whereWhich side goes where when turning the cube?

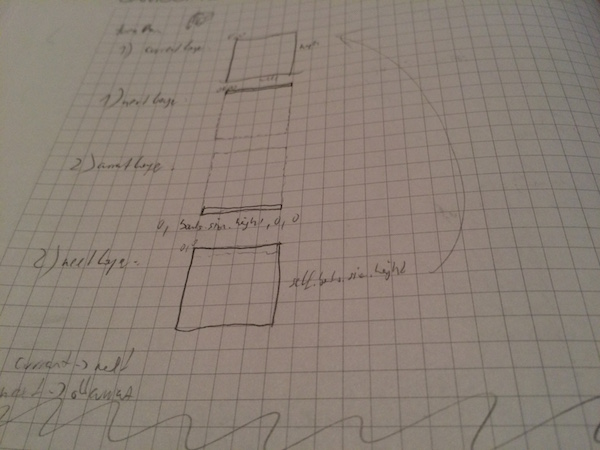
To make the animation possible, I would have to use at least two CALayers that changed in shape and color, and would have to be kept up to date in terms of data (which side holds which number).

One layer would always be hidden, the layer to turn to, so to speak, the other layer would always be visible. They would alternate in doing that.
For example:

Layer 1 is visible with the front number of the cube.
You turn the cube right and layer 2 (still hidden) gets the number of the left side of the cube.
Layer 1 is animated to fold to the right
Layer 2 shows and animates to the full size of the front cube side.
Layer 1 is hidden

Turning Cube Down on PaperTurning the cube from the top on paper

With that done, I had the cube – of course, there were some kinks to be worked out (for example, sometimes the hidden layer would suddenly be visible with a completely wrong size), but basically, the cube was working.
In code, turning the cube upwards looks like this:

- (void)turnUp
{
ESSCubeSide *oldUp = self.topSide;
ESSCubeSide *oldFront = self.frontSide;
ESSCubeSide *oldDown = self.bottomSide;
ESSCubeSide *oldBack = self.backSide;
self._cubeDict[ESSCUBE_FRONT] = oldDown;
self._cubeDict[ESSCUBE_TOP] = oldFront;
self._cubeDict[ESSCUBE_BACK] = oldUp;
self._cubeDict[ESSCUBE_BOTTOM] = oldBack;
}

This is only the data model, of course. The view code just the two layers – resizing them in unison, hiding one layer and showing the other, etc.

Random Numbers

The next thing that had to be done was to fill the cube with random numbers, some of which would add up to ten.

I chose to do the following:

  1. Decide how many sides it takes to solve the current cube (a number between 2 and 6); let’s say it’s 3 – 3 sides to solve the cube.
  2. Loop while we create 3 random numbers between 1 and 9 that add up to ten.
  3. Fill the rest of the cube (3 more sides) with random numbers between 1 and 9.
  4. Shuffle the resulting array of six numbers so the solving sides aren’t always on the same sides
The same principle works for the minus mode, where there are positive and negative integers that you need to select to add up to ten.

Interface

The first interface concept, as you can see in the first screenshot of this blog post, was pretty simple. The title and three buttons. There was no mention of animations!

As it always happens, things change during the development process, you iterate on everything, and the interface gets overhauled as well. This new one was, in my opinion, much nicer as it demonstrates the “cube-y” nature of the game very nicely.

ZEN Line animation

But it took me some time to get there. I was hoping that Sebastian could define the animations in svg or gif or something like that and I could just load them in and display them.
However, I could not do that – apparently iOS doesn’t support svgs or gifs out of the box (and I didn’t want to rely on 3rd party libraries to do the job). After googling around for a couple of days (because, you know, you want to be thorough), I tried doing it in a web view, because these animations would work in the browser. However, I wouldn’t have that amount of control over them as I did with the final approach I took – code it in Core Animation as well.

So I have one view class that, depending on the width and height of the bounds of the view either expands horizontally or vertically. That was the easy part.

The hard part was creating all the views in Xcode’s Interface Builder with the proper dimensions and positioning them so they would define the buttons and letters. I’m just glad the Help – view is not animated 😉 :

Help ViewThe Help View – thankfully for me, not animated

Creating ZEN was a very exciting experience and I learned a lot during the process. As I usually work alone, working within a team on this project (even if it’s just two people) was a breath of fresh air and is a lot of fun, bouncing ideas off of each other, inspiring each other – there’s a whole lot of energy there.
While I do have a few dear friends with whom I can exchange ideas over the internet for my own projects, it’s quite different when you’re one on one, face to face.

It’s been  a lot of fun.

—-
My name is Matt, I’m the developer of Eternal Storms Software. If you’d like to comment, you can catch me on twitter here: [twitter-follow screen_name=’eternalstorms’ show_count=’yes’] or by eMail.

Read more