Yoink for Mac, the drag-and-drop improving utility, is now available in version 3.6.8.
What’s New?
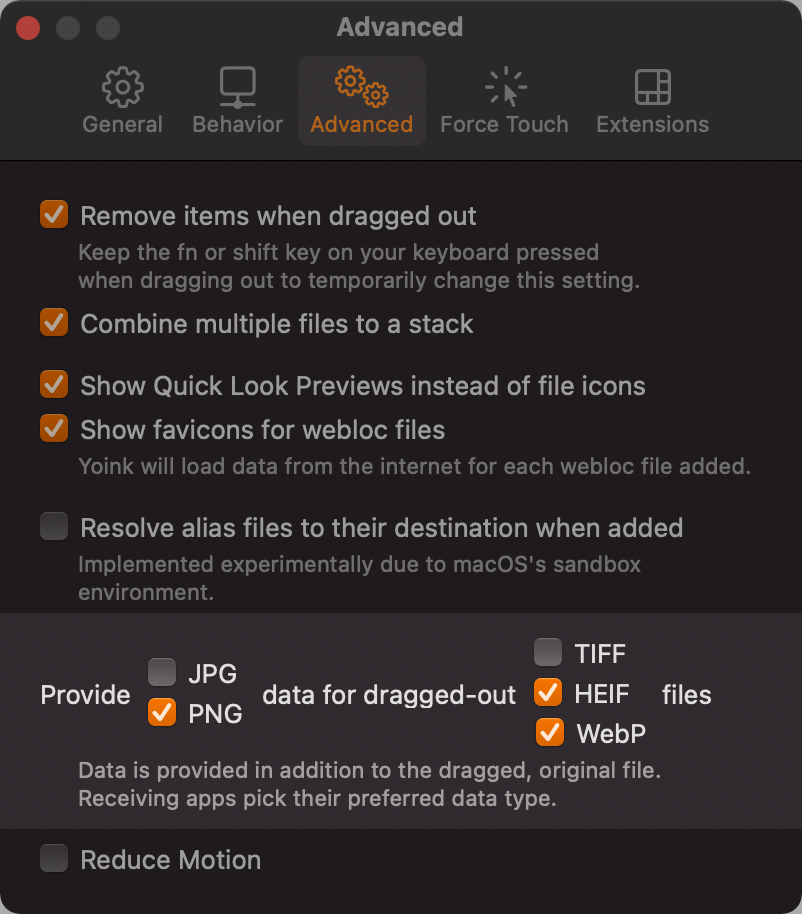
There’s now a preference for having Yoink dynamically provide JPEG and/or PNG data for TIFF, HEIF and/or WebP image files you drag out of it.
I’ve also fixed a couple of bug fixes and made some quality-of-life improvements, like having a dedicated “Pinned Copies” sub-menu in Yoink’s contextual menu’s Clipboard History.
As always, it’s a free update for existing customers of the app.
It requires macOS Sierra 10.12 or newer and runs natively on Apple Silicon and Intel Macs. Yoink is available in English, German, French, Italian, Simplified Chinese, Japanese, Korean and Portuguese.
With Yoink for Mac‘s clipboard history working again on macOS Big Sur and newer, I’ve seen, in forums and such, some questions about how the clipboard history operates and what it stores, in regards to privacy. I’ve answered those questions, but figured I’d let everyone know about it as well here on my blog, since this *should* be publicly available info:
General Notes about Yoink’s Clipboard History
By default, the clipboard history feature is disabled. It has to be manually enabled by either clicking onto the widget in Notification Center, or in Yoink’s preferences, under Extensions.
The clipboard history feature can be disabled at any time (and will clear any stored items at that point) in Yoink’s preferences, under Extensions.
Individual items can be deleted in the Clipboard History browser, accessible by command-clicking onto an item in the widget, by selecting Clipboard History > Organize… in Yoink’s contextual menu, or by clicking Organize… in Yoink’s preferences under Extensions.
What the Clipboard History stores
By default, Yoink stores anything you copy or cut, be it some text from a document, an image on a website, or a file in Finder, for example. Please read “What the Clipboard History does not store” below for important exceptions to this.
The clipboard history can be configured by you to completely ignore copy/cut operations in certain apps. This can be done in Yoink’s preferences, under Extensions, by pressing “Ignored Applications: Edit…”
The clipboard history is stored locally on your Mac and does not leave your Mac, unless you do it manually.
What the Clipboard History does *not* store
Yoink completely ignores cut/copy operations from any app or process that has one of the following in its name: Keychain, Enpass, 1Password, KeePass, LastPass, Password, Kaspersky, mSecure, AppLocker, Keeper Password, Passwort, oneSafe, Secrets, Strongbox, RememBear, Dashlane and Bitwarden. Anything copied from an app whose name contains one of the above (case insensitive) does not get stored in Yoink’s clipboard history.
In addition to that, Yoink also ignores copied content from any app, if the resulting clipboard content contains any of the following data types (as suggested by developers, for developers, on nspasteboard.org): com.agilebits.onepassword, org.nspasteboard.TransientType, org.nspasteboard.ConcealedType and org.nspasteboard.AutoGeneratedType. If you copy something from an app, and that app writes, say, a string to the pasteboard, and also specifies one of the data types above, the clipboard history will not pick it up.
If you have any suggestions, possible additions, questions or feedback regarding this, please do mail me.
I’ve also updated my privacy policy to clarify all of this.
Long story short: I’m not interested in anybody’s data. I don’t do any tracking, no usage statistics, and, if my apps use your internet connection, it’s exclusively for a specific feature that it offers to you, the user.
alternate clickbaity title: the update I learned Swift and SwiftUI for.
I’m happy to announce Yoink for Mac v3.6.5’s immediate availability. In addition to numerous quality-of-life improvements and adjustments, this update re-introduces the (judging from the inquiries I received about it) beloved Clipboard History feature, and its widget.
What’s Yoink?
Yoink offers you a temporary place (a “shelf”) for files you drag from Finder, or app-content like images from websites. It frees your hand and mouse cursor to let you more easily and quickly navigate to the destination of your files.
Yoink automatically appears at the edge of your screen when you start a drag a file, allowing you to place it there.
What’s New in Yoink v3.6.5?
Let’s talk about the most important thing first – the resurrected clipboard history and its widget. Up until earlier this year, I had virtually no experience with Swift, let alone SwiftUI, and I was pretty happy to continue with my Objective-anCient ways. But I realized it held me back. Things are clearly moving away from Objective-C and towards Swift, so at the beginning of this year (2022), I made a point of learning the basics of Swift as quickly as possible to have the option of using everything Apple’s platforms and APIs have to offer.
With macOS Big Sur, Apple got rid of its old-style Today Widgets (which could be written in Objective-C and a nice .xib-interface file) and brought over the new SwiftUI-style widgets from iOS. That’s why Yoink’s widget had been defunct for so long – I didn’t have the skills to replace it.
But enough chit-chat, here’s the nitty-gritty!
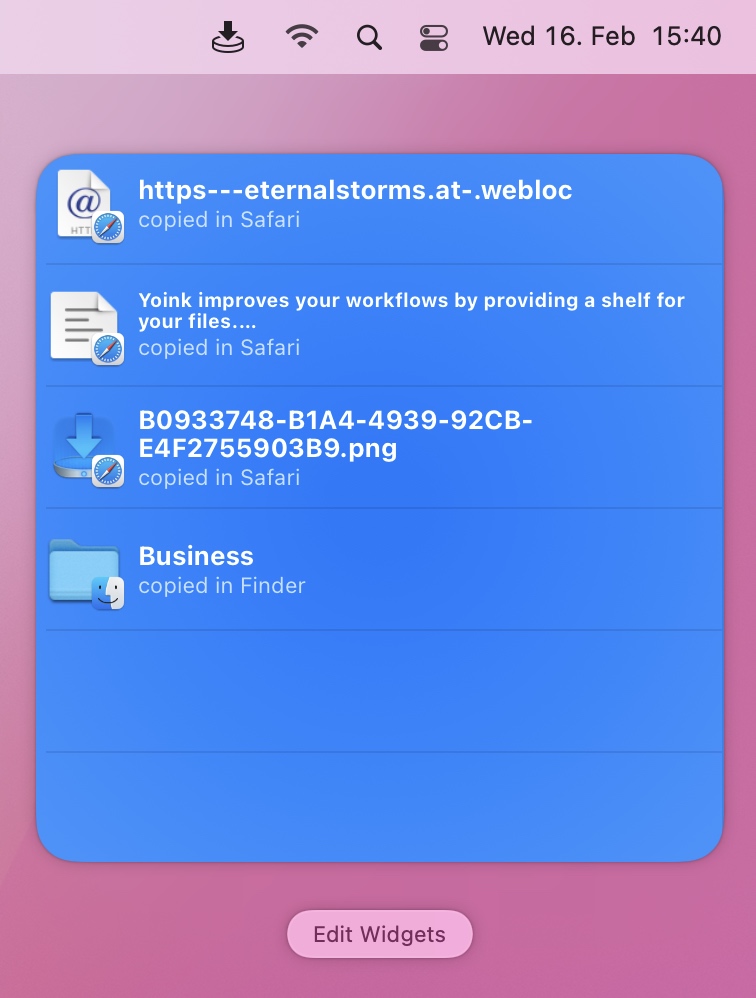
While the clipboard history recording still happens in Yoink itself in the background, the widget provides quick access to previous copies. It comes in two sizes: medium and large. The medium widget shows up to 6 copied objects, the large one up to 12.
Widget Configurability
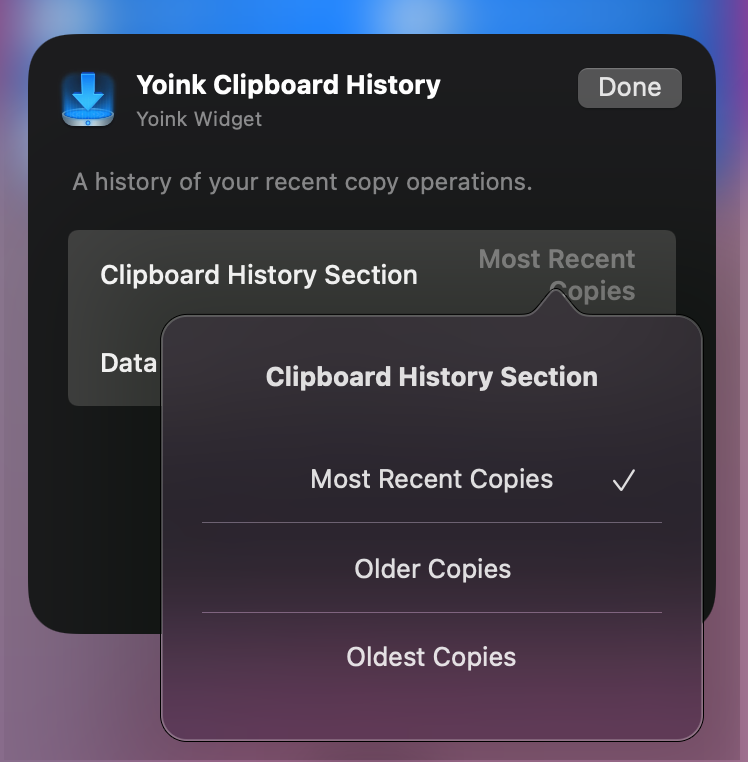
That doesn’t sound like a lot, but you can have multiple widgets, and they can be configured to show 1) the most recent copies (medium: 1-6, large: 1-12) 2) older copies (medium: 7-12, large: 13-24) 3) oldest copies (medium: 13-18, large: 25-36)
So you can, for example, have one large and one medium widget to show the last 18 copied items, or three large widgets to show the last 36 copied items.
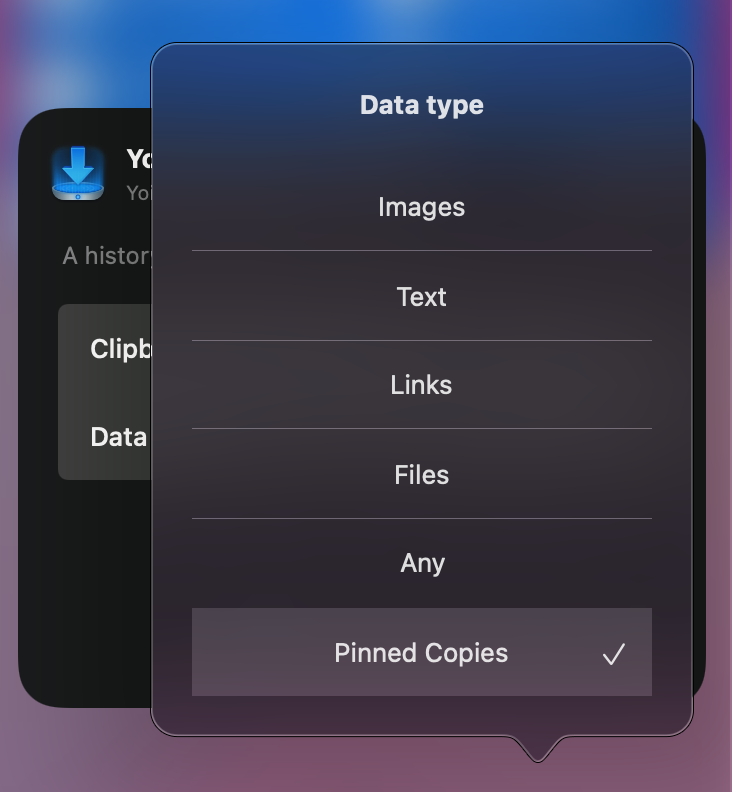
Apart from that, you can have the widget show only particular data types:
1) Only copied images 2) Only copied text 3) Only copied links 4) Only copied files 5) All copied items 6) Only pinned copies (pinning copied items is new in Yoink v3.6.5)
That allows the widget to be very flexible and useful.
How to use the Widget (Widget Clicks and Tricks)
– Click on an item in the widget, and it is copied to your clipboard – Option(⌥)-click on an item, and it gets sent to Yoink so you can drag it out at a later time – Shift(⇧)-click on an item, and it gets pinned (new in v3.6.5) – Command(⌘)-click on an item, and it is revealed in the Clipboard History Browser (new in v3.6.5)
Pinning Items (new in v3.6.5)
A pinned item in the widget
When the Clipboard History reaches its threshold (up to 36 items), it will begin clearing out the oldest copies to make place for new ones. In some cases, you might want to hold on to items indefinitely. That’s why you can now pin them. A pinned item will not be cleared out, unless you unpin it or delete it manually.
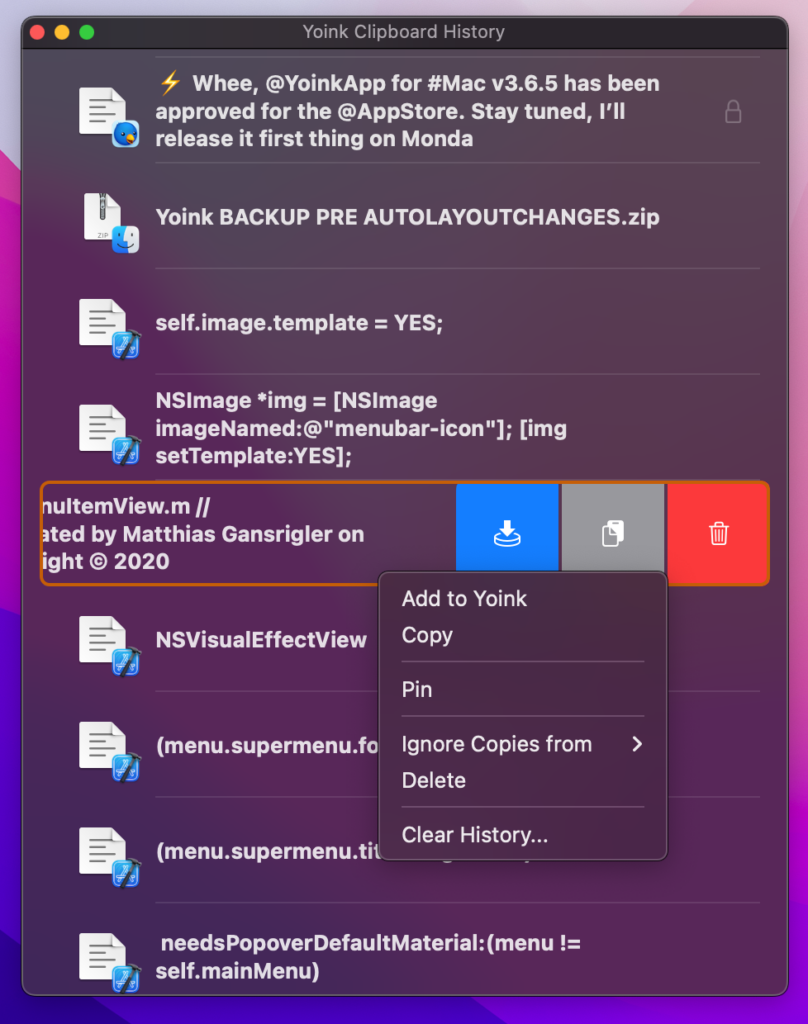
Clipboard History Browser (new in v3.6.5)
The history browser gives you a simple way to organize your copied items. Pin, unpin, delete, send to Yoink, copy, or clear out the entire history.
If you’d like to learn more about some of the implementation details behind this new widget, here’s a blog post for you.
What else is new in Yoink v3.6.5?
– It raises the minimum system requirements from macOS 10.10 Yosemite to macOS 10.12 Sierra. – Instead of a TIFF file, a PNG file is created when pasting image data into Yoink. In that vain, Yoink also transparently provides PNG and JPEG data when dragging out images of the types HEIC, HEIF or TIFF to broaden compatibility with other apps. – It also fixes a couple of bugs and improves compatibility with, among other apps, DEVONthink, where items dragged from DEVONthink to Yoink and then out of Yoink are no longer moved, but copied, to ensure the integrity of DEVONthink’s files database.
What do I need to use Yoink for Mac?
Yoink runs natively on Apple Silicon and Intel Macs, and requires macOS Sierra 10.12 or newer. It’s localized in English, German, French, Italian, Simplified Chinese, Japanese, Korean and Portuguese.
Where can I get Yoink?
Free Demo(direct download, ~28 MB, 30 days, notarized by Apple) Mac App Store($7.99, one-time purchase, no in-app purchases, update free for existing customers, as it’s been the case since v1.0) Mac Productivity Bundle(Mac App Store, 25% off Yoink, Transloader and ScreenFloat) Setapp(subscription service with over 200 Mac apps)
I’m so happy to finally be able to announce the immediate availability of Transloader v3.0 for Mac, iPhone and iPad. The app has been re-imagined, re-designed and re-developed from the ground up, with macOS Big Sur, iOS/iPadOS 14 and Apple Silicon in mind. It’s been such a long time since the app received its last meaningful update, but oh boy, this is a great one, if I may say so myself.
Intro to Transloader
What is Transloader?
With Transloader running on your Macs, you can assign downloads to it from afar – using your iPhone, iPad, and other Macs.
Say you’re in a Café, surfing on your iPhone and find out Apple has just released a new beta of Xcode. Wouldn’t it be awesome if you could start downloading that huge xip file immediately on your Mac back home, and have it ready when you return? With Transloader, you can.
Send the link to your Mac, and it will start the download right away. When it’s done, it’ll also send you a push notification about it. You can start downloads on Macs from Transloader itself, directly from within your browser using its Share extension, and – on iOS – with Siri Shortcuts.
What’s New in Transloader v3.0?
– Support for multiple Macs You can now specify one or several Macs you’d like to download a link on.
– Start downloads from other Macs Where in previous versions you could start downloads only from your iOS devices, Transloader 3.0 lets you initiate downloads on Macs from other Macs as well.
– Login to download If a download requires a login on its website before you can access it (like the aforementioned Xcode beta), that’s no longer a problem for Transloader. You can login to sites you anticipate to download from beforehand, or later, at any time, from any device.
– Link- and File Actions on Mac Using Actions, you can modify Transloader’s behavior in different scenarios.
With a Link Action, you define an app or Automator Workflow that should be opened with a specific assigned link (based on criteria like the URL host, or URL scheme), instead of being downloaded in Transloader. This way, you can send ftp:// links directly to your favorite FTP app.
File Actions make Transloader open specific files it has downloaded with an app or Automator Workflow you choose – based on criteria like the downloaded file’s type, or the original URL’s host. As an example, you could use this to organize downloaded files into folders automatically.
– Share Extension Start downloads on Macs right from within your browser, or any other app that supports sharing links – on any device.
– Save links for later Whether your desired Mac is not yet activated with Transloader, or you’d just like to wait for a later time until you start a download, you can now save links in Transloader for later, and assign them whenever you please.
– Push Notifications Transloader can inform you about the status of your downloads, and that of your Macs.
– New App for iPhone and iPad Alongside the new Mac app comes – naturally – a new iOS app. Among other key features, the app now supports gestures, drag and drop, keyboard shortcuts, Siri Shortcuts for powerful download workflows, and a Share extension, which works like the Mac version’s.
Can I see more of Transloader in action?
Of course.
Login to Download
Link- and File Actions
What are Transloader’s requirements?
– An iCloud account – At least one Mac with macOS 10.14 or newer – An optional iPhone and/or iPad with iOS 14 or newer with the free iOS Transloader app
I hope you’ll enjoy this new version of Transloader for Mac, iPhone and iPad. Should you have any feedback or questions, please don’t hesitate to write me! If you’re a member of the press and would like to get in touch, please feel free to do so at any time!