cocoa

You’re working on your Share extension with support for MacBook Pro’s Touch Bar, but it’s empty and doesn’t appear when your extension is loaded?

NSTouchBar Empty

The solution is simple:

Solution for showing NSTouchBar from within a Share extension

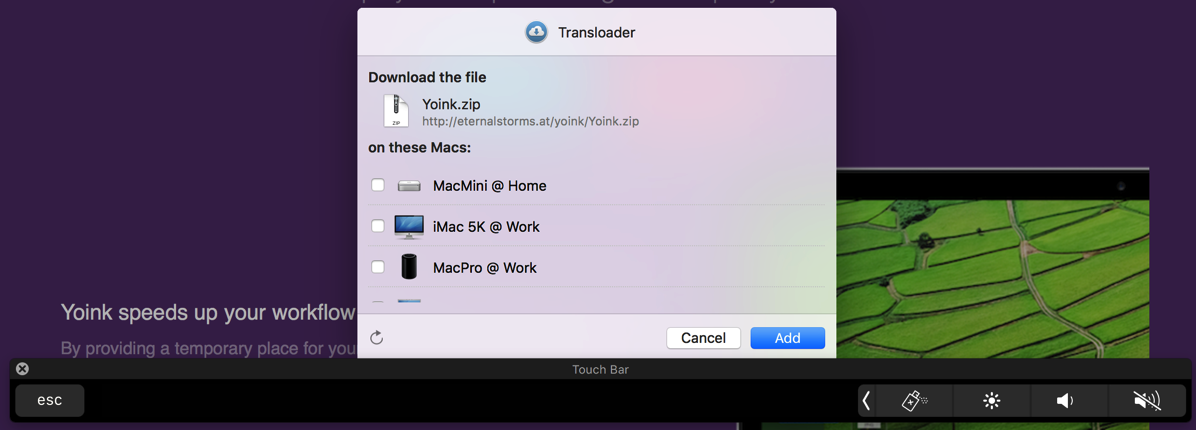
Call [self.view.window makeFirstResponder:self.view]; and it will push your glorious NSTouchBar onto the stack:

NSTouchBar working in a Share extension

Hope it helps – it would have saved me 20 minutes if I’d known 😉

Eternal Storms Software Logo

– – – Do you enjoy my blog and/or my software? – – –
Stay up-to-date on all things Eternal Storms Software and join my low-frequency newsletter (one mail a month at most).
Thank you 🙂

Read more

In an effort to show preferences for configuring Force Touch in my apps (in particular, Yoink) only when a Force Touch device is actually available, I had to find a way to figure out how to detect Force Touch devices.

If this was iOS, I’d be done by now

On iOS, Apple provides a simple API for this:

UIForceTouchCapabilityUnavailable and UIForceTouchCapabilityAvailable

which you can check by calling UIView’s – (UIForceTouchCapability)traitCollection;. Lo and behold, a simple API like this is sadly not available on OS X. On the Mac, you have to do it yourself.

IOKit is where it’s at

Using IOKit, you can sort of set up a set of properties you’re looking for in a device and see if it returns anything. This does not only include an external or internal keyboard, mouse or trackpad, but also graphic cards, for example. To find out what the right properties are, I downloaded Apple’s Hardware IO Tools for Xcode 7.1 from their developer downloads site (Apple Developer account required) and launched the app IORegistryExplorer.

Digging down the IO Registry

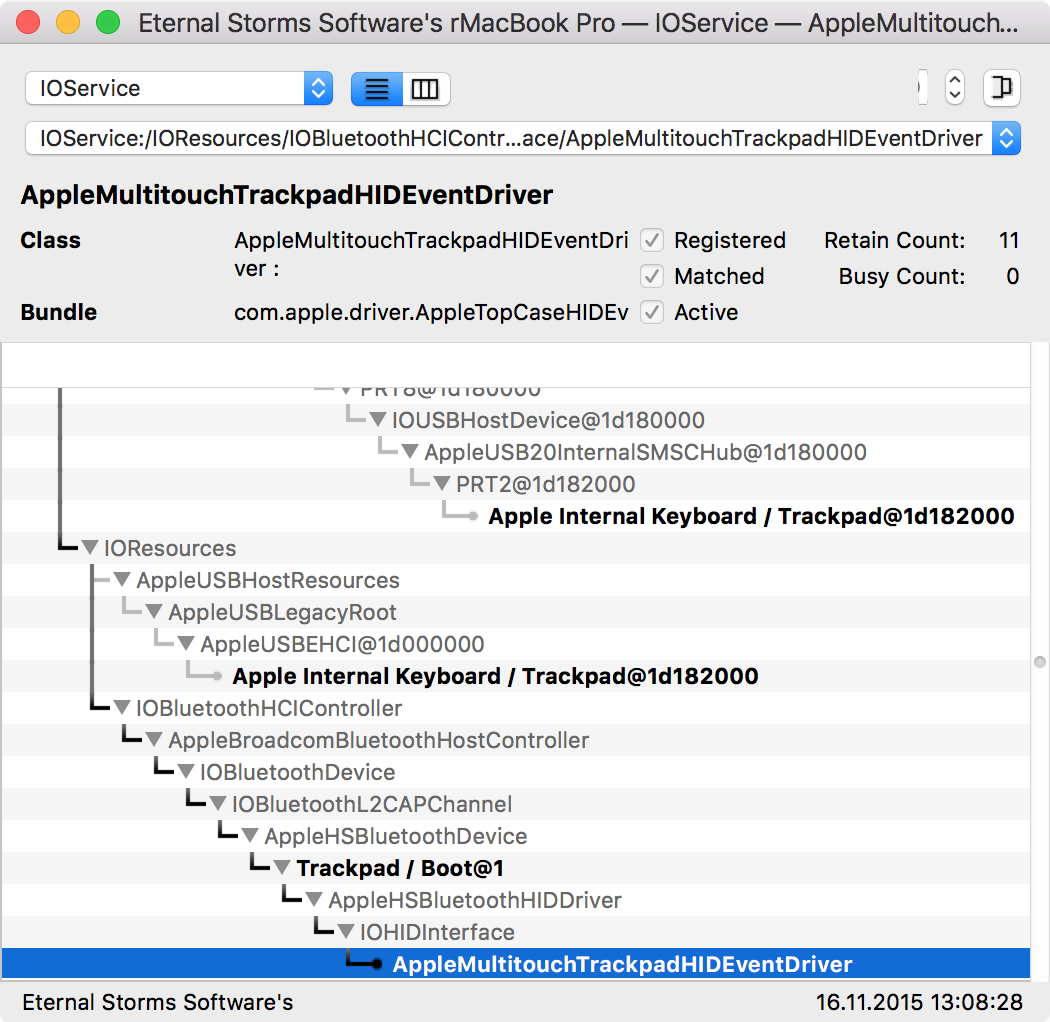
I do have a Magic Trackpad 2 “attached” to my Mac via Bluetooth, so I tried searching for the term “Trackpad”, and sure enough, I saw my internal and external ones:

IORegistry TrackpadsThe Trackpads attached to my Mac, either via Bluetooth or internally.

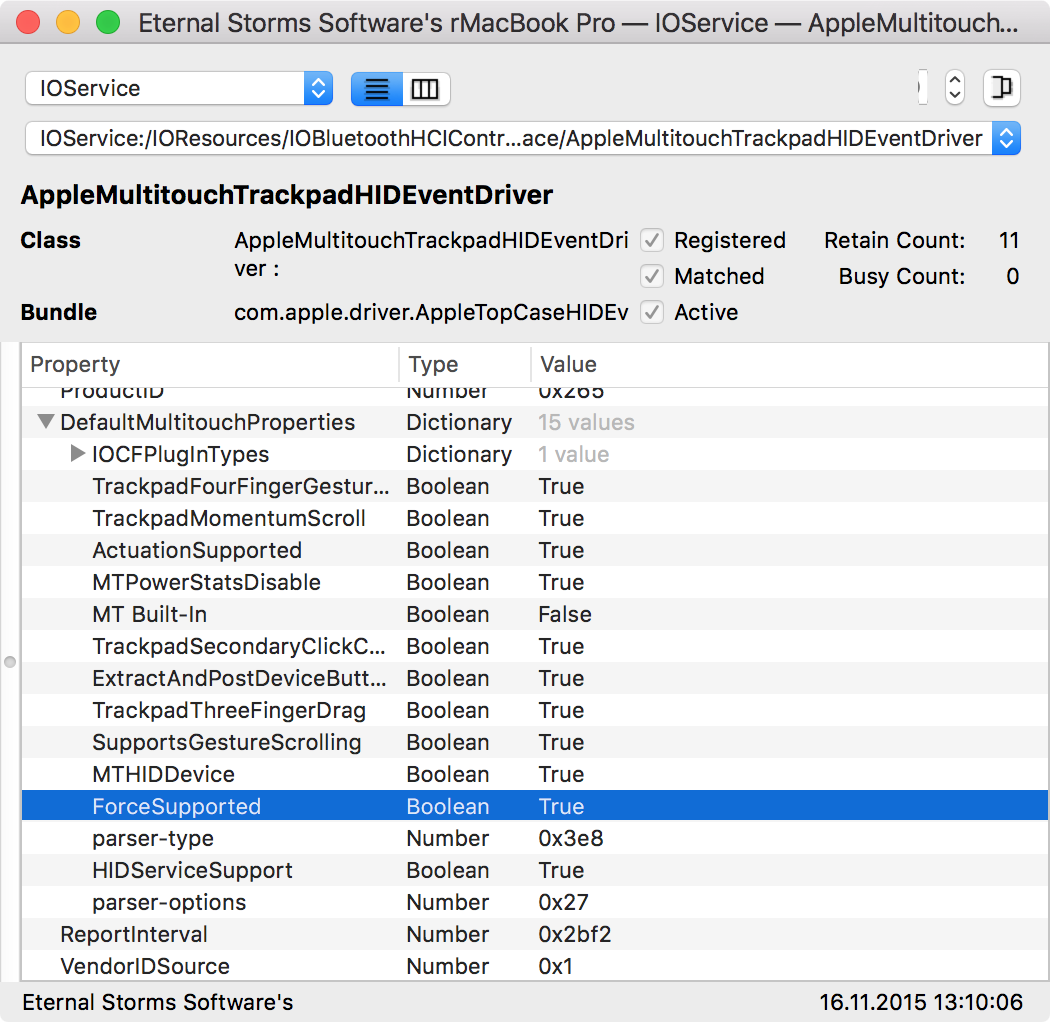
Having found the Magic Trackpad 2, the next step is to see what properties it offers and if they are unique to the class of the device:

Trackpad PropertiesJackpot!

Sure enough, there it is – ForceSupported: True. I could not find such a key in the internal trackpad’s properties, hinting that it might be exclusive to devices that do support Force Touch. There’s also an entry for “Manufacturer”, which is “Apple Inc.”. Perfect.

Looking for Devices with IOKit

Now all I have to do is filtering devices by the Manufacturer – “Apple Inc.” -, iterate over the resulting devices, and filter out devices that have a DefaultMultitouchProperties key, containing a ForceSupported key with a value of true. If such a device is found, it means a device with Force Touch capabilities is available.

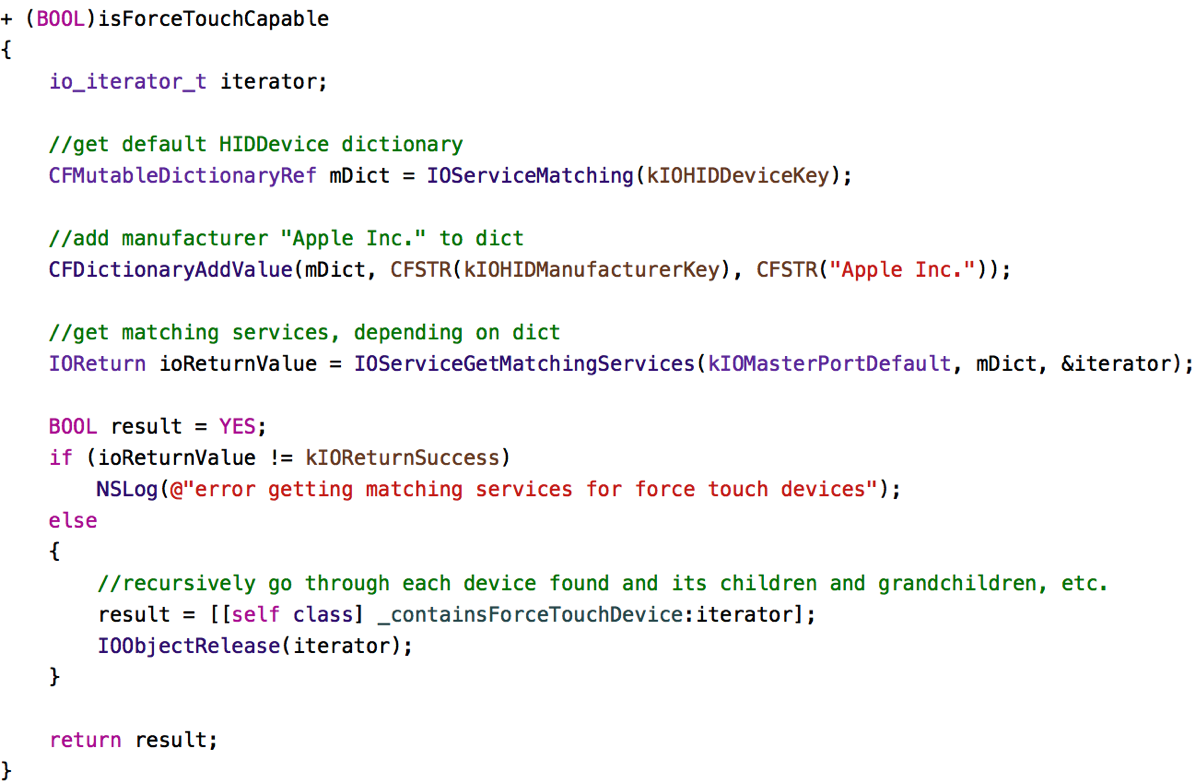
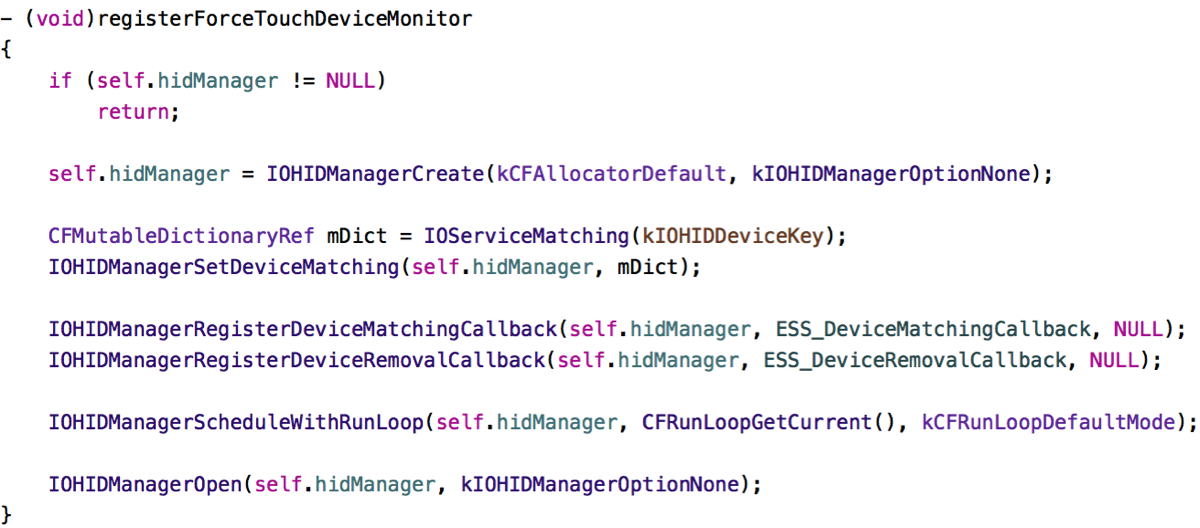
Code Listing #1

In this method, I create a dictionary mDict that is used to find matching devices. In this case, I’m looking for devices with the Manufacturer set to “Apple Inc.”. I query for possible devices using IOServiceGetMatchingServices. I can then iterate over the returned io_iterator_t iterator and recursively over the children in the core of all of this: – (BOOL)_containsForceTouchDevice:io_iterator_t)iterator;.

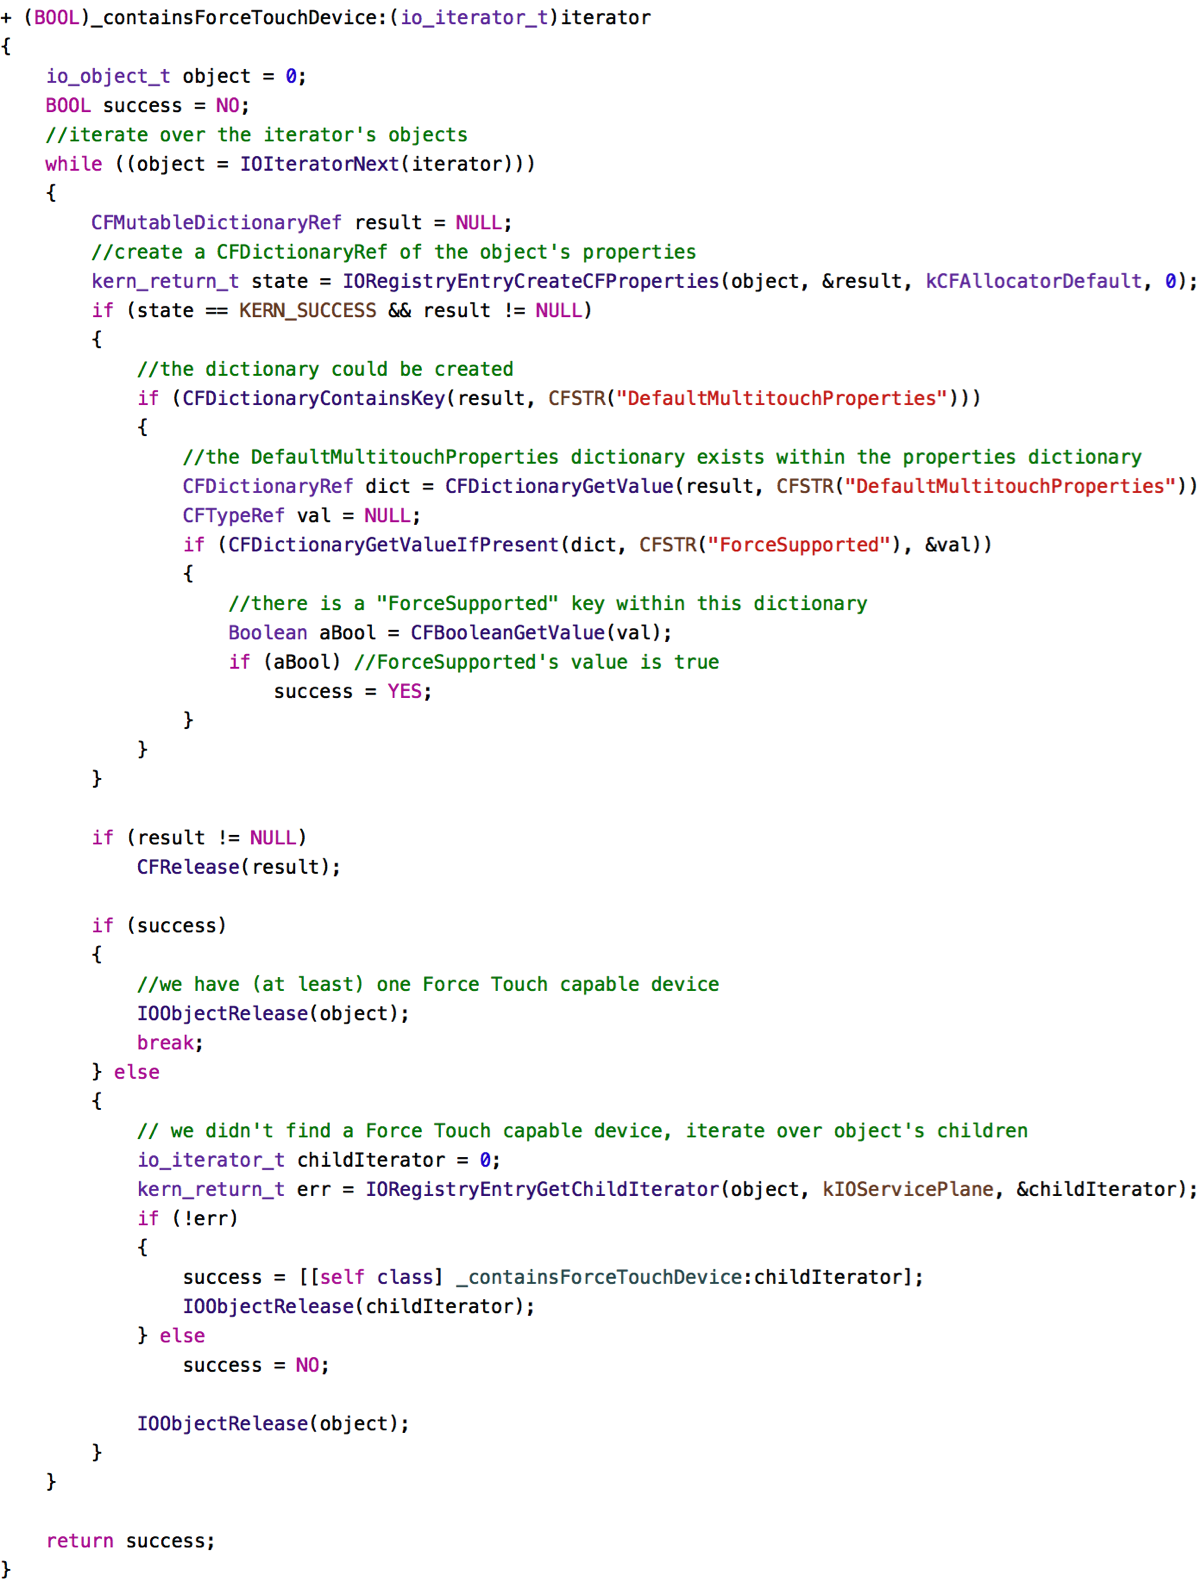
Code Listing #2

Here, we iterate recursively over iterator’s objects, checking for the DefaultMultitouchProperties key and, subsequently the ForceSupported key (and value).

Testing it with other Trackpads

The code you see above is final. However, in a previous version, all I could use to test it with was my Magic Trackpad 2 – an internal Force Touch Trackpad (the likes of which the new MacBooks and MacBook Pros feature) was not available to me directly. So I sent the first draft of the code to my friend (and fellow developer) Maurice Kelly (@mauricerkelly on twitter) who was kind enough to volunteer as my “test subject”; and – of course – it didn’t work. Turns out I shouldn’t assume the vendorID to be the same (which I used in the first draft just like the Manufacturer to filter the possible results). After leaving it out, it worked fine over all currently available Force Touch Trackpads.

Hot (Un-)Plugging

Sometimes you might want to get notified when devices are plugged in to or unplugged from the Mac. In Yoink, I’d like to display preferences specific to Force Touch if according hardware is available, but not show them if there isn’t any hardware connected that supports it. Also, as a nice touch, I’d like to hide the preferences if according hardware is disconnected and show it again when it is connected. We can accomplish this like that:

Code Listing #3

Sandbox

The code works just as well in the Sandbox environment, these entitlements have to be set, though, for the notifications to work:

Sandbox Entitlements

com.apple.security.device.usb and com.apple.security.device.bluetooth

Future Proof?

I’m not sure this code is future proof. The basic APIs will stay around, sure, but it all depends on the keys DefaultMultitouchProperties, ForceSupported and their according values which are not defined in the IOKit header files, which I unsuccessfully searched for constants pertaining to force/pressure. So, depending on this, the code might break with future versions of the Force Touch Trackpad and I’ll have to keep testing it as Apple releases new hardware. Nevertheless, I’m quite happy with the code and it works very well.

Getting the Source Code

I’ve uploaded a sample project to my server, you can download it here. The category on NSApplication in which this is available can be downloaded from Github. The example app is pretty simple:

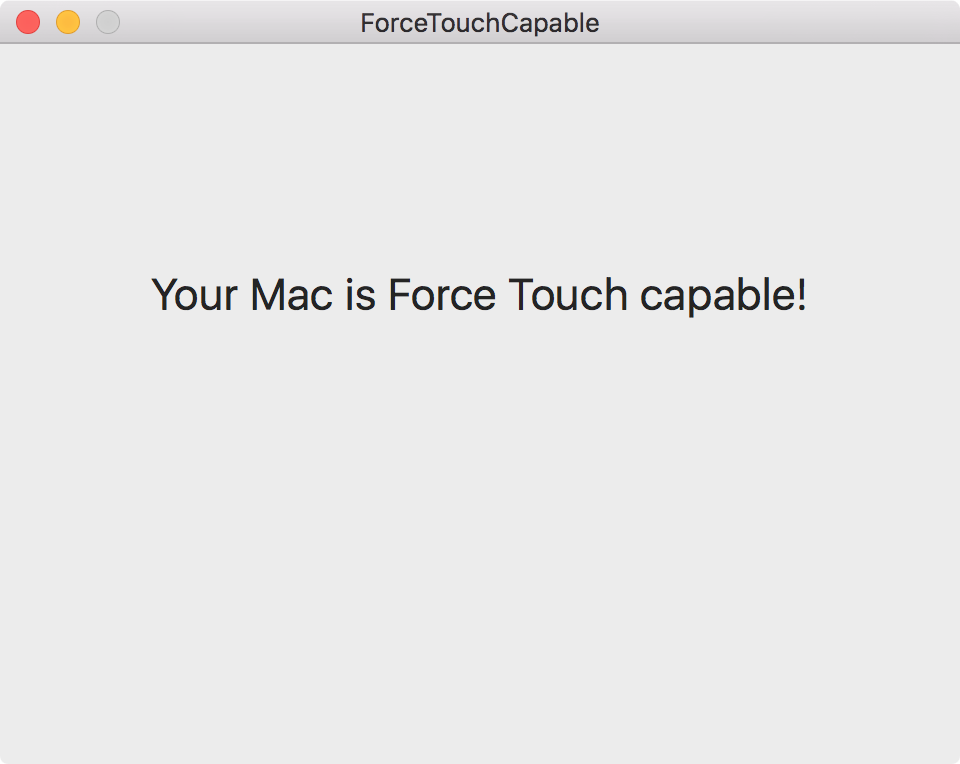
Force Touch Device Detection Example App Screenshot

At launch, it asks if a Force Touch capable device is available and displays an according message. If subsequently the availability status changes, the message will be updated accordingly.

If you’d like to get in touch, you can mail me or write me on twitter. I’m looking forward to hearing from you 🙂

Read more

After having spent over a (completely fruitless) month on fiddling with this without having an actual Force Touch Trackpad to test with, having gotten one recently, it still was insanely difficult for me to finally figure out how to receive Force Touch events from an NSTableView. But I finally did it. Here’s how.

Apple Keynote - MacBook Force TouchImage Credit: Apple, Inc.

The Premise

In Yoink, the usual way to select all files (pressing ⌘-A like you would in almost any application) is not a viable option. Yoink is written to not have key focus, as it would otherwise interfere with work in other applications too much (believe me, I’ve tried).
So I had to come up with a different way to do it. What I’ve done up until now is to allow the user to hold down the option (⌥) key on the keyboard and double-clicking onto any file in Yoink to select all files.

When Force Touch was introduced, I thought that would be a very nice alternative to option-double-clicking. And it is. Once I got it working, anyway.

The Issue

What I thought would be the easiest way to get Force Touch events from an NSTableView was to override – (void)pressureChangeWithEvent:(NSEvent *)theEvent.
Only that it doesn’t get called as it would normally be called: continuously, after – (void)mouseDown:(NSEvent *)theEvent, with every change of pressure on the trackpad.

No, in an NSView-based NSTableView (I haven’t tested cell-based tableViews), -pressureChangeWithEvent: gets called at -mouseDown: with a pressure of 0.0, and then just “dies”, not getting called again until the next -mouseDown:.
That’s interesting. And there’s more interesting-ness going on.

Once I override the tableView’s -mouseDown:, -pressureChangeWithEvent: suddenly gets called continuously, as you’d expect. So something apparently happens inside the tableView’s -mouseDown: implementation that sort of prevents -pressureChangeWithEvent: from getting called.

Finding A Solution

Knowing that the table view’s default implementation of -mouseDown: somehow interferes with the easy way of using -pressureChangeWithEvent:, my first attempt at a solution was to override -mouseDown: and re-implement its functionality myself, because then I would receive -pressureChangeWithEvent: properly. Then it dawned on me what I was in for. Dragging something out of the tableView (something kind of essential in Yoink) suddenly didn’t work anymore. I’d have to re-implement the selection mechanism (selecting with a mouse click, de-selecting with the command key pressed, adding an additional selection with either the shift- or the command key, etc.)
That alone would have taken more time than the entire feature of having force-click-to-select-all is worth.

Next, I thought NSGestureRecognizer could work. I created a subclass of it that overrides -pressureChangeWithEvent: and checked to see if it was called. But it was the same thing all over again. Adding it to the tableView, the NSTableRowView, the NSTableCellView and the underlying contentView of NSWindow, trying to figure out if they maybe swallowed the method call yielded no result or any change. It was all the same. It got called at the first -mouseDown: call, but then stopped.

Next I tried a local NSEvent monitor thinking it might do the trick, and it works, but only when the window’s contentView is force clicked, not the tableView. A global monitor doesn’t seem to work with pressure events.

So the only way that seemed to get me anywhere at all was to override NSTableView’s -mouseDown:. And that’s what I ended up doing. At first. After a day’s work, though, it still didn’t yield any results what-so-ever. The amount of time I’ve wasted on this is astounding, but apparently, when you keep going and really want to get somewhere, you eventually will.

The Solution

In OS X 10.10 Yosemite, Apple introduced a new NSEvent-tracking API in NSWindow: – (void)trackEventsMatchingMask:(NSEventMask)mask timeout:(NSTimeInterval)timeout mode:(NSString *)mode handler:(void(^)(NSEvent *event, BOOL *stop))trackingHandler that lets you, in a tracking loop, monitor for events matching the mask you provide, in this case, NSEventMaskPressure.

I actually had played around with this before, coming recommended from Markus Müller (@fafner on twitter), developer of the marvellous Mac and iOS app MindNode, who, by the way, in order for me to be able to test this stuff before I got my own Force Touch-able Trackpad, kindly invited me to their office to use his MacBook – thank you, Markus.
However, I didn’t get very far, as I didn’t know how to use the API correctly. Calling it from – (void)awakeFromNib, for example, isn’t the best idea, as it a) doesn’t appear to be able to track anything and b) locks up the app. It has to be called from inside a tracking loop (like -mouseDown: or -pressureChangeWithEvent:).

Again, after a lot of time wasted getting nowhere, this is the solution I came up with:
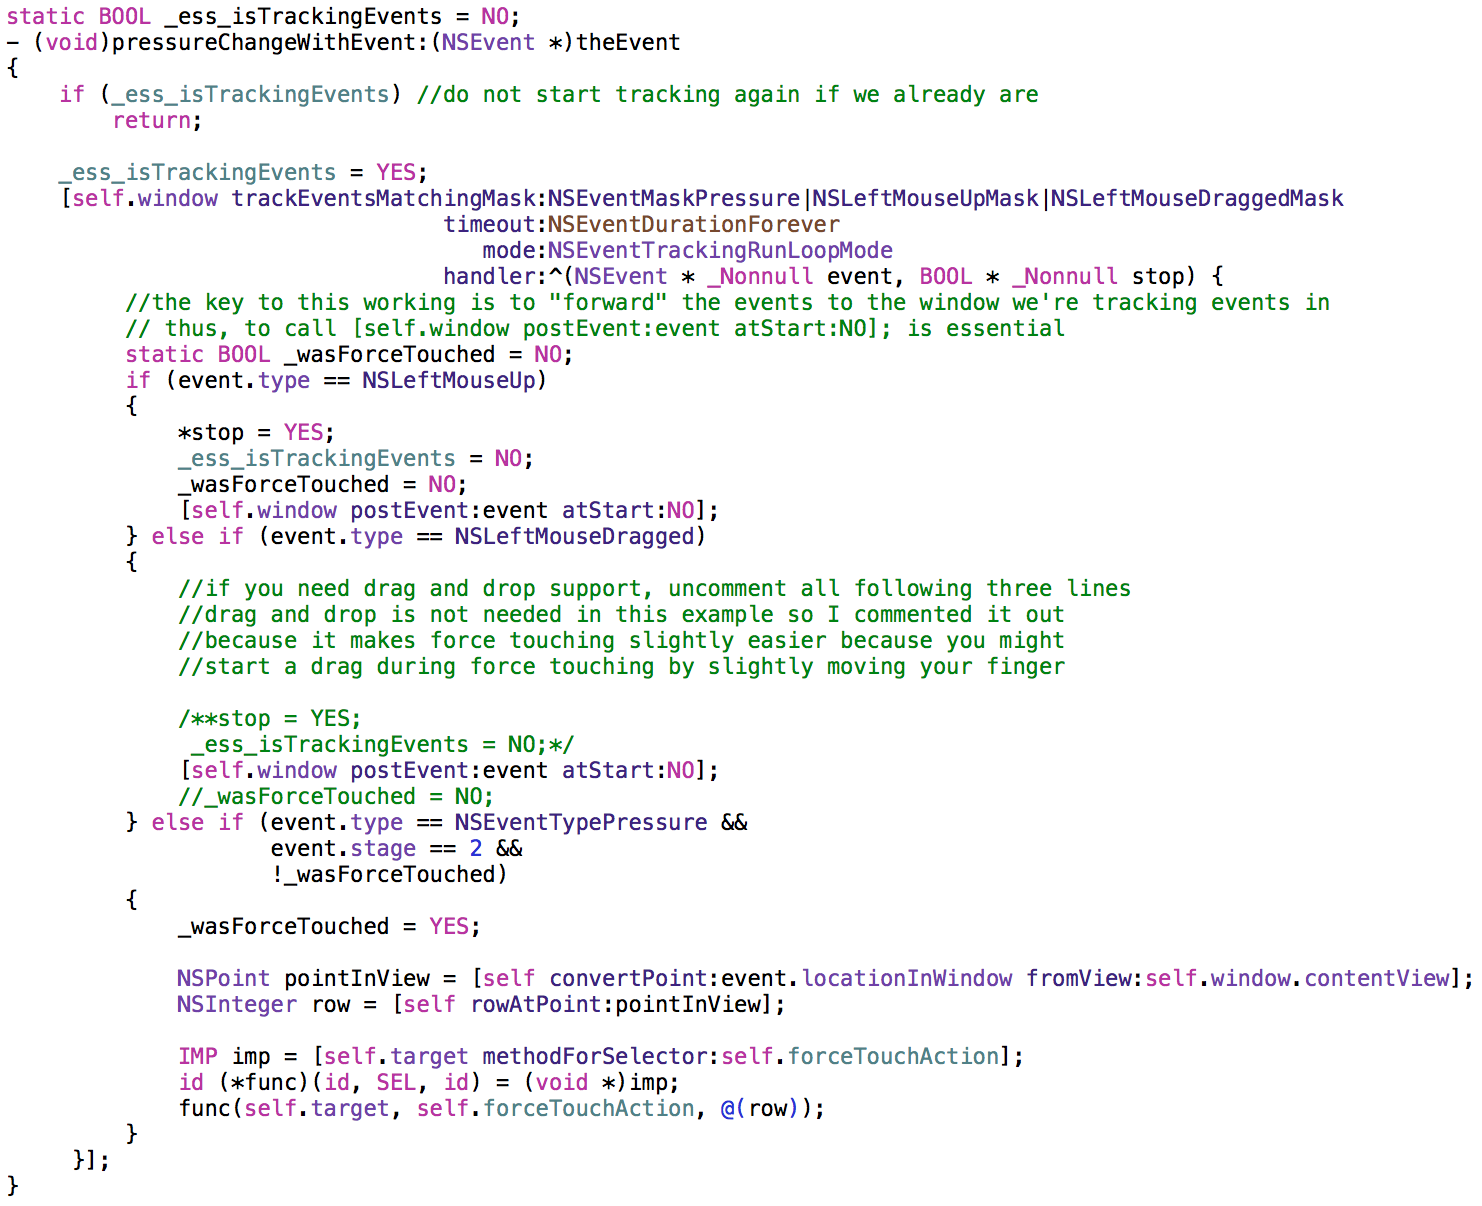
Source Code for how to receive Force Touch events from an NSTableView

I decided to imitate NSTableView’s -action and -doubleAction methods for handling receiving force touch events in a target.
NSTableView can be set up with a -target that should receive the selectors set in -action-doubleAction, and with this, -forceTouchAction, as seen in the code above, uses the same approach – send the specified selector to the NSTableView’s -target.

This code starts tracking Pressure-, Drag- and Mouse Up events in -pressureChangeWithEvent:, and practically waits until the Pressure event’s stage 2 is reached, which is a force touch. Then it sends the -forceTouchAction to -target.

The important lesson that I learned here is that the events have to be forwarded to the window, as they’re intercepted. So calling [self.window postEvent:event atStart:NO]; is imperative.

I watch for NSLeftMouseUp and NSLeftMouseDragged because I need to be able to stop tracking at some point, and mouseUp and mouseDragged are the perfect moments to do that.

Sample Project

I’ve uploaded a quick sample project to my server which you can download here. It requires OS X 10.10.3 (because of the APIs used). I’ve only tested it On 10.11 El Capitan, though, so your mileage may vary.

I hope this sample code is useful to you and saves you all the headaches I’ve experienced (and a lot of time) figuring this stuff out. Maybe I’m not smart enough. Or maybe this is harder than it should be. I dream of a time where the Force Touch APIs on OS X get the loving treatment 3D Touch enjoys on iOS 😉
Read more

Open-Source: NSBegin*AlertSheet(…) with ^Blocks

There’s NSBeginAlertSheet, NSBeginInformationalAlertSheet and NSBeginCriticalAlertSheet, so the * is a wild-card for all those functions.

Apple Opensource Icon

picture credit: Apple, Inc.

What is this?

I’ve been growing more and more tired of always having to set up a callback-method (in the worst case, two, for didDismiss and didEnd) for NSBegin*AlertSheet(…) calls, like

– (void)alertSheet:(NSPanel *)panel endedWithCode:(NSInteger)returnCode contextInfo:(void *)info
{
 …code here…

Especially, since we have such a great thing like blocks where you can pass blocks of code as arguments to methods and functions, just like an Objective-C object.

So instead of having to set up callback methods for NSBegin*AlertSheet(…), I created ESSBegin*AlertSheet(…). Instead of callback @selectors, it takes blocks for didEnd and didDismiss callbacks.

I find it also makes for cleaner code having the callbacks right in the ESSBegin*AlertSheet(…) calls as you don’t lose the context of what’s happening before the call in my code.

Available for OS X Snow Leopard and up

Blocks were introduced with OS X Snow Leopard, so I assume (yes, I assume since I’ve only tested this on OS X Mountain Lion) it should run on Snow Leopard as well.

Download and Usage

NSApplication+ESSApplicationCategory Github Repository (refer to the read me for how to implement it in your projects)
Eternal Storms Software Open Source Projects


Enjoy! And let me know what you think 🙂

Take care,
Matthias

[twitter-follow screen_name=’eternalstorms’ show_count=’yes’]

Read more