Software

[Note: This is a guest blog post written by my cousin, Sebastian Gansrigler, about the iOS game ZEN (App Store) he and I developed during 2014]

It was around March 2014, I started to set up a basic idea for a game I wanted to create in my spare time. How about combining a Rubik’s Cube and 3D game mechanics with complex mathematical theory and provide all of this with minimalistic pixel art on a touch interface? ZEN was born.

Basic concept on paper, pixel measurements, final screenBasic concept on paper, pixel measurements, final screen

I can’t really say where the idea came from, the game was always based on the concept of a rotating cube, about revealing something that’s hidden, about stress, learning, advancing and getting better and better by repeating it over and over again. ZEN was a good name: …a school of Mahayana Buddhism that developed in China during the 6th century. The word might be translated as something like “absorption” or “meditative state”.

Since I didn’t want to use any fonts, plugins or other preset assets, I created everything from scratch. Beginning with first scribbles on paper, I subsequently moved on to Photoshop and Illustrator to build a basic grid system, alignment rules, colors, etc. I tried to treat pixels like real pixels, there’s not one element in the game that’s round or off grid. Everything had to be perfectly consistent and at the end, of course, fun to play. From then on I went into After Effects for animations and interactions.

All game elementsAll game elements

One musician I had in mind for ZEN’s sound design was Brian Grainger aka Milieu. He created the original score for “Eufloria”, which I played a few years ago on PS3 and totally loved. I wanted something relaxing, yet stressful and packed with tension. Somewhere between Mount Kimbie, Kavinsky and Baiyon. I wrote him, Brian got on board and created an amazing soundtrack (soon available on his Bandcamp) and all sound effects.

Matthias Gansrigler, my cousin, has created some great apps for OS X and iOS, so I contacted him about the game. He did all the code and actual implementation of graphics and animations. The bug fixing was most fun, as soon as something had been fixed, something else came up. Special thanks to Das Möbel in Vienna for a great location to brainstorm and discuss (and of course for the ham & cheese toasts).

Funny button bugFunny button bug

After quite a bit over half a year of production, the game was completed and went online on December 21 2014 on the App Store for iPhone and iPad.


Sebastian Gansrigler is a 20-year old photographer and designer in Vienna, Austria. He works for WDM responsible for web and graphic design. You can reach him on twitter under @gansrigler.

Read more

Yoink for Mac Usage Tip #9

The following explains how send screenshots directly to Yoink.
For more Usage Tips like this, click here.

I recently had a very interesting conversation with a customer of Yoink, Bogdan V. He wanted to make Yoink detect screenshots he created so they would show up in Yoink’s window.

Automator to the Rescue

I had the idea of using Automatorto create the screenshot and send it to Yoink. After experimenting around a little bit, I sent Bogdan a very rudimentary workflow (that could, if saved as an OS X Service, also be launched with a keyboard shortcut) and he immediately turned it into something awesome.

The Automator Workflow

This is the script of the workflow Bogdan came up with:

Automator Workflow Screenshot

You can download the Automator Workflow here (~59KB) (tested on OS X Yosemite 10.10.1).

Setting up the Service

  1. Download the Automator Workflow
  2. Unzip it and double-click on the resulting screencapture.workflow file
  3. In the dialog, select Install (except if you’d like to edit the script, then click on Open with Automator)
  4. It will be installed in your ~/Library/Services/ folder: Automator Service Path
  5. To confirm installation, in Finder, click on Finder in your menu bar, select Services and find Capture Screenshot to Yoink in the list: Service in Menu
  6. In your ~/Documents/ folder, create a folder titled Yoink (where captured screenshots will reside)

You have now successfully installed the Service to capture screenshots to Yoink. What you can do now is create a keyboard shortcut for it so you can more easily access this

Create a Keyboard Shortcut

  1. Launch System Preferences
  2. Click on Keyboard -> Shortcuts -> Services
  3. Find Capture Screenshot to Yoink in the list, under General:Screenshot System Preferences Keyboard Shortcuts
  4. Click on add shortcut and enter the shortcut you’d like to use to activate the service.

That’s It

That’s all there is to it. Now you can create screenshots that are then immediately available in Yoink for you to drag around.
If you find it useful, be sure to let me know on twitter (@eternalstorms) or by eMail – I’d appreciate the feedback!
Take care!

Update (October 14, 2015)

I got a bit of feedback on this – especially feedback from Pietro S. and Jeremy M. pushed me to update this post with a bit more information.
  • To make the Automator Script capture the entire display instead of just a selected portion, replace the line ‘ do shell script “screencapture -i ” & filePath ‘ with ‘do shell script “screencapture “ & filePath ‘ (removing the -i option to cause the selection)
  • Jeremy was so kind to provide an updated Automator Workflow that appended a date and timestamp to the screenshot’s filename; add two actions before the actual script (“Get Value of Variable”) with the variables Date and Timestamp and import them into the script – as in this screenshot:
    Screenshot of Automator, appending date and time to the filename
  • To use this Automator Workflow with the standard keyboard shortcut command-shift-4, you first have to deactivate the standard action in System Preferences -> Keyboard -> Shortcuts -> Screen Shots, or assign it a different keyboard shortcut: Screenshot of System Preferences

A ‘thank you’ goes to Jeremy and Pietro for the updated workflows.

Read more

10904415 10205535099647537 6831010725206999453 o

Apple is currently featuring Yoink on the Mac App Store, in the category “New Year, New You”, and it’s in great company with the very popular apps MindNode Pro, 1Password, OmniFocus and Evernote.
I couldn’t be more proud and humbled.

This certainly wouldn’t have happened without all of you, so

Thank you!

—-
My name is Matt, I’m the developer of Eternal Storms Software. If you’d like to comment, you can catch me on twitter here: [twitter-follow screen_name=’eternalstorms’ show_count=’yes’] or by eMail.

Read more

Yoink for Mac Usage Tip #5

The following explains how to send files to Yoink from the Terminal, or a shell script.
For more Usage Tips like this, click here.

Here’s a quick tip for those of you who spend their days in OS X’s Terminal and want to use Yoink with it more easily. This is something that customers request quite a lot, so here it is for future reference 😉

terminal to yoink
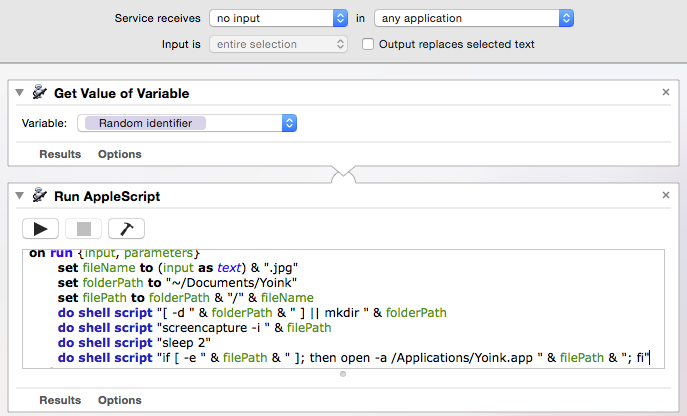
To send a file from Terminal.app to Yoink, you can use this command:

open -a Yoink /path/to/the/file

You can simplify this by creating what is called an alias command:

alias yoink=“open -a Yoink”

This way, all you have to type in Terminal.app is this:

yoink /path/to/the/file

This is a temporary alias and will work for the current Terminal session. If you’d like to make the alias permanent, please do the following (taken from this MacLife post)

To make the alias permanent, you will need to edit a file called “.bash_profile” by running the following command:

nano ~/.bash_profile

This will open nano (a command line text editor). Use the arrow keys to place the cursor at the bottom of the file, and type in the aliases that you wish to use, one per line, just as you did when creating temporary aliases. When you are done, press Control + O (Write Out) to save the file. Press Command + X to exit nano and go back to the command line.

When you quit and re-open the Terminal application, your aliases will work without having to re-create them each time.

I hope you find it useful – let me know if you have any questions or comments 🙂

Take care!
—-
My name is Matt, I’m the developer of Eternal Storms Software. If you’d like to comment, you can catch me on twitter here: [twitter-follow screen_name=’eternalstorms’ show_count=’yes’] or by eMail.

Read more